> ## Documentation Index
> Fetch the complete documentation index at: https://docs.useinvent.com/llms.txt
> Use this file to discover all available pages before exploring further.
# Instagram Direct Messages
> Connect an Instagram professional account to your assistant and reply to DMs automatically
New to channels? Start with the [Channels Overview](/assistants/channels) to see the universal connect flow that every channel shares. This guide walks through the Instagram-specific screens on top of that flow.
Connecting Instagram puts your assistant inside the DMs of a real Instagram account. Anyone who taps **Message** on your profile, replies to a Story, sends a Reel, or messages you from an Instagram ad lands in a conversation that your assistant answers instantly, 24/7. Everything appears in the same [Inbox](/guides/inbox) as your other channels, with the same assistant, the same [Knowledge](/guides/knowledge), and the same [Memory](/guides/memory).
The whole setup happens in a single popup. You sign in to Instagram, switch the account to a professional (Business or Creator) account if it is not already one, and Invent takes care of the messaging permissions and webhook subscription for you.
## Before You Start
You need three things:
1. **An Instagram account** for the business you want to connect, with the password to hand. If your business does not have an account yet, create one in the Instagram app first.
2. **A professional account type** (Business or Creator). Personal accounts cannot grant messaging access to third-party tools. Don't worry if you are still on a personal account today, the connect flow lets you switch in two clicks without losing followers, posts, or your username.
3. **DMs turned on for the account**. This is the default for every Instagram account, but if you have ever blocked DMs from non-followers in **Settings → Privacy → Messages**, loosen those rules so customers can reach you.
You do **not** need to link the Instagram account to a Facebook Page anymore. Invent uses Instagram's own login (the Login with Instagram flow), so a standalone Instagram professional account is enough. If you already manage your Instagram from a Facebook Page, that still works, just sign in here with your Instagram credentials directly.
## Step 1: Open the Instagram Connect Dialog
From your assistant's **Channels** tab, find **Instagram Direct Messages** in the list and click **Connect**. The Instagram connect dialog opens.
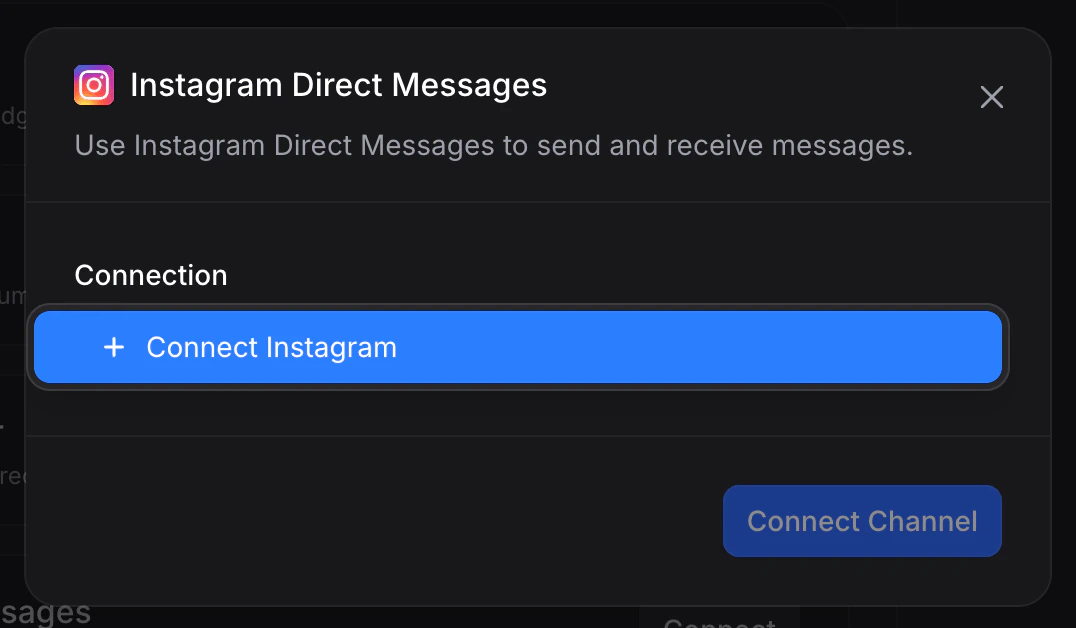 The dialog has one field:
* **Connection**: the authenticated link to an Instagram account. If this is your first Instagram connection, the dropdown is empty apart from a blue **+ Connect Instagram** button you use to start the sign-in flow (covered in the next step). If you have already connected Instagram for another assistant, your existing connections are listed here and you can reuse any of them, in which case you can skip to [Step 9](#step-9-pick-the-connection).
You can attach more than one Instagram connection to your workspace. After you add the first one, opening the **Connection** dropdown again shows all existing connections plus a **+ Connect Instagram** button at the top to add another. Pick whichever fits this assistant's use case.
## Step 2: Sign In to Instagram
Open the **Connection** dropdown and click **+ Connect Instagram**. Instagram's login popup opens.
The dialog has one field:
* **Connection**: the authenticated link to an Instagram account. If this is your first Instagram connection, the dropdown is empty apart from a blue **+ Connect Instagram** button you use to start the sign-in flow (covered in the next step). If you have already connected Instagram for another assistant, your existing connections are listed here and you can reuse any of them, in which case you can skip to [Step 9](#step-9-pick-the-connection).
You can attach more than one Instagram connection to your workspace. After you add the first one, opening the **Connection** dropdown again shows all existing connections plus a **+ Connect Instagram** button at the top to add another. Pick whichever fits this assistant's use case.
## Step 2: Sign In to Instagram
Open the **Connection** dropdown and click **+ Connect Instagram**. Instagram's login popup opens.
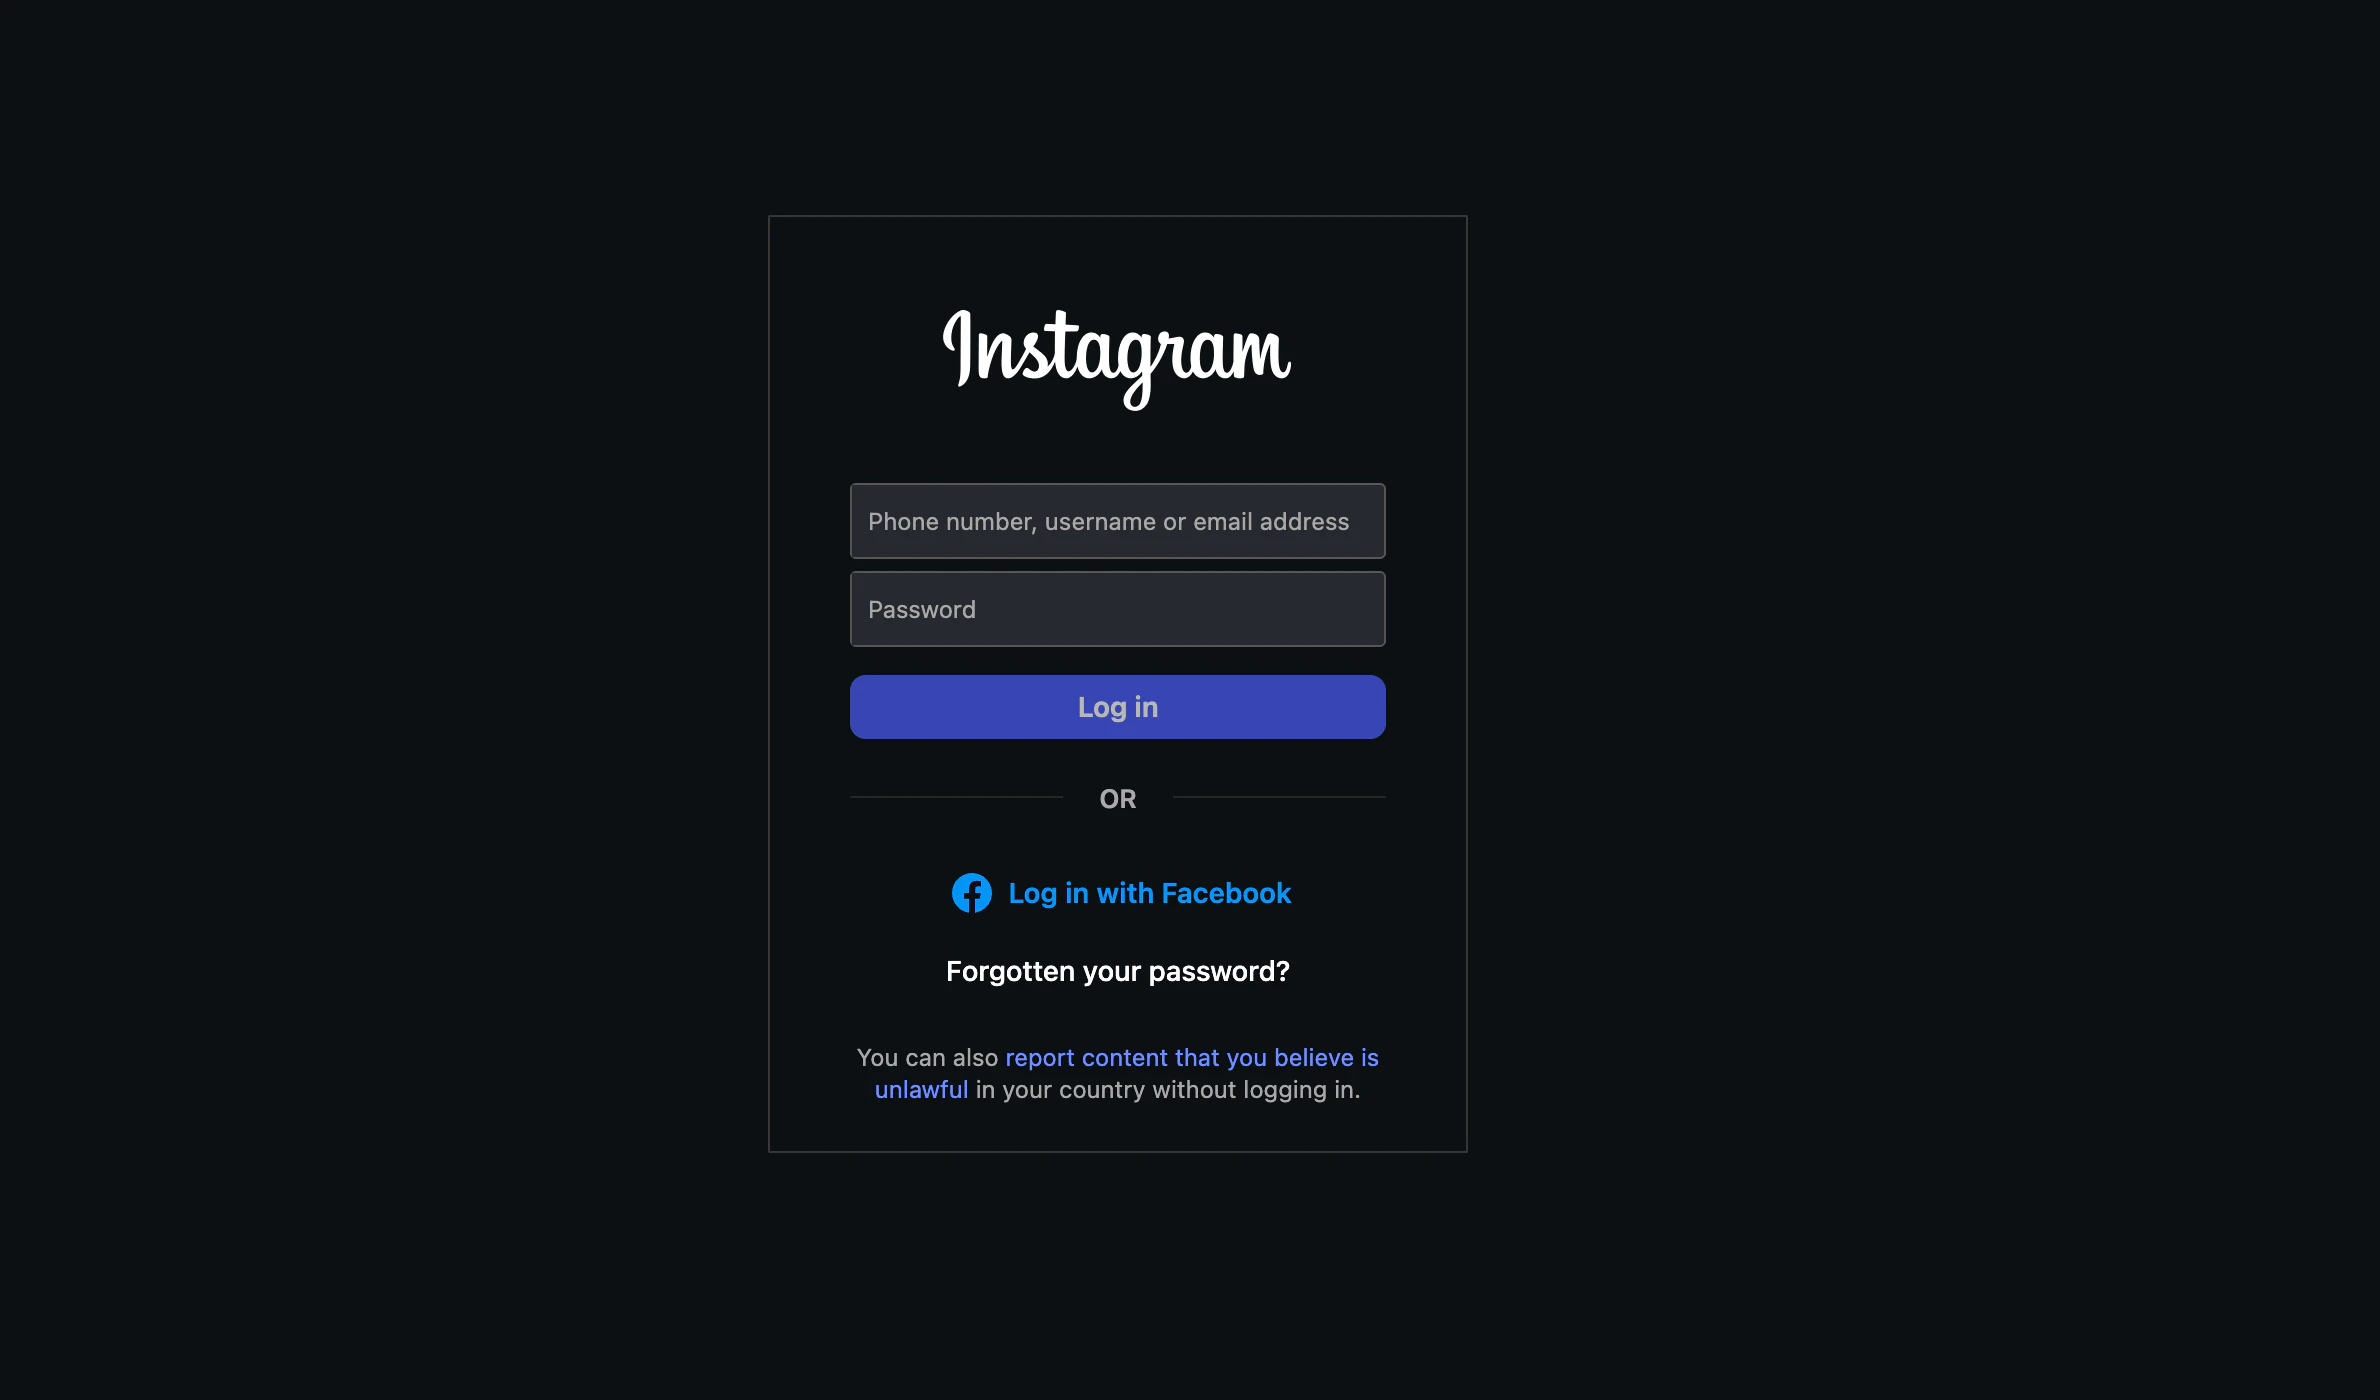 This is Instagram's standard sign-in, run entirely on `instagram.com`. Your credentials are only entered on Instagram's domain, never on Invent's.
You have two paths:
* **Log in with Instagram credentials**: enter the phone number, username, or email and the password for the account that owns the DMs you want the assistant to handle. This is the recommended path because it does not depend on a linked Facebook Page.
* **Log in with Facebook**: only use this if the Instagram account is linked to a Facebook profile and you would rather authenticate through Facebook. The end result inside Invent is the same.
Sign in with the **business owner's** Instagram account, not a personal employee account that may leave the company later. Access to the Invent connection follows whoever signed in: if that account is deleted, has its password rotated without informing you, or revokes the Invent integration in Instagram's settings, the connection breaks until it is re-authenticated.
Click **Log in** to continue.
## Step 3: Complete Two-Factor Authentication
If the account has two-factor authentication enabled (and it should), Instagram asks for a one-time code. Depending on the account's 2FA configuration, the code is sent to:
* **WhatsApp** on the phone number registered to the Instagram account.
* **An SMS** to the same number, if WhatsApp delivery is not configured.
* **An authenticator app** like Google Authenticator or Authy, if the account uses one.
This is Instagram's standard sign-in, run entirely on `instagram.com`. Your credentials are only entered on Instagram's domain, never on Invent's.
You have two paths:
* **Log in with Instagram credentials**: enter the phone number, username, or email and the password for the account that owns the DMs you want the assistant to handle. This is the recommended path because it does not depend on a linked Facebook Page.
* **Log in with Facebook**: only use this if the Instagram account is linked to a Facebook profile and you would rather authenticate through Facebook. The end result inside Invent is the same.
Sign in with the **business owner's** Instagram account, not a personal employee account that may leave the company later. Access to the Invent connection follows whoever signed in: if that account is deleted, has its password rotated without informing you, or revokes the Invent integration in Instagram's settings, the connection breaks until it is re-authenticated.
Click **Log in** to continue.
## Step 3: Complete Two-Factor Authentication
If the account has two-factor authentication enabled (and it should), Instagram asks for a one-time code. Depending on the account's 2FA configuration, the code is sent to:
* **WhatsApp** on the phone number registered to the Instagram account.
* **An SMS** to the same number, if WhatsApp delivery is not configured.
* **An authenticator app** like Google Authenticator or Authy, if the account uses one.
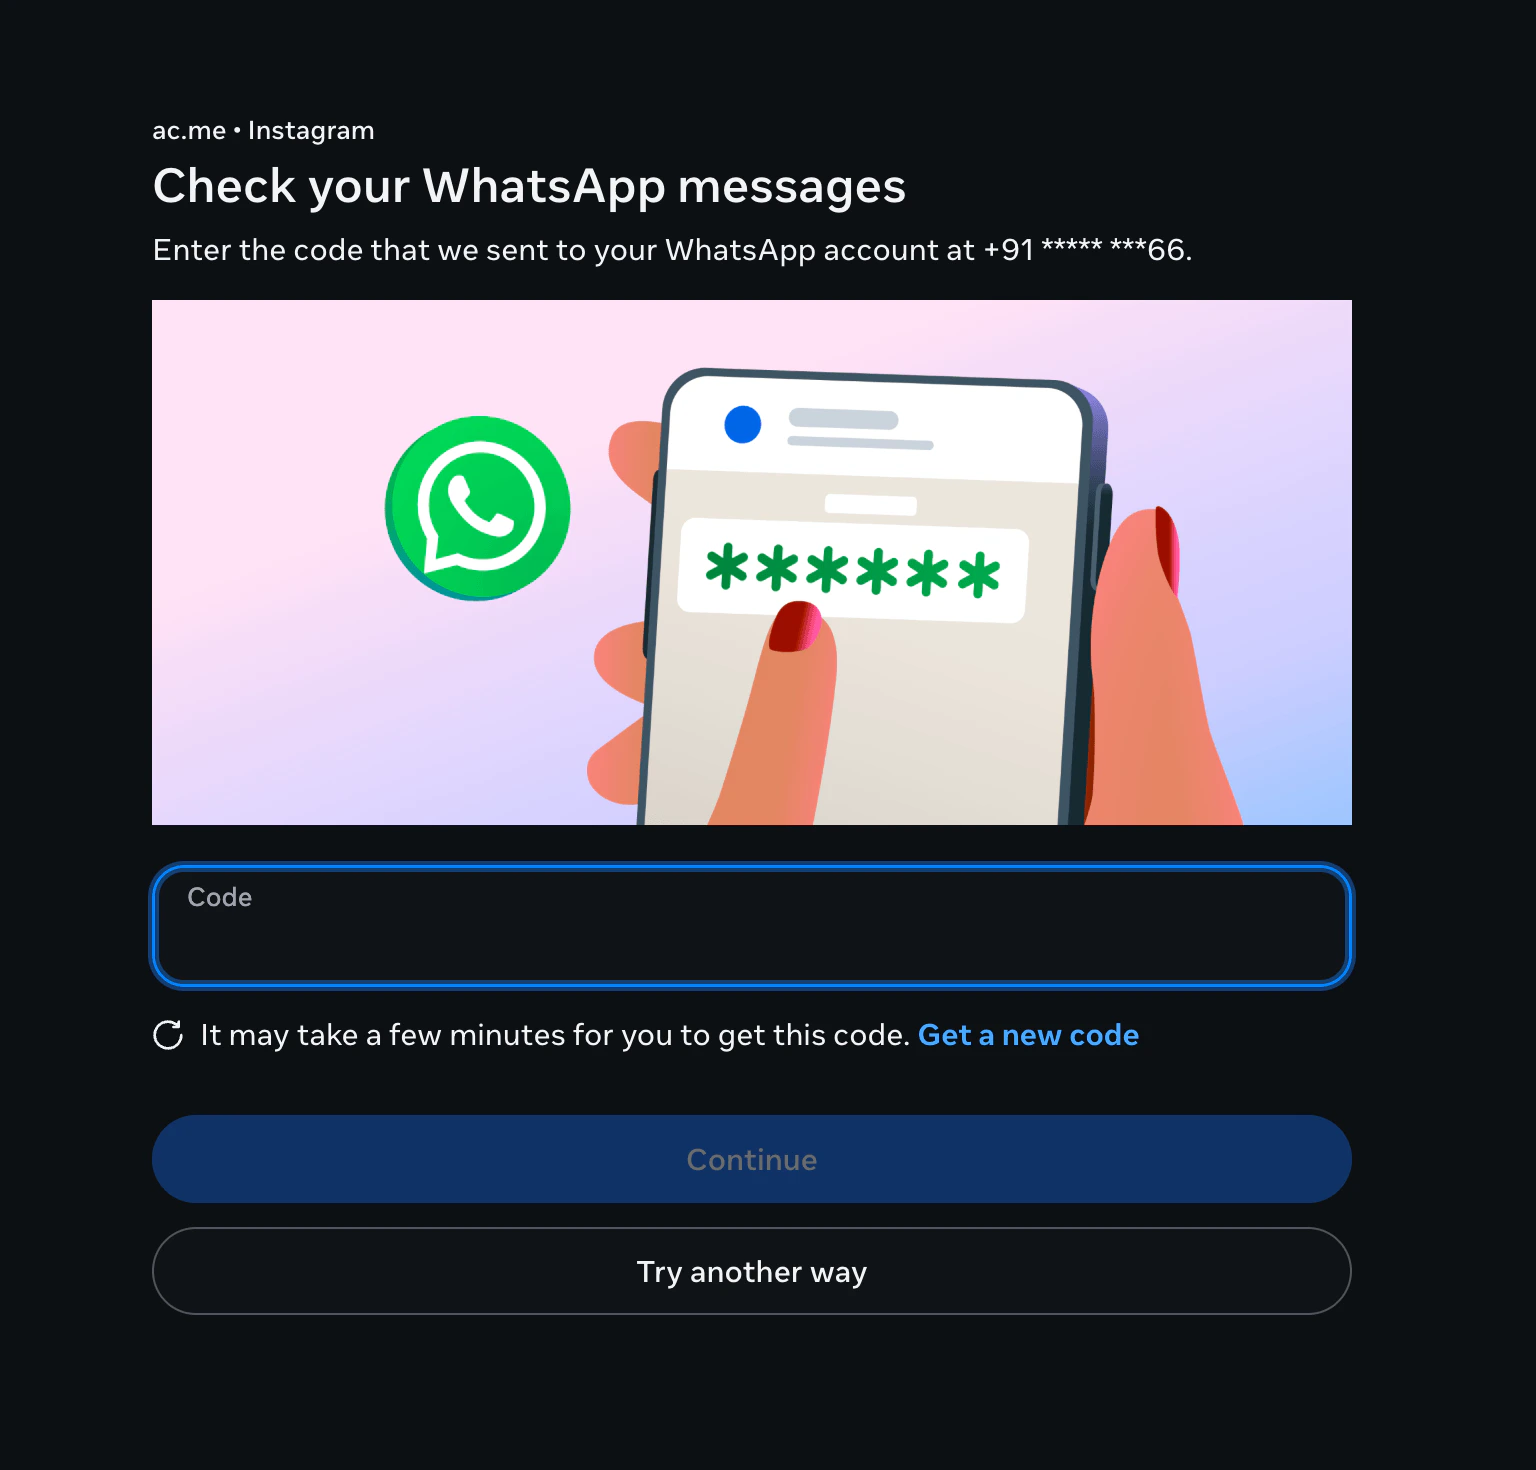 Open the relevant inbox or app on the phone that owns the account, copy the 6-digit code, paste it into the **Code** field, and click **Continue**. The code is single-use and expires after a few minutes; if it does not arrive, click **Get a new code** or **Try another way** to switch delivery method.
If you do not have access to the phone that receives the code, stop here and have the account owner run this step on their own machine. They can complete the rest of the connect flow inside their own Invent session and the connection will appear in your shared workspace, ready for you to bind to this assistant.
## Step 4: Switch to a Professional Account (If Needed)
Invent's messaging integration only works with **professional accounts** (Business or Creator). If the Instagram account you signed in with is already a professional account, Instagram skips this step entirely and jumps straight to the [permissions screen](#step-7-review-permissions-and-confirm).
If the account is still personal, Instagram shows the **Change to professional account** prompt below.
Open the relevant inbox or app on the phone that owns the account, copy the 6-digit code, paste it into the **Code** field, and click **Continue**. The code is single-use and expires after a few minutes; if it does not arrive, click **Get a new code** or **Try another way** to switch delivery method.
If you do not have access to the phone that receives the code, stop here and have the account owner run this step on their own machine. They can complete the rest of the connect flow inside their own Invent session and the connection will appear in your shared workspace, ready for you to bind to this assistant.
## Step 4: Switch to a Professional Account (If Needed)
Invent's messaging integration only works with **professional accounts** (Business or Creator). If the Instagram account you signed in with is already a professional account, Instagram skips this step entirely and jumps straight to the [permissions screen](#step-7-review-permissions-and-confirm).
If the account is still personal, Instagram shows the **Change to professional account** prompt below.
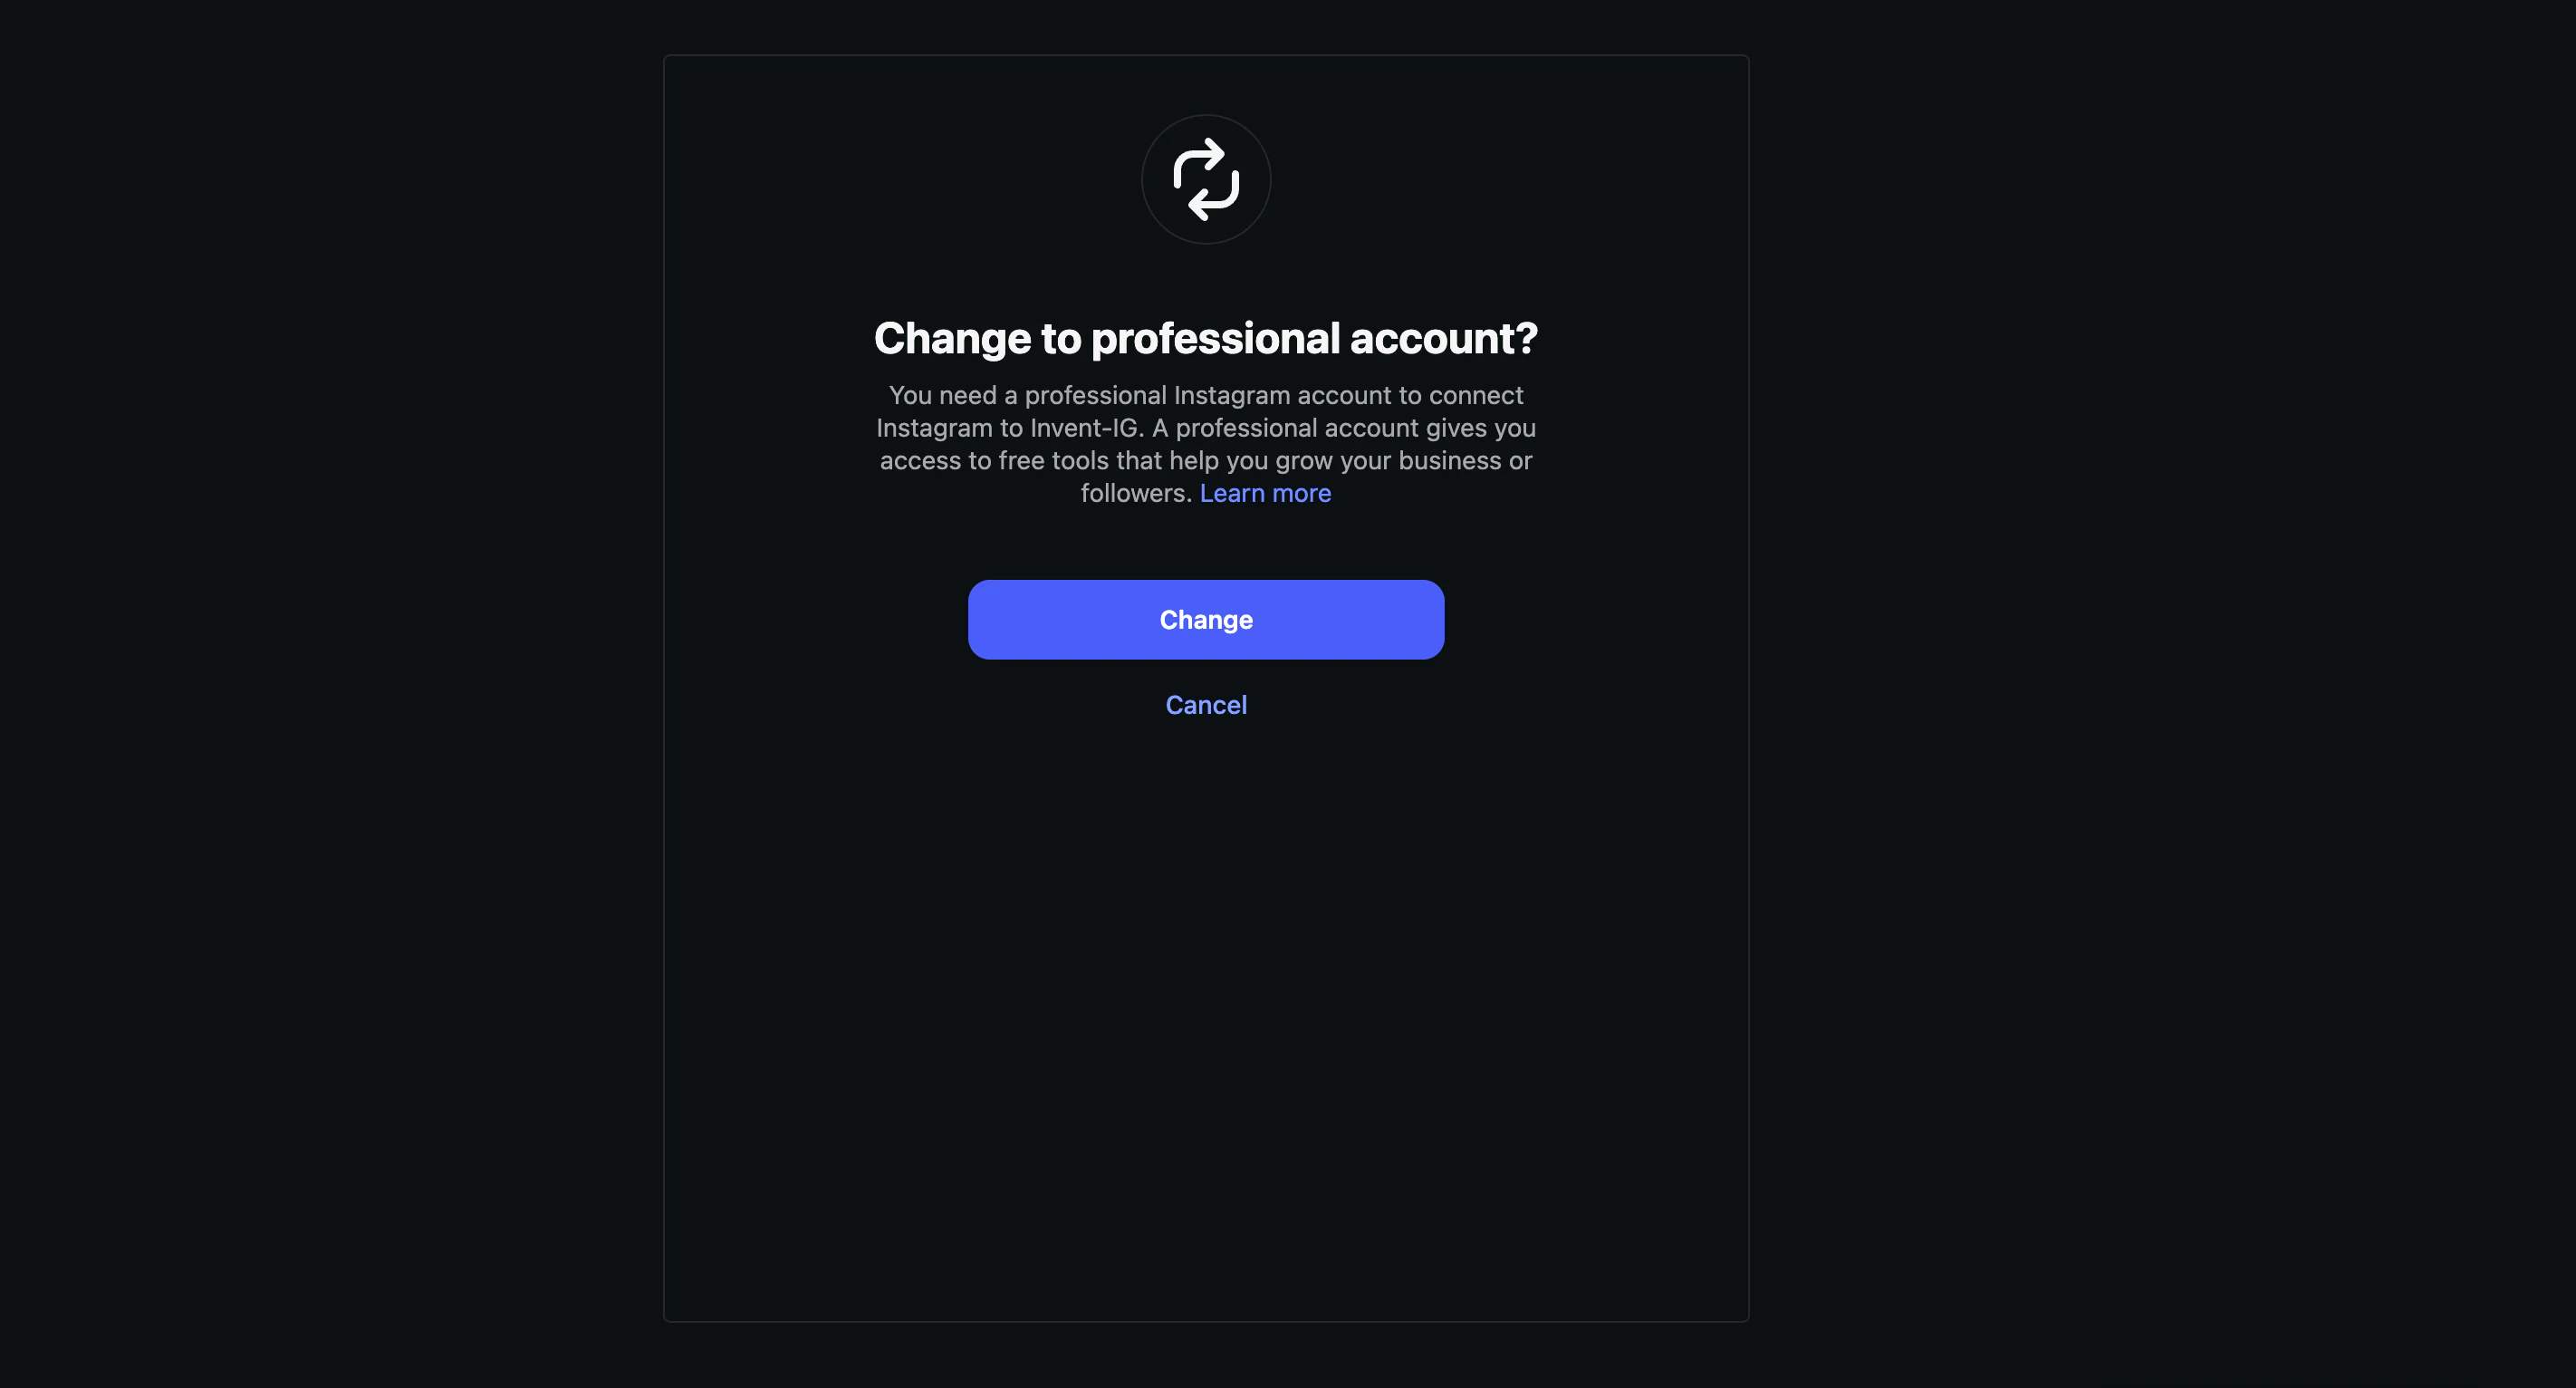 Click **Change** to start the upgrade. The switch is **non-destructive**:
* Your username, profile, posts, Reels, Stories, followers, and follower count all stay exactly as they are.
* You can revert to a personal account at any time from **Instagram → Settings → Account → Switch to personal account**.
* No followers are notified, no Stories or posts get republished, nothing is announced anywhere.
The only change customers might notice is a small **Business** or **Creator** label under the bio (which you can hide later if you want).
### Step 4a: Pick a Professional Account Type
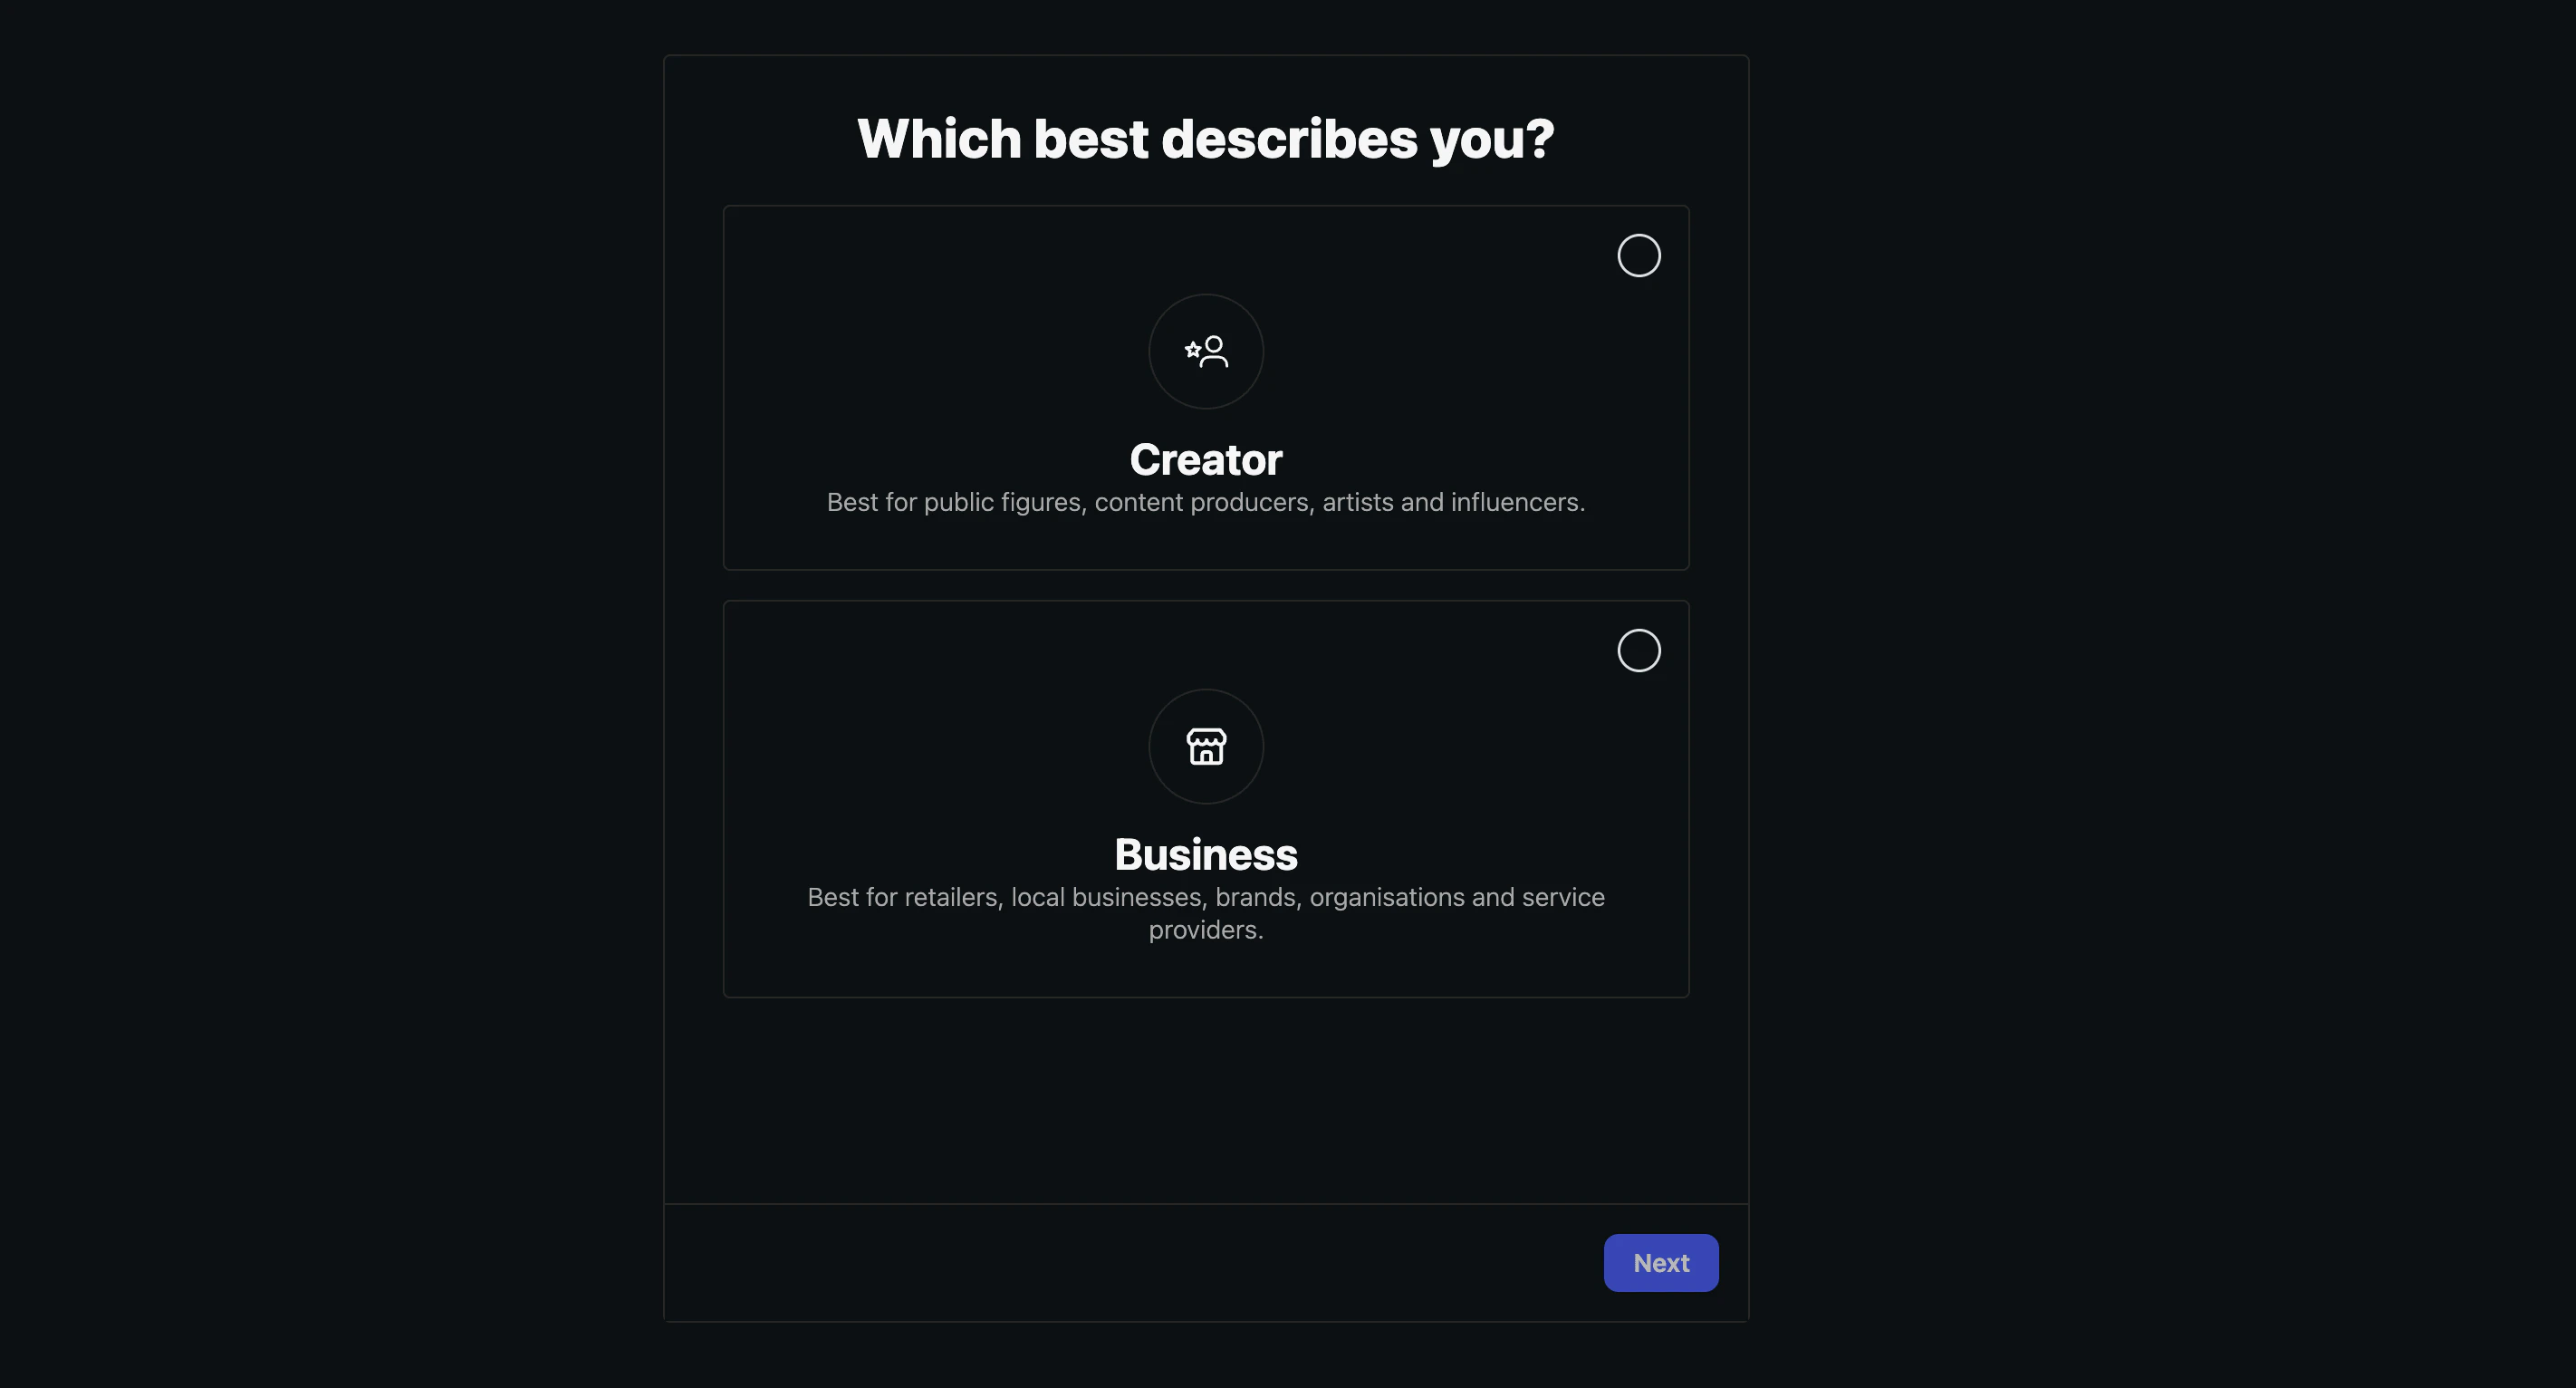
Instagram asks whether you are a **Creator** or a **Business**.
Click **Change** to start the upgrade. The switch is **non-destructive**:
* Your username, profile, posts, Reels, Stories, followers, and follower count all stay exactly as they are.
* You can revert to a personal account at any time from **Instagram → Settings → Account → Switch to personal account**.
* No followers are notified, no Stories or posts get republished, nothing is announced anywhere.
The only change customers might notice is a small **Business** or **Creator** label under the bio (which you can hide later if you want).
### Step 4a: Pick a Professional Account Type
Instagram asks whether you are a **Creator** or a **Business**.
 | Option | When to pick it |
| ------------ | -------------------------------------------------------------------------------------------------------------------------------------------------------------------------- |
| **Creator** | You are a public figure, content producer, artist, influencer, podcaster, or any individual whose Instagram presence is built around personal content rather than a brand. |
| **Business** | You are a retailer, local business, brand, organisation, agency, or service provider. This is the right choice for almost every customer-support or sales use case. |
Both account types unlock the messaging API the assistant needs. Pick whichever describes the account most accurately, then click **Next**.
| Option | When to pick it |
| ------------ | -------------------------------------------------------------------------------------------------------------------------------------------------------------------------- |
| **Creator** | You are a public figure, content producer, artist, influencer, podcaster, or any individual whose Instagram presence is built around personal content rather than a brand. |
| **Business** | You are a retailer, local business, brand, organisation, agency, or service provider. This is the right choice for almost every customer-support or sales use case. |
Both account types unlock the messaging API the assistant needs. Pick whichever describes the account most accurately, then click **Next**.
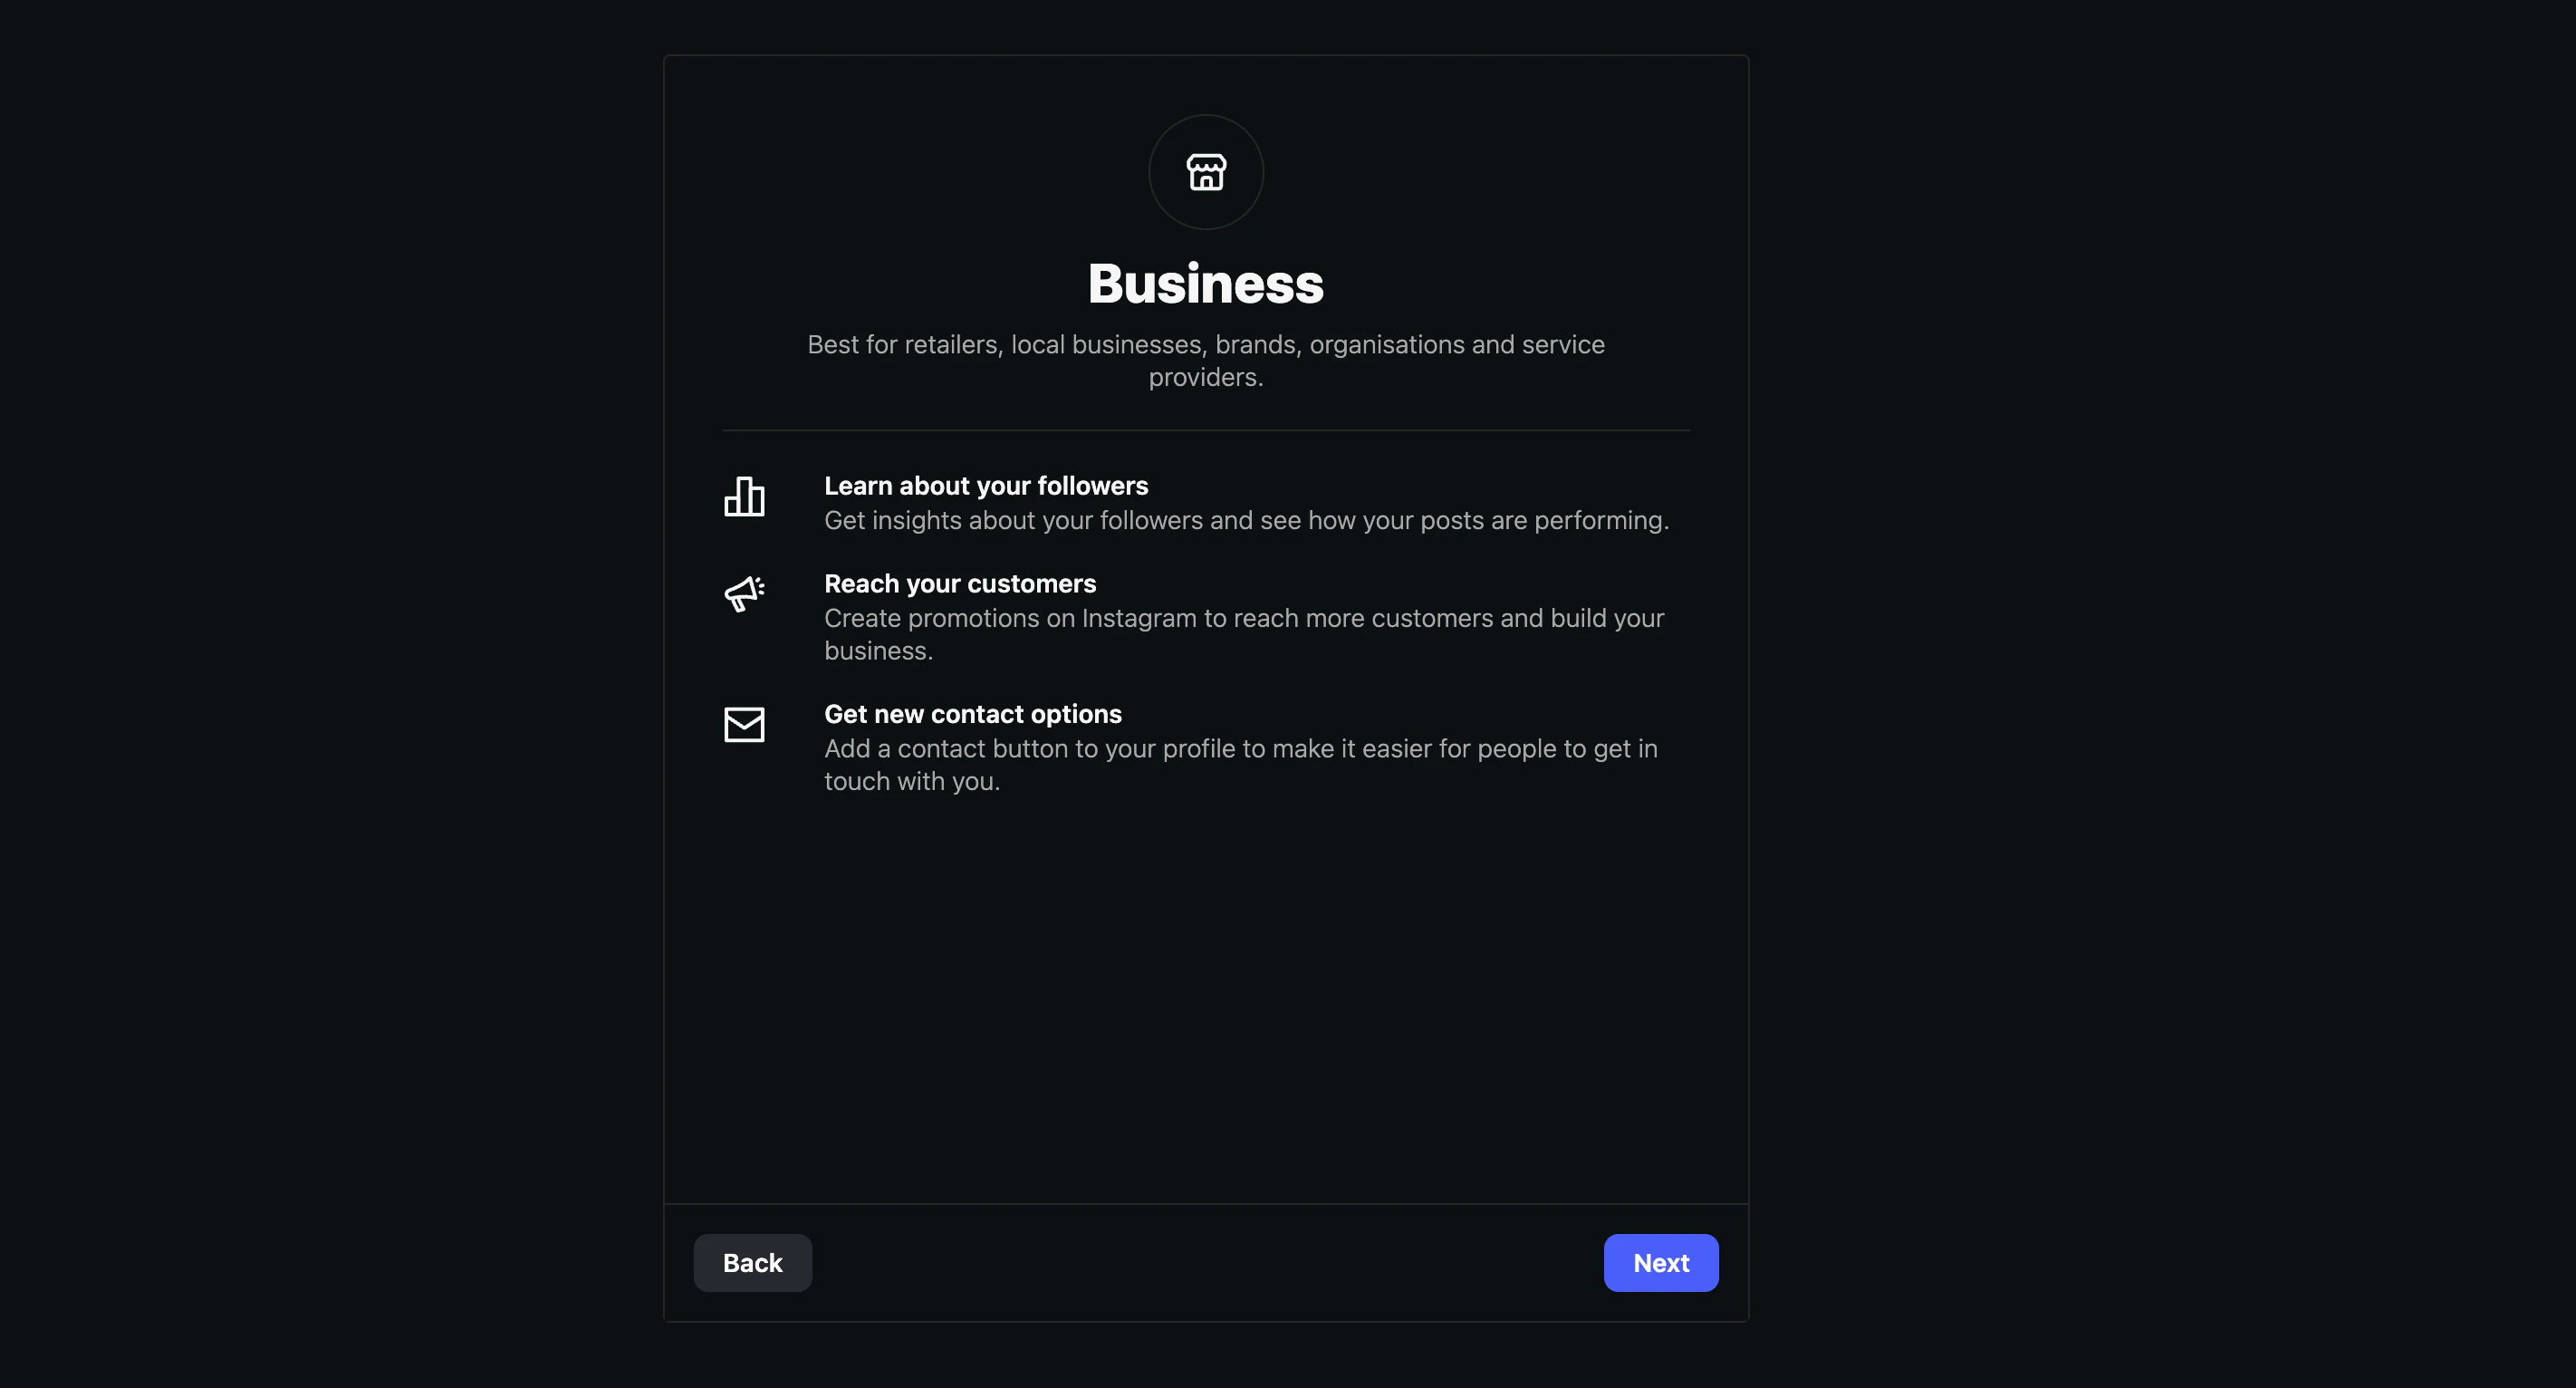 Instagram shows a quick summary of what the chosen type unlocks (insights, promotions, contact options). Click **Next** to continue.
### Step 4b: Select a Category
Instagram shows a quick summary of what the chosen type unlocks (insights, promotions, contact options). Click **Next** to continue.
### Step 4b: Select a Category
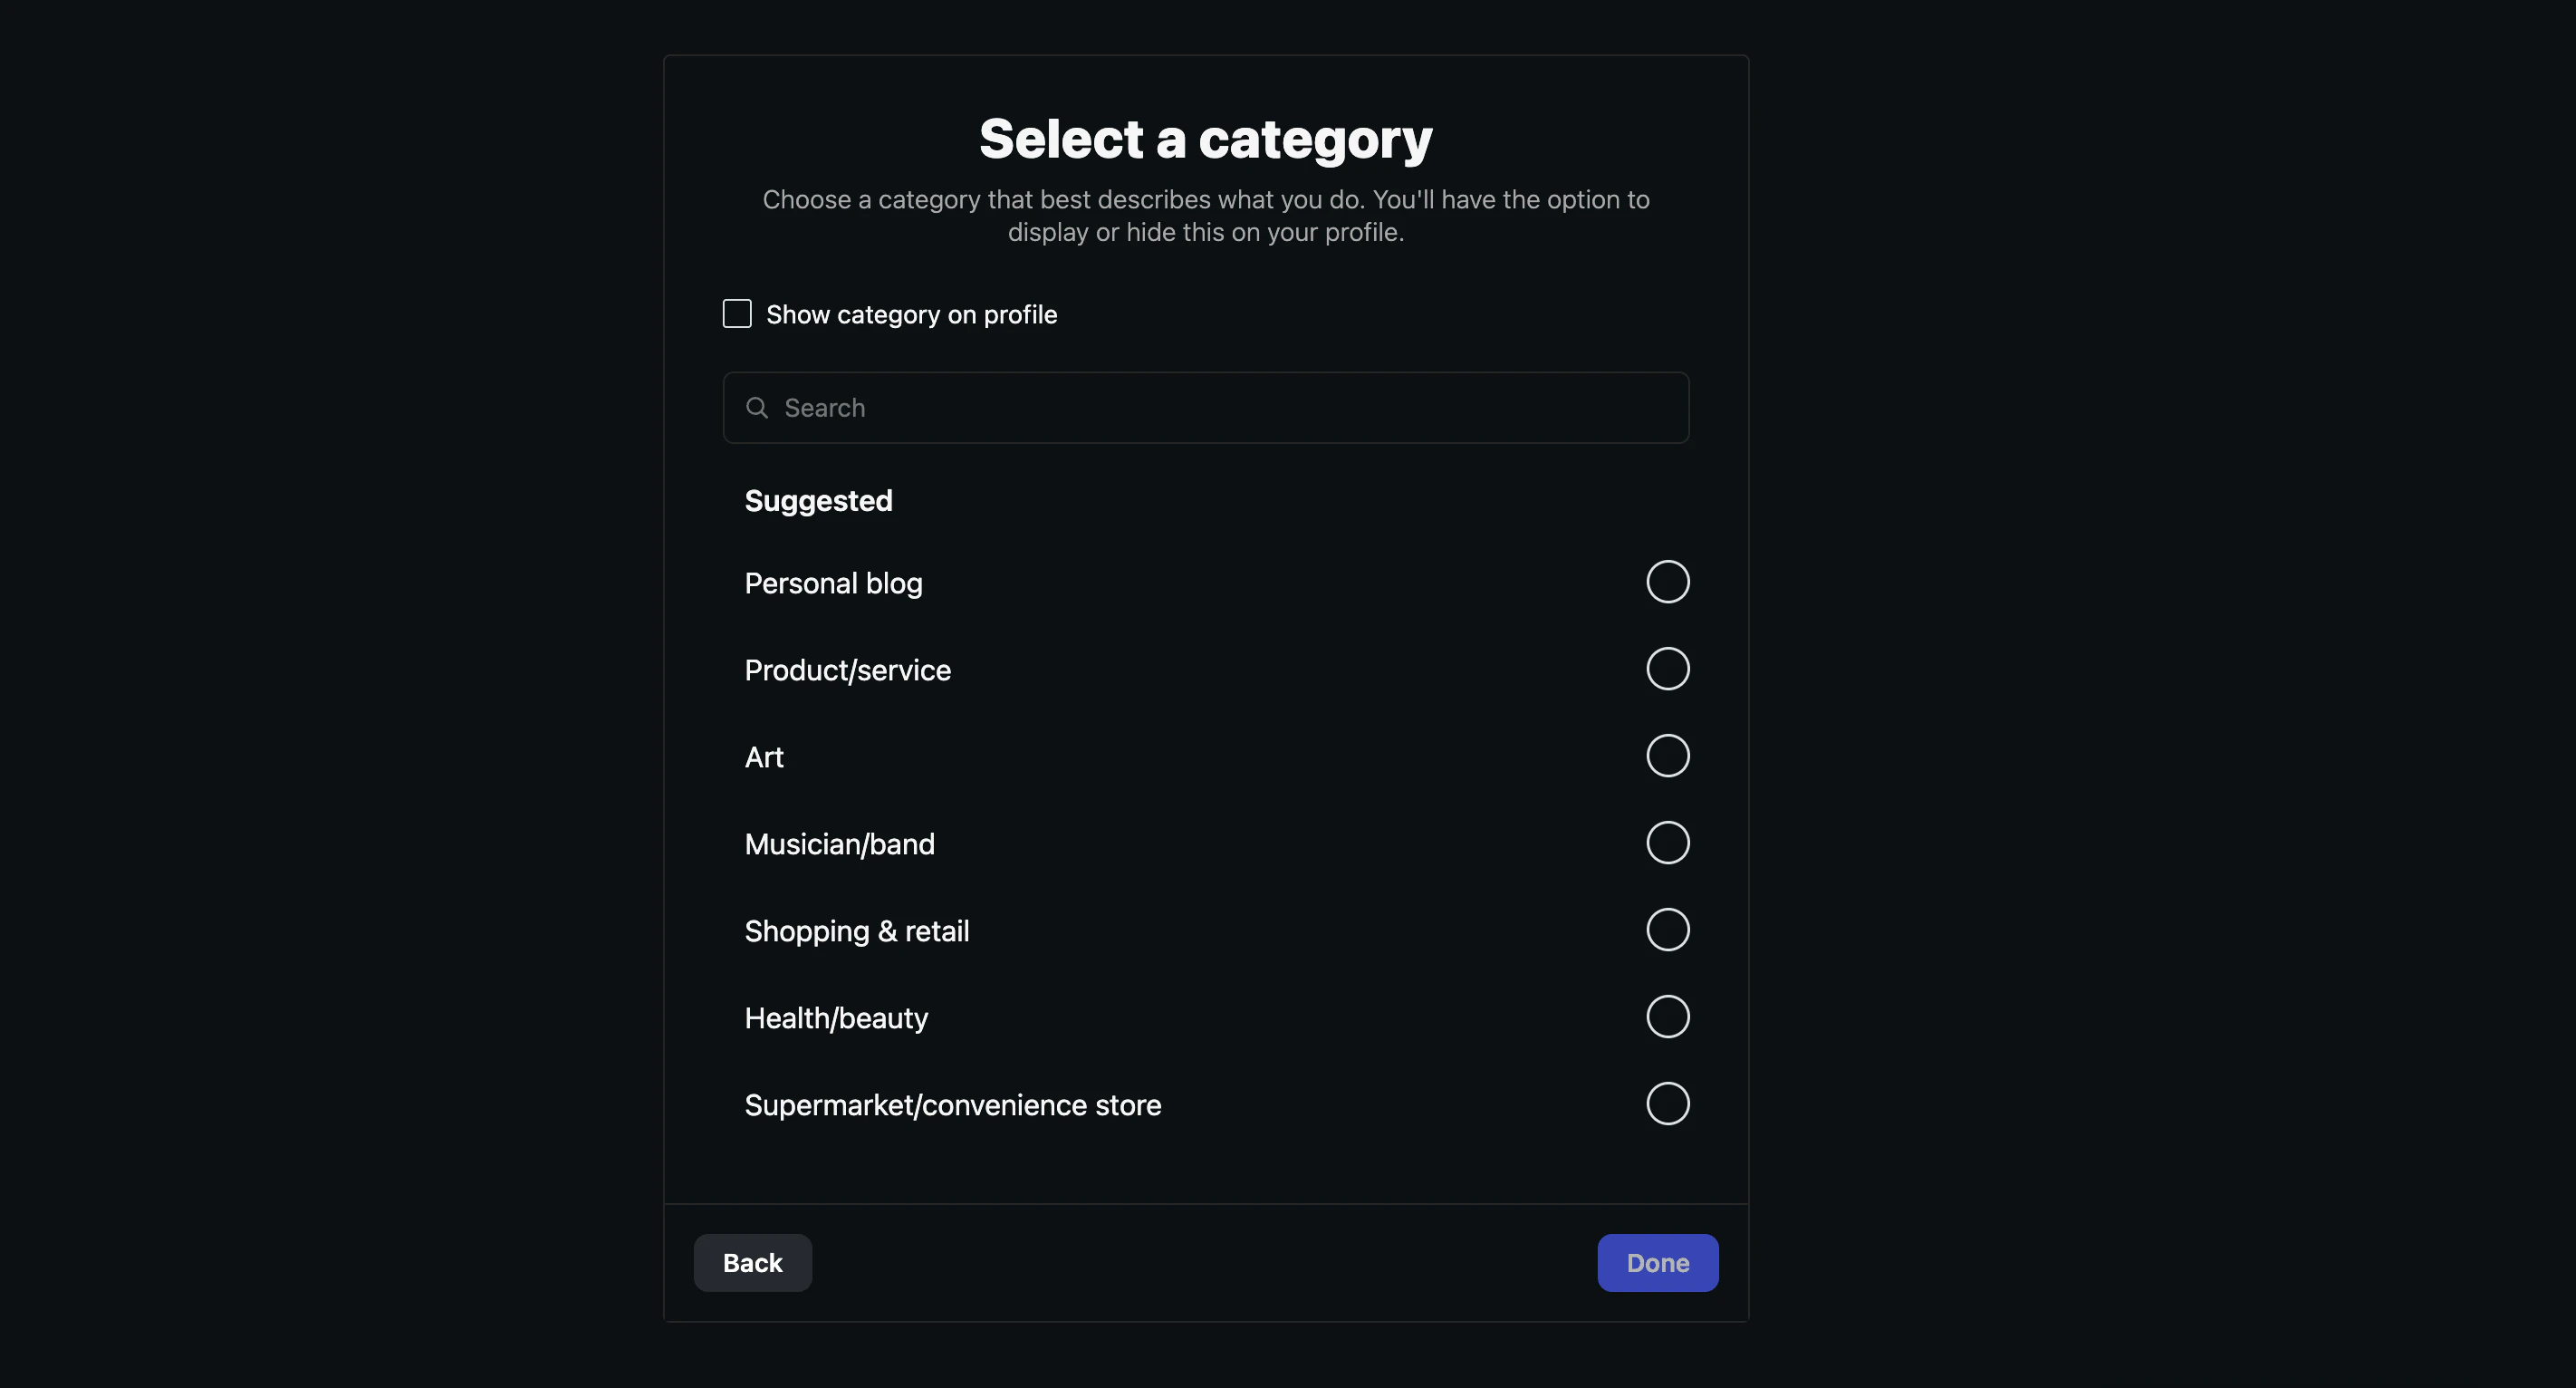 Pick the category that best describes what the business actually does. Use the search field if your industry is not in the suggested list. The category drives Instagram's discovery surfaces; it has no effect on the assistant.
If you would rather not show the category under your bio publicly, leave **Show category on profile** unchecked at the top. The category is still set internally, just not visible to visitors.
Click **Done**.
### Step 4c: Confirm the Switch
Instagram shows a final confirmation explaining that professional profiles are public.
Pick the category that best describes what the business actually does. Use the search field if your industry is not in the suggested list. The category drives Instagram's discovery surfaces; it has no effect on the assistant.
If you would rather not show the category under your bio publicly, leave **Show category on profile** unchecked at the top. The category is still set internally, just not visible to visitors.
Click **Done**.
### Step 4c: Confirm the Switch
Instagram shows a final confirmation explaining that professional profiles are public.
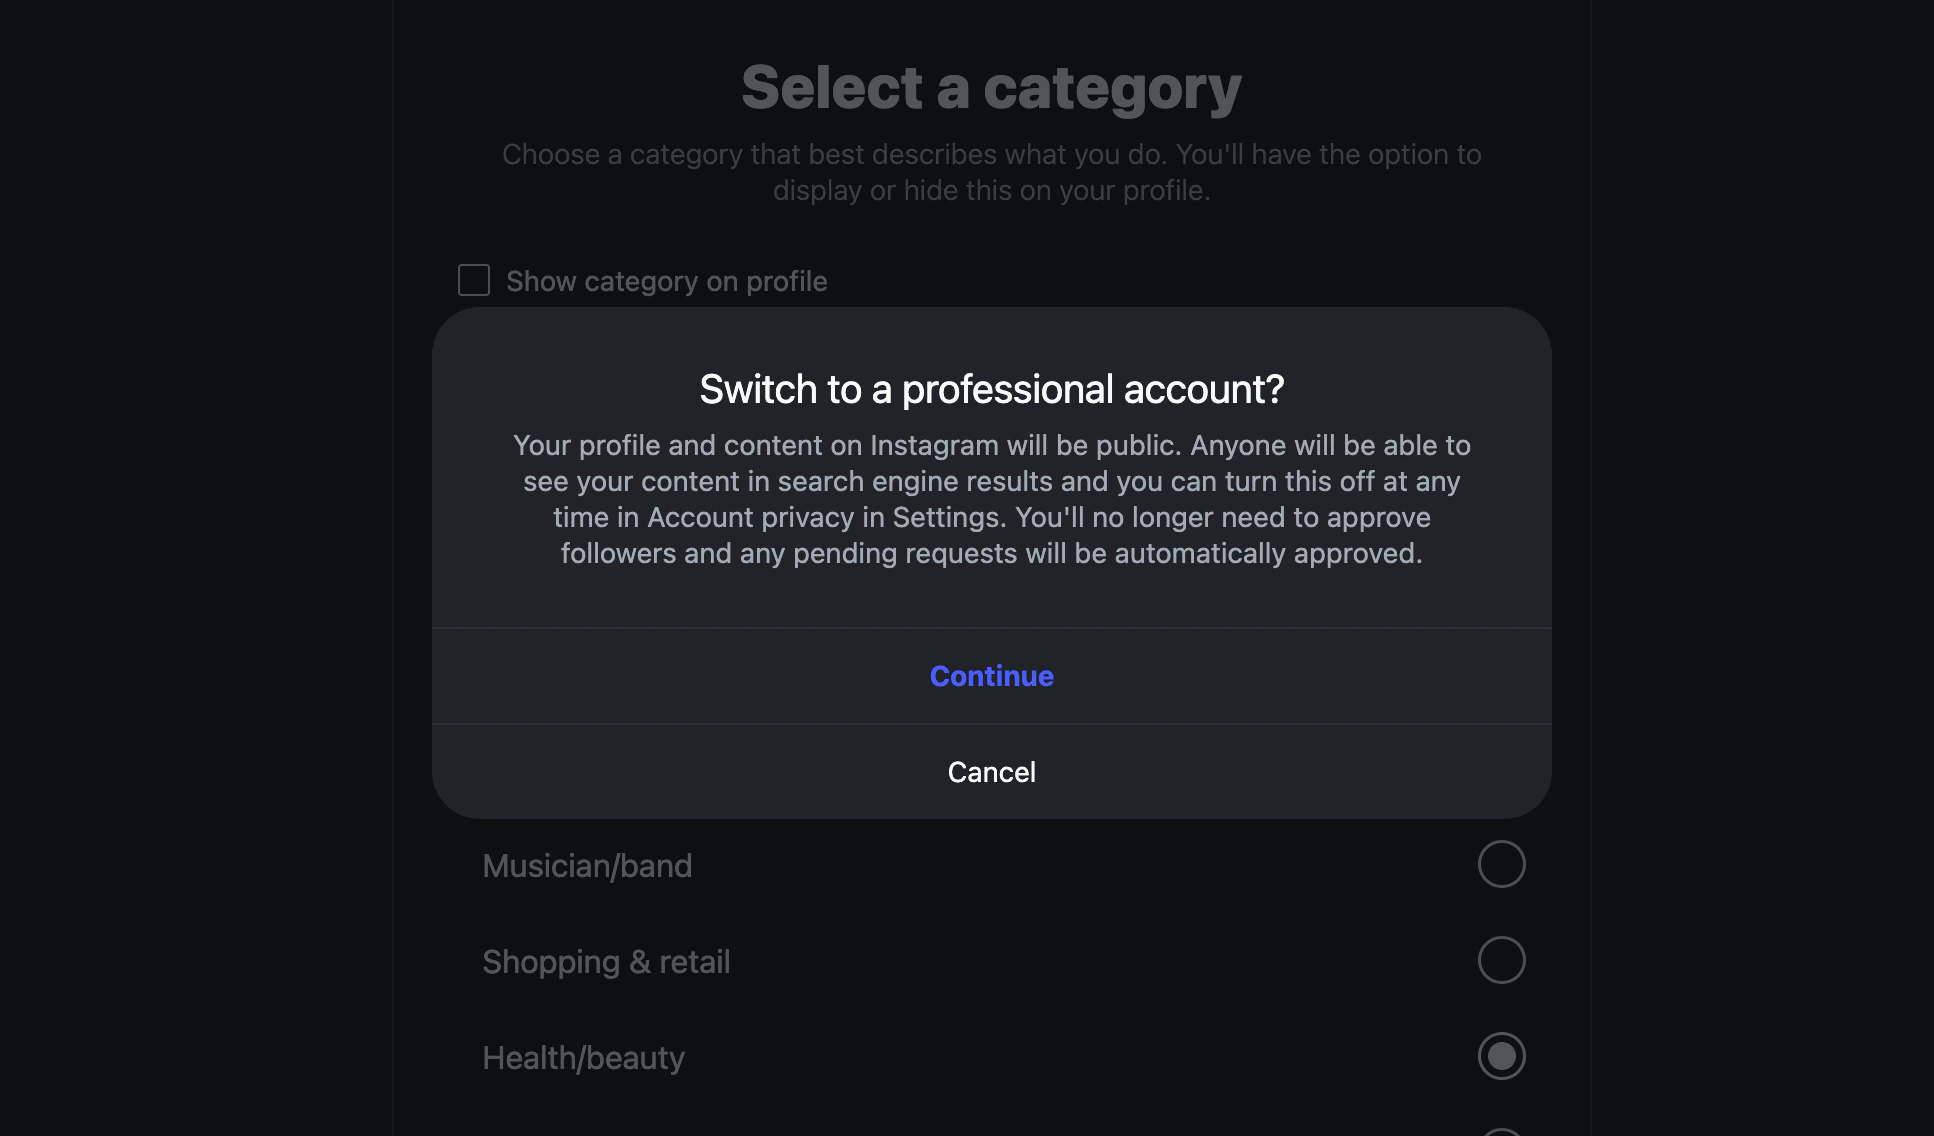 A few things to know before you click **Continue**:
* **The account becomes public** if it is currently private. Pending follower requests are auto-approved.
* **Search engines may index your content** (Instagram's wording, not ours). In practice this only applies to public posts and the profile page.
* You can switch back to **Private** later from the Instagram app, but messaging access for the assistant requires a professional, public account.
Click **Continue** to commit the switch.
## Step 5: Review Your Contact Info
Instagram offers to surface a public **email**, **phone number**, and **address** on the profile so customers can reach you outside of DMs.
A few things to know before you click **Continue**:
* **The account becomes public** if it is currently private. Pending follower requests are auto-approved.
* **Search engines may index your content** (Instagram's wording, not ours). In practice this only applies to public posts and the profile page.
* You can switch back to **Private** later from the Instagram app, but messaging access for the assistant requires a professional, public account.
Click **Continue** to commit the switch.
## Step 5: Review Your Contact Info
Instagram offers to surface a public **email**, **phone number**, and **address** on the profile so customers can reach you outside of DMs.
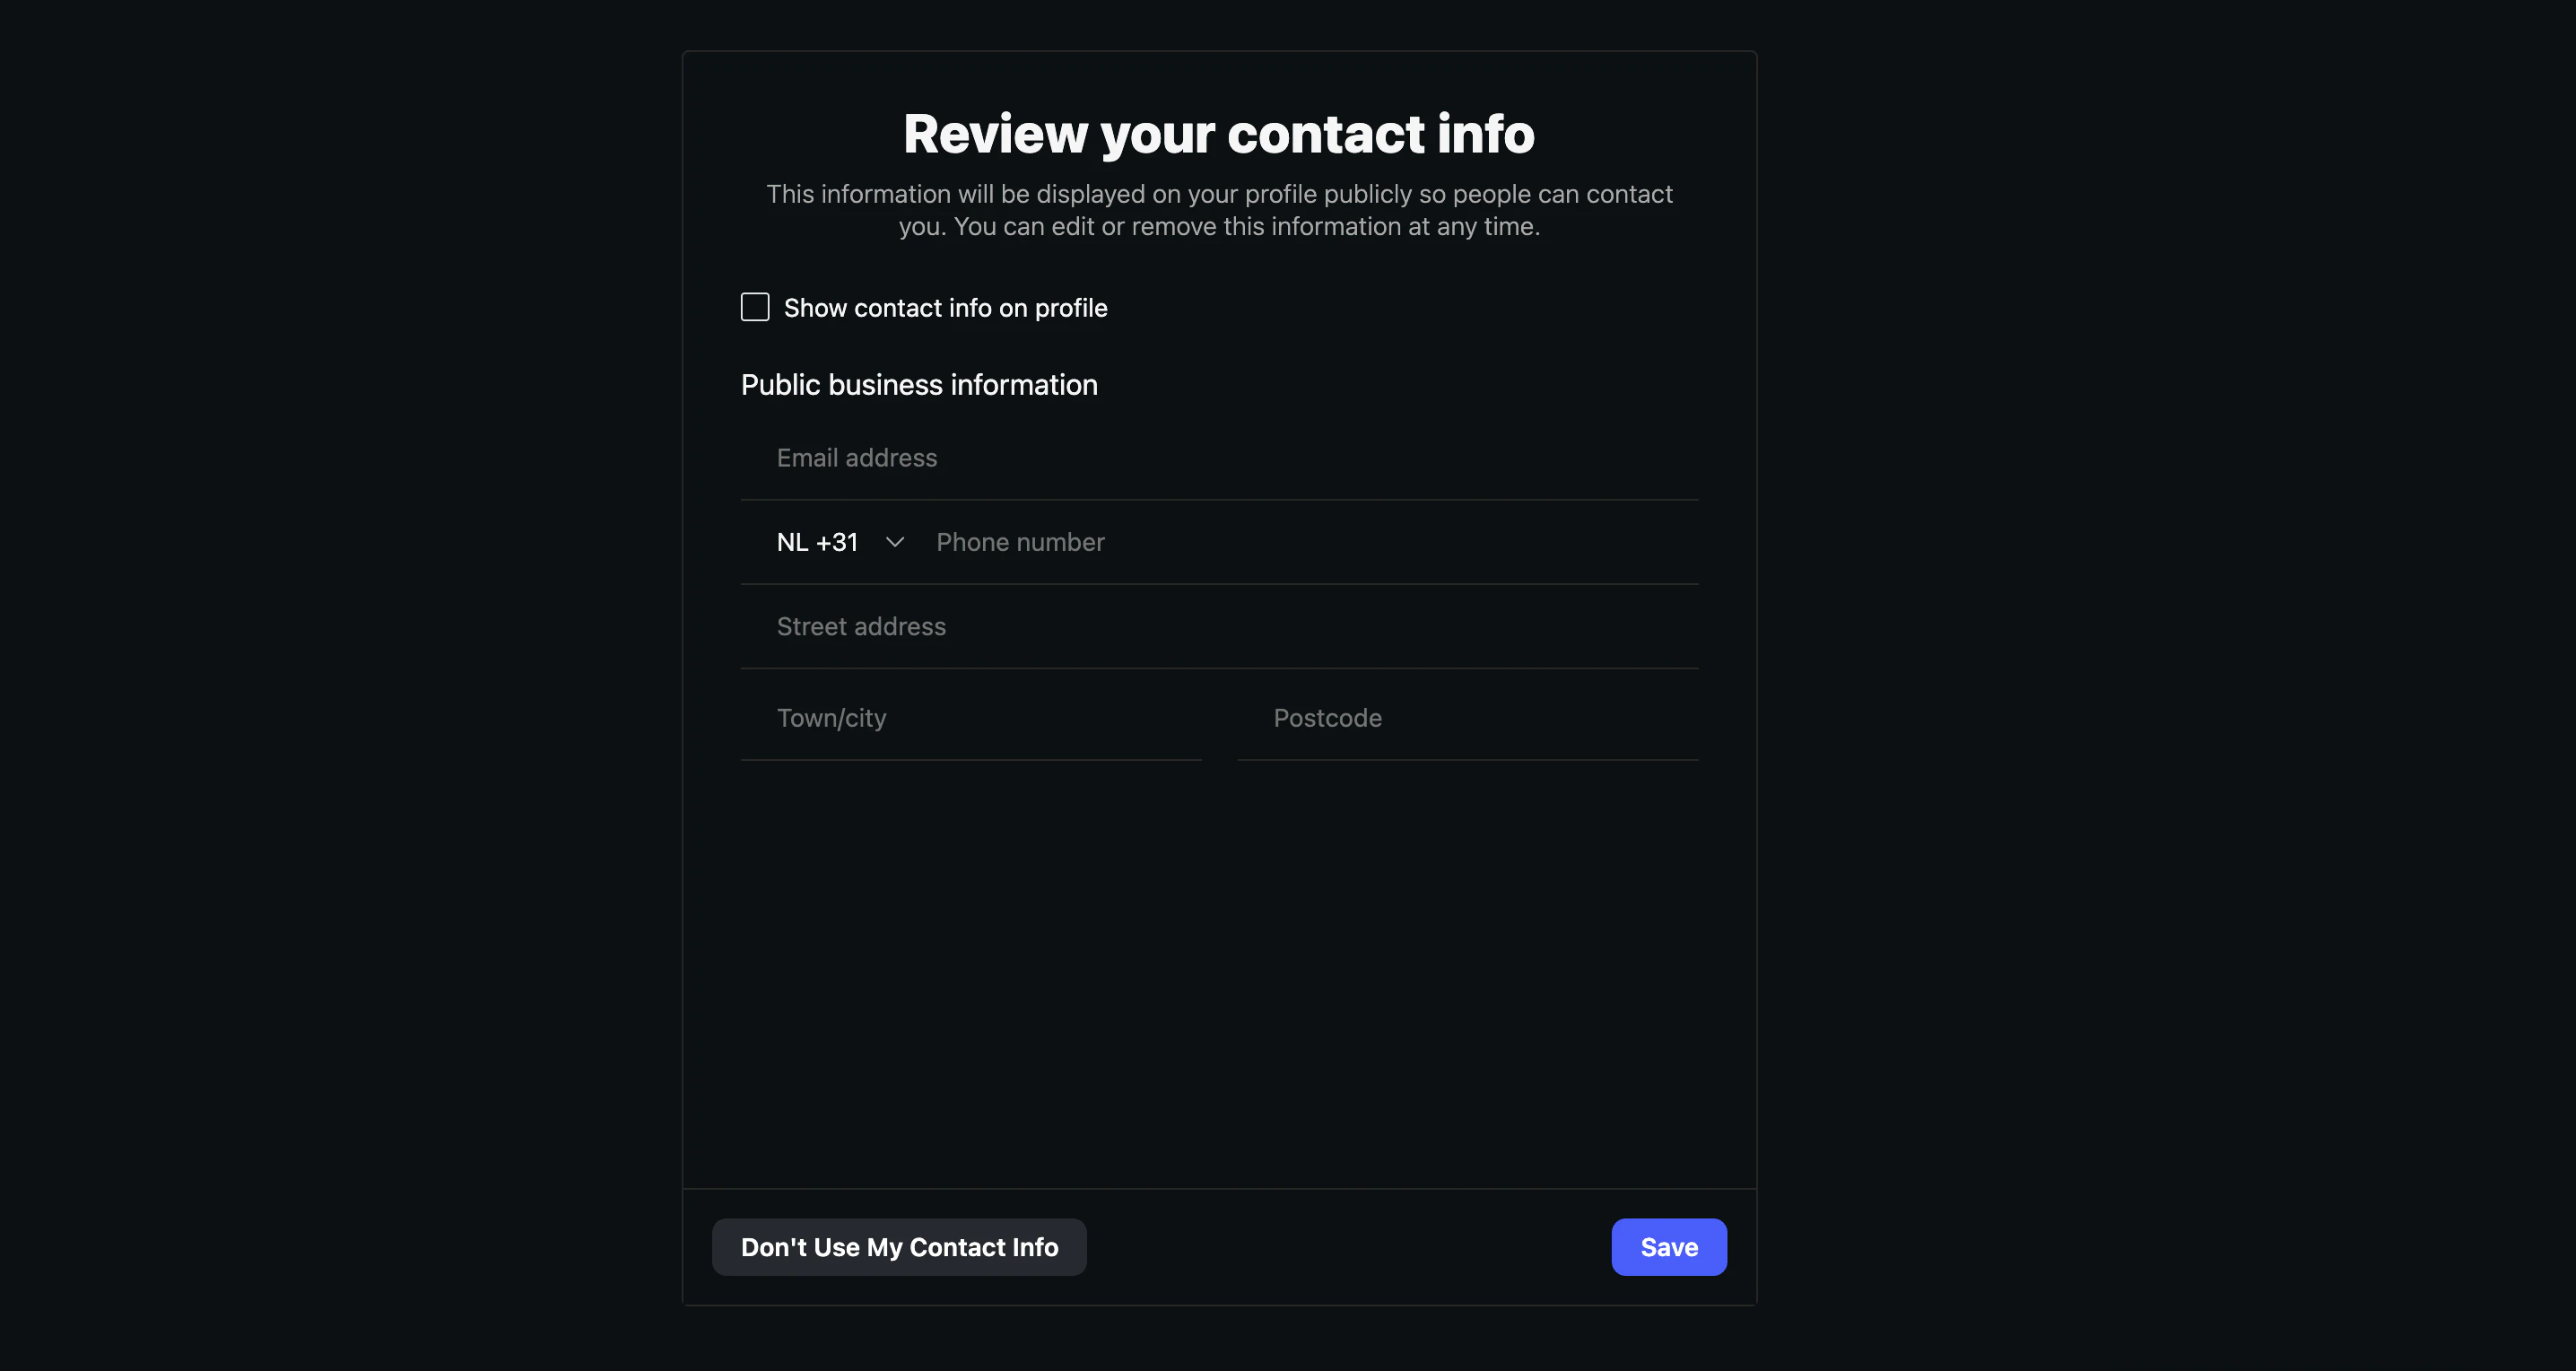 This step is **optional** and has no effect on the assistant integration. You have three sensible defaults:
* **Skip it entirely**: click **Don't Use My Contact Info** at the bottom-left. The assistant still works perfectly; customers just contact you through DMs.
* **Fill it in but keep it private**: enter the fields and leave **Show contact info on profile** unchecked. Useful if Instagram requires the data internally for some categories, but you do not want it shown publicly.
* **Fill it in and publish it**: enter the fields and tick **Show contact info on profile**. Customers see the email and phone as buttons under your bio.
Click **Save** (or **Don't Use My Contact Info**) to continue.
## Step 6: Confirmation Screen
Instagram confirms the account is ready.
This step is **optional** and has no effect on the assistant integration. You have three sensible defaults:
* **Skip it entirely**: click **Don't Use My Contact Info** at the bottom-left. The assistant still works perfectly; customers just contact you through DMs.
* **Fill it in but keep it private**: enter the fields and leave **Show contact info on profile** unchecked. Useful if Instagram requires the data internally for some categories, but you do not want it shown publicly.
* **Fill it in and publish it**: enter the fields and tick **Show contact info on profile**. Customers see the email and phone as buttons under your bio.
Click **Save** (or **Don't Use My Contact Info**) to continue.
## Step 6: Confirmation Screen
Instagram confirms the account is ready.
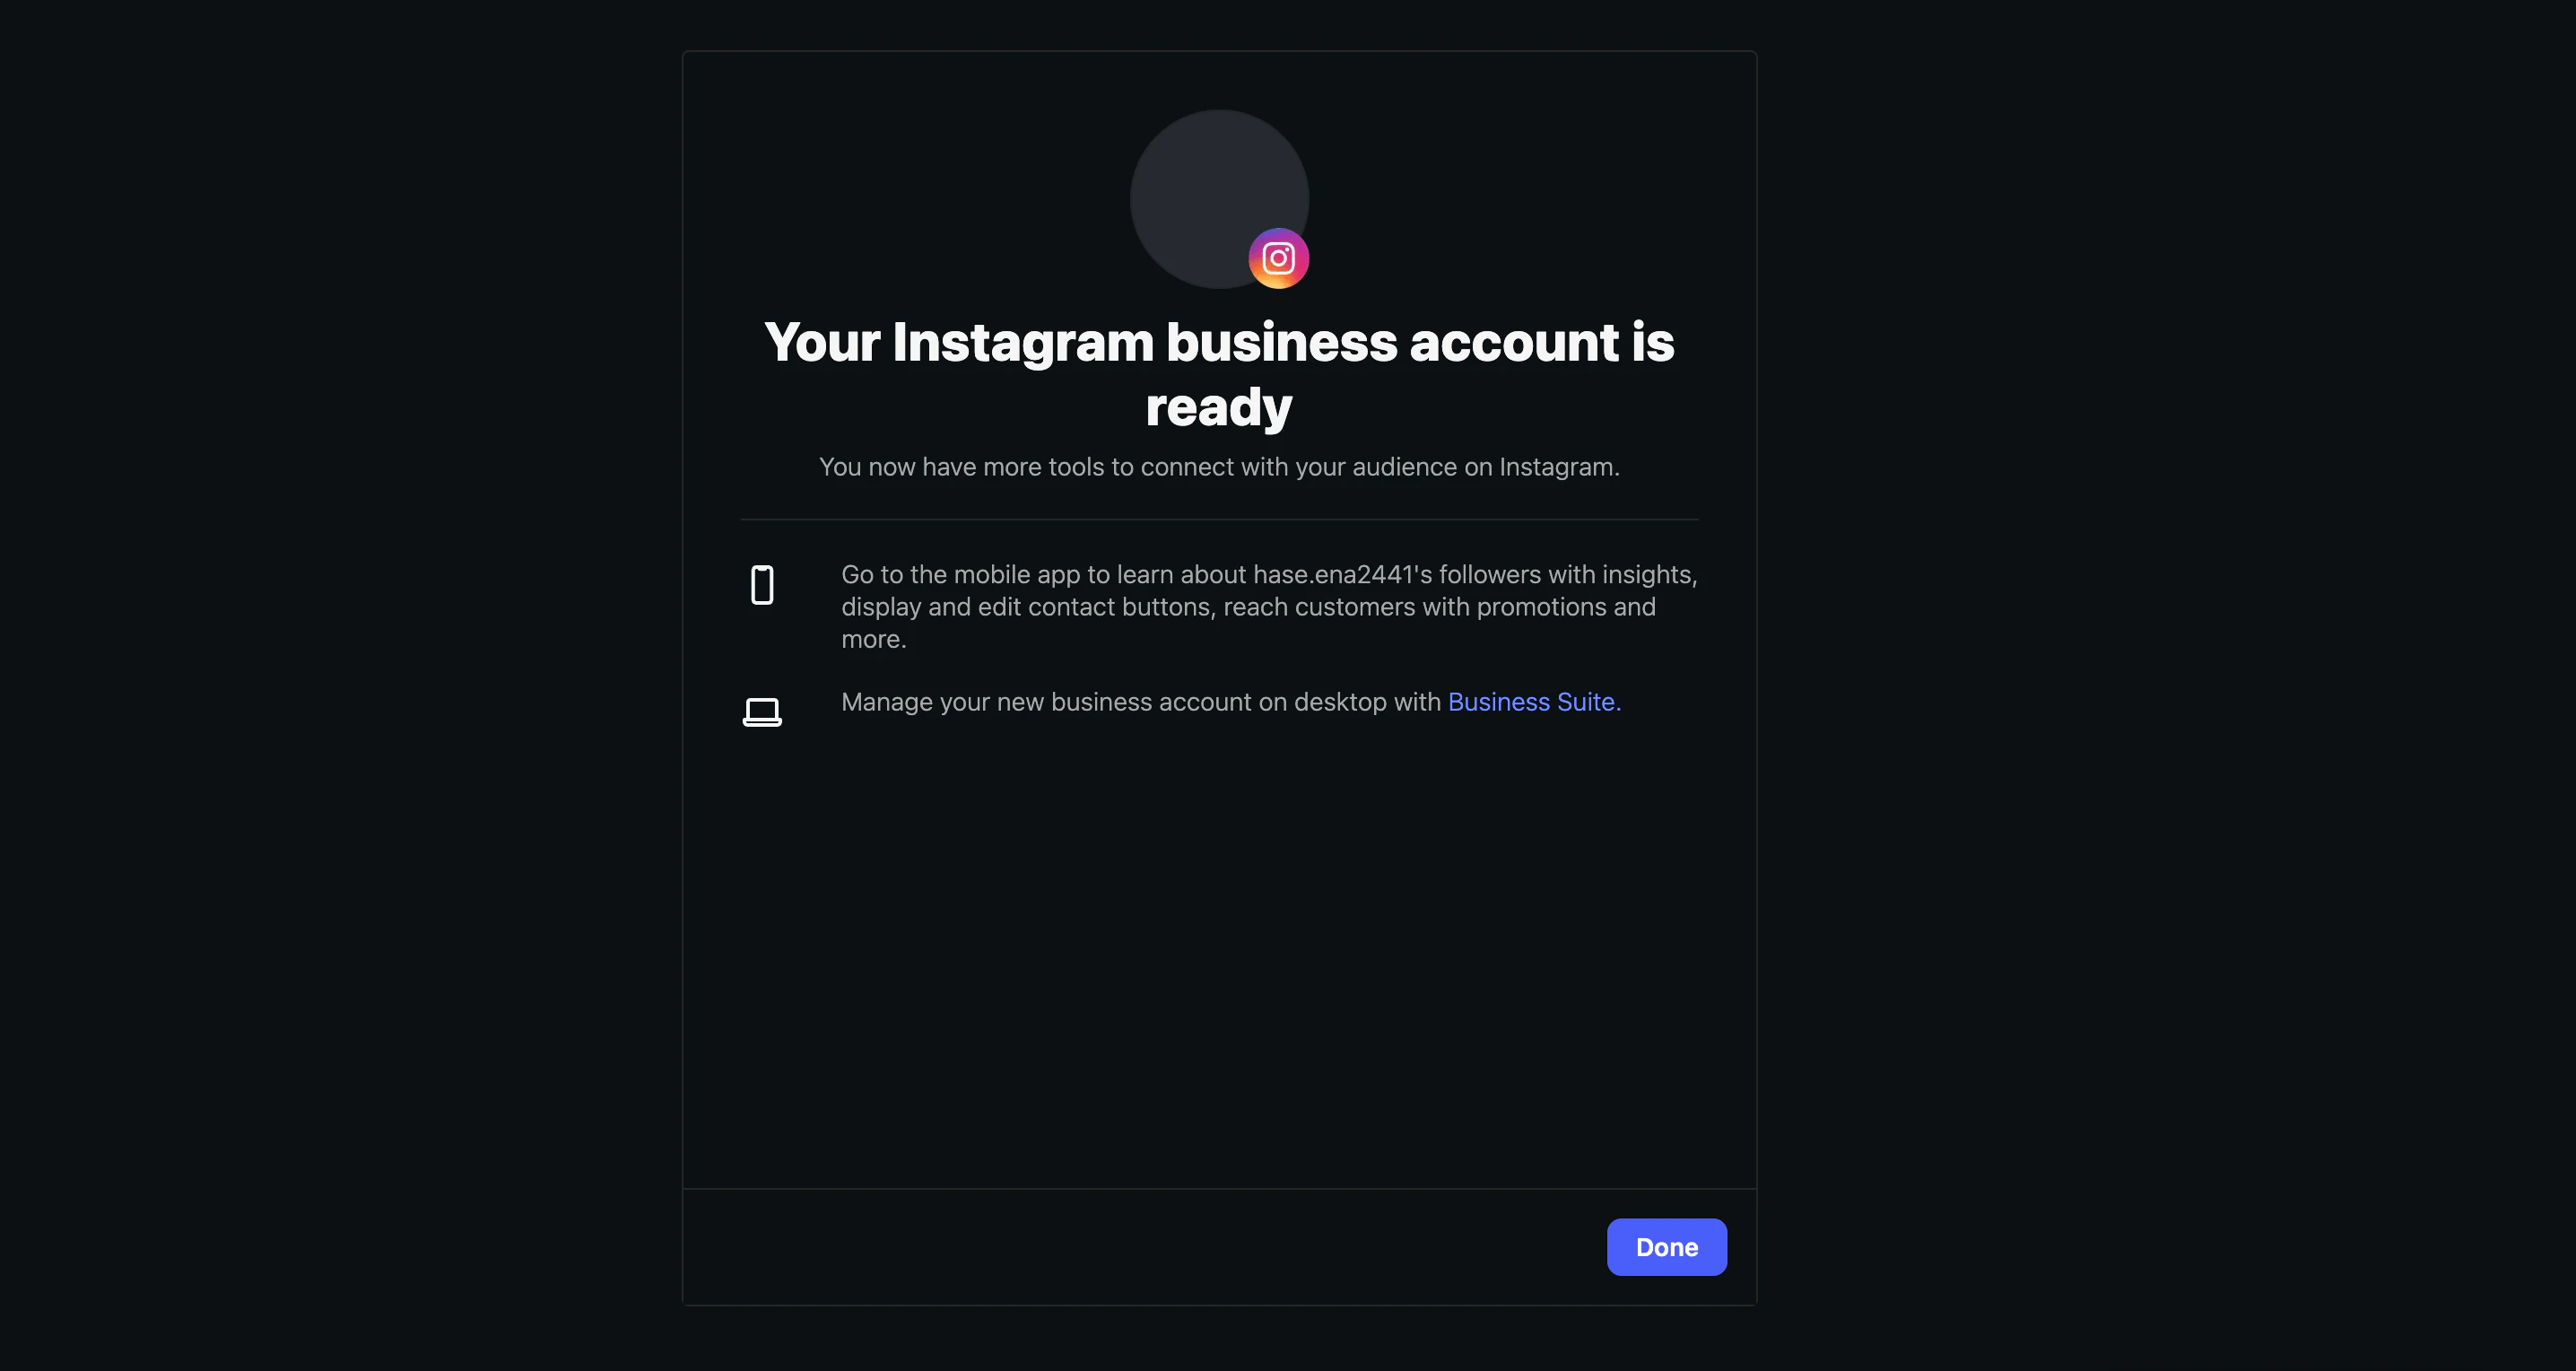 The on-screen tips about the Instagram mobile app and Meta Business Suite are Instagram's own suggestions; they are not required for the Invent integration. Click **Done** to move on.
## Step 7: Review Permissions and Confirm
This is the most important screen in the entire flow. Instagram now asks which messaging permissions to grant Invent.
The on-screen tips about the Instagram mobile app and Meta Business Suite are Instagram's own suggestions; they are not required for the Invent integration. Click **Done** to move on.
## Step 7: Review Permissions and Confirm
This is the most important screen in the entire flow. Instagram now asks which messaging permissions to grant Invent.
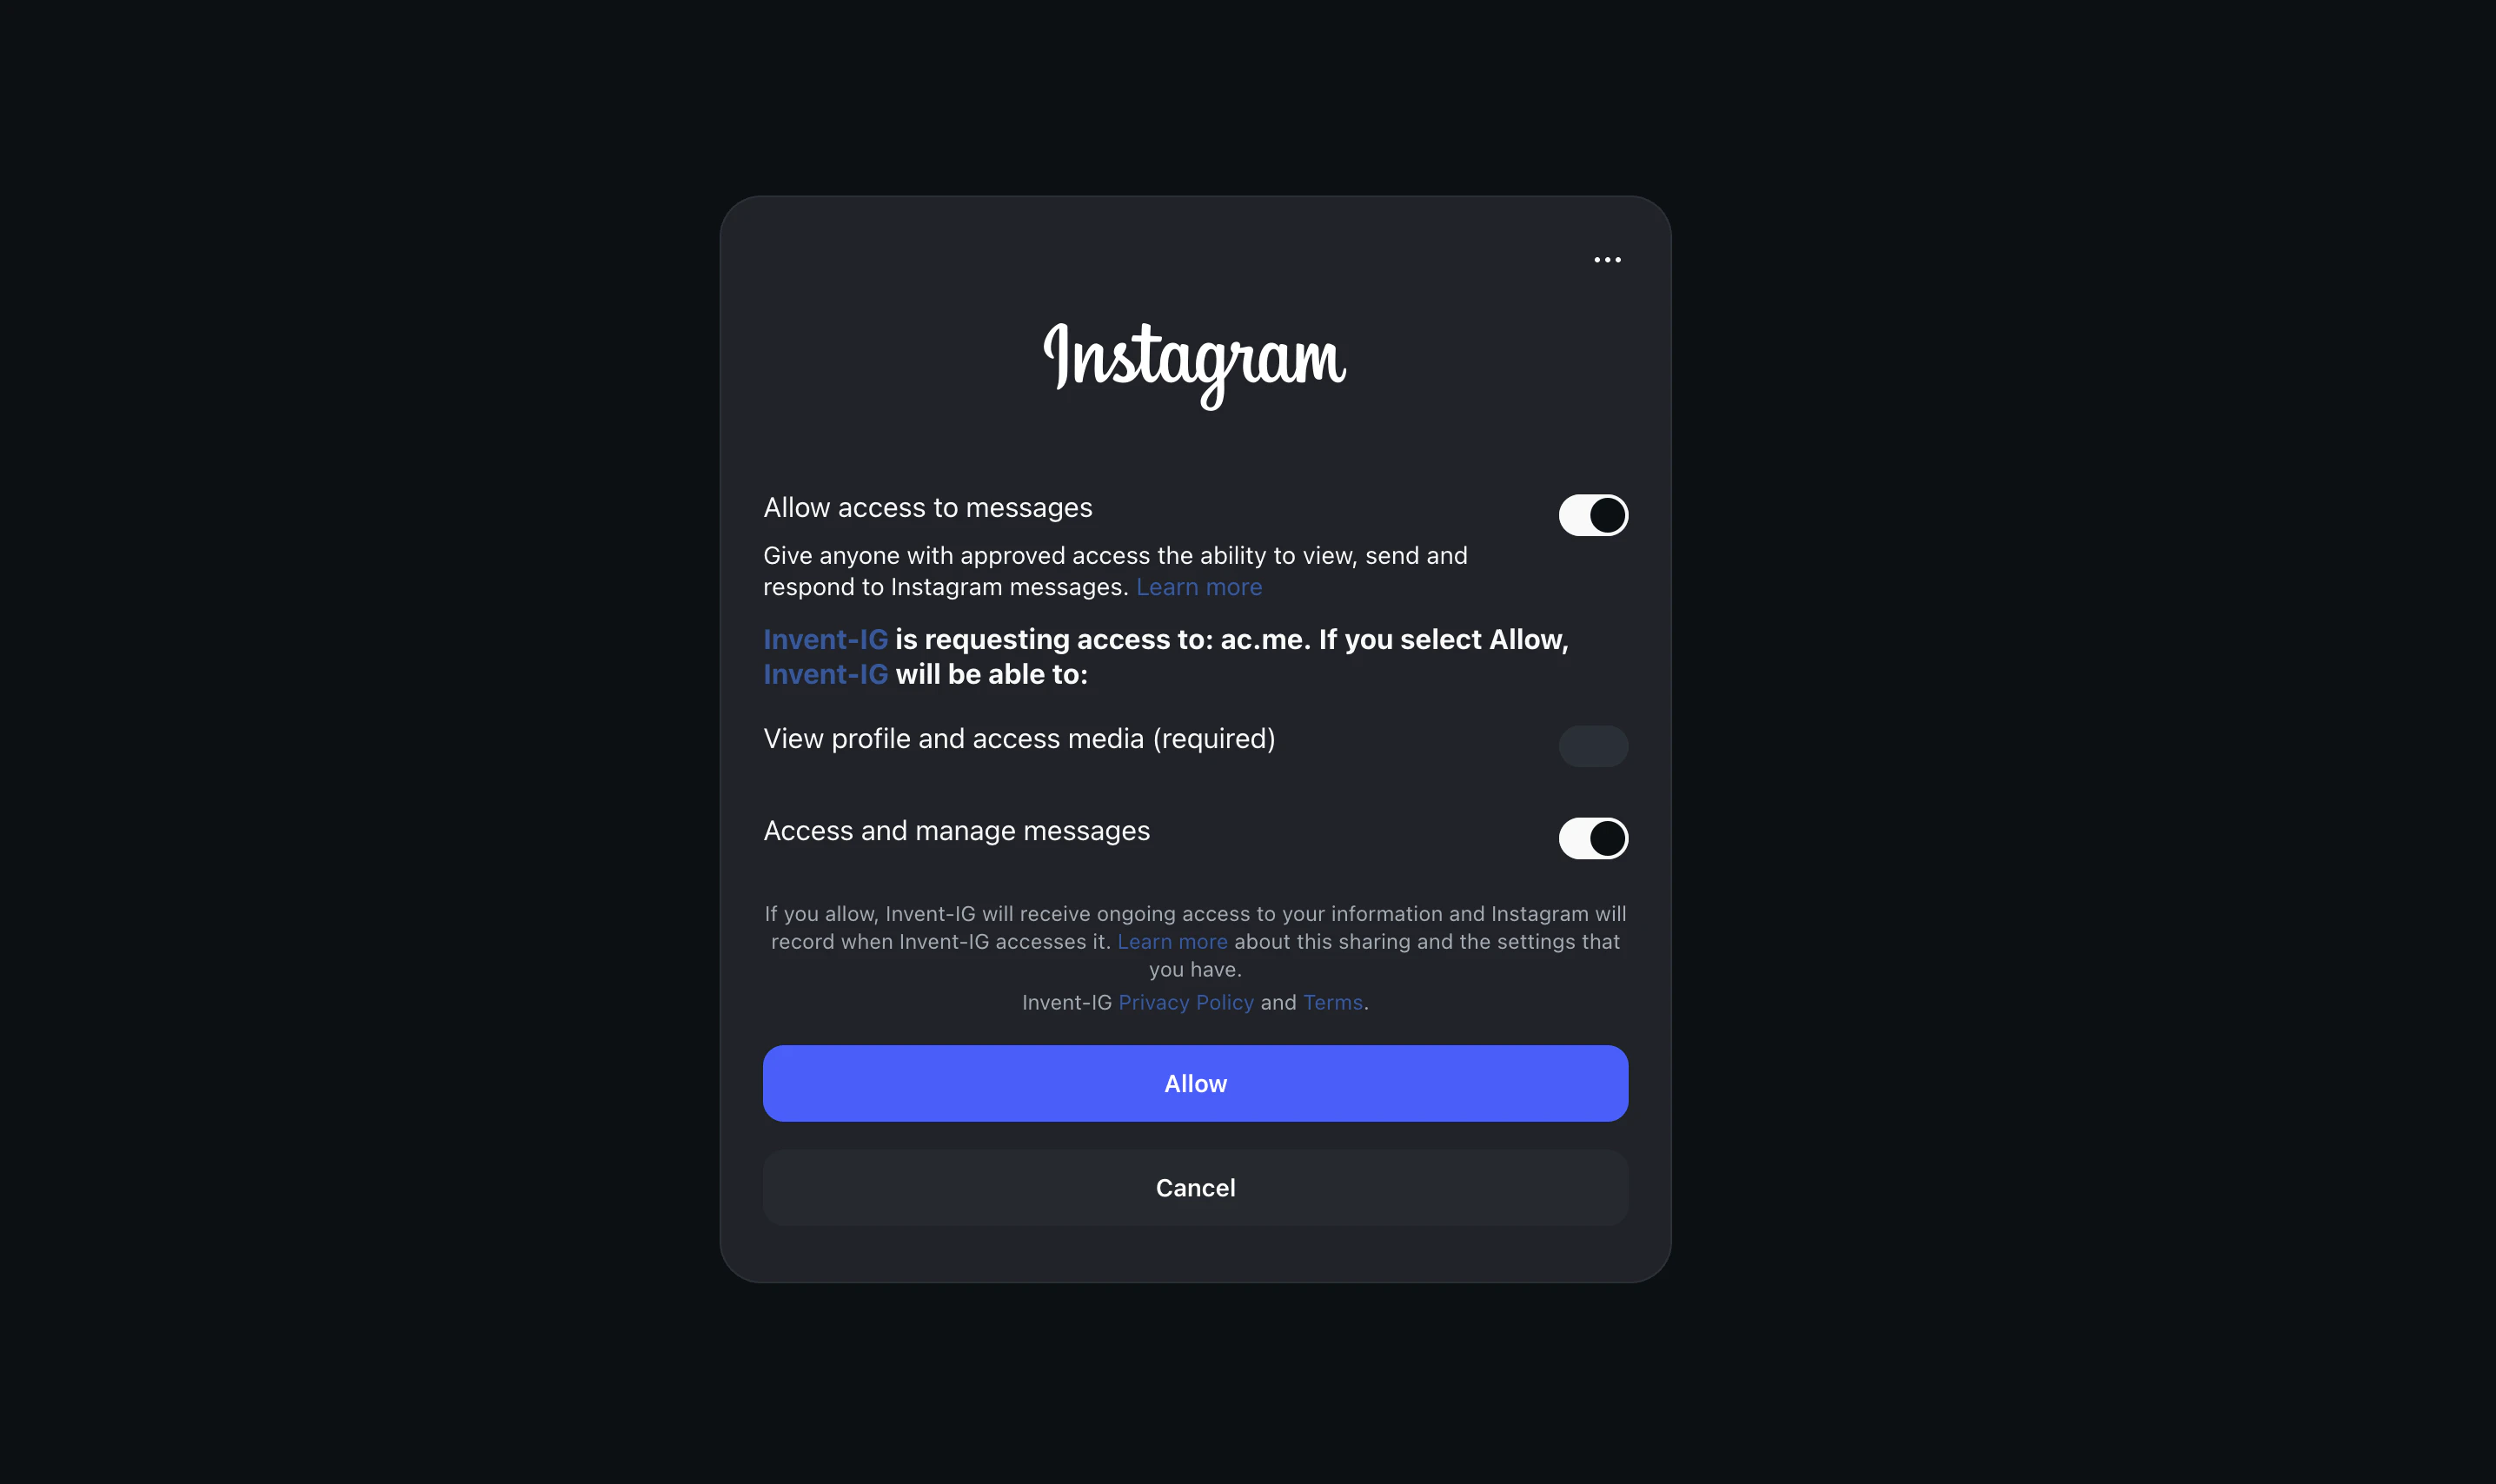 You will see three rows. **Both message-related toggles must be ON** for the assistant to send and receive DMs.
| Permission | Default | Required for assistant? | What it does |
| --------------------------------- | ------------------------ | ----------------------- | --------------------------------------------------------------------------------------------------------------- |
| **Allow access to messages** | ON | **Yes, leave on** | The master switch. Lets Invent receive incoming DMs and send replies on behalf of the account. |
| **View profile and access media** | Locked ON, cannot toggle | **Yes, automatic** | Lets Invent read the profile (username, avatar, bio) and any media customers reference (Reels, posts, Stories). |
| **Access and manage messages** | ON | **Yes, leave on** | The actual send-and-respond capability. Without this, Invent could see DMs but never reply to them. |
If you toggle **Allow access to messages** off here, Invent's connection is created but the assistant cannot send or receive a single DM until you re-run this step and turn it back on. Same for **Access and manage messages**. Leave both on.
Click **Allow** to grant access. Instagram briefly provisions the connection, then redirects you back to Invent.
## Step 8: Name the Connection in Invent
Instagram redirects you back to Invent and prompts you to label the new connection (for example, "Brand Sales DMs"). This is the name you will see inside Invent, it does not change anything on Instagram's side.
Click **Create** and Invent stores the connection in [Settings → Connections](/assistants/connections), where you can rename it or disconnect it at any time.
Pick a name that describes *which account this connection is for*, not who signed in. "Sales Instagram" or "EU Brand DMs" reads better in the channel list a year from now than "Alice's Instagram".
## Step 9: Pick the Connection
Back on the Instagram connect dialog, your new connection is already selected.
You will see three rows. **Both message-related toggles must be ON** for the assistant to send and receive DMs.
| Permission | Default | Required for assistant? | What it does |
| --------------------------------- | ------------------------ | ----------------------- | --------------------------------------------------------------------------------------------------------------- |
| **Allow access to messages** | ON | **Yes, leave on** | The master switch. Lets Invent receive incoming DMs and send replies on behalf of the account. |
| **View profile and access media** | Locked ON, cannot toggle | **Yes, automatic** | Lets Invent read the profile (username, avatar, bio) and any media customers reference (Reels, posts, Stories). |
| **Access and manage messages** | ON | **Yes, leave on** | The actual send-and-respond capability. Without this, Invent could see DMs but never reply to them. |
If you toggle **Allow access to messages** off here, Invent's connection is created but the assistant cannot send or receive a single DM until you re-run this step and turn it back on. Same for **Access and manage messages**. Leave both on.
Click **Allow** to grant access. Instagram briefly provisions the connection, then redirects you back to Invent.
## Step 8: Name the Connection in Invent
Instagram redirects you back to Invent and prompts you to label the new connection (for example, "Brand Sales DMs"). This is the name you will see inside Invent, it does not change anything on Instagram's side.
Click **Create** and Invent stores the connection in [Settings → Connections](/assistants/connections), where you can rename it or disconnect it at any time.
Pick a name that describes *which account this connection is for*, not who signed in. "Sales Instagram" or "EU Brand DMs" reads better in the channel list a year from now than "Alice's Instagram".
## Step 9: Pick the Connection
Back on the Instagram connect dialog, your new connection is already selected.
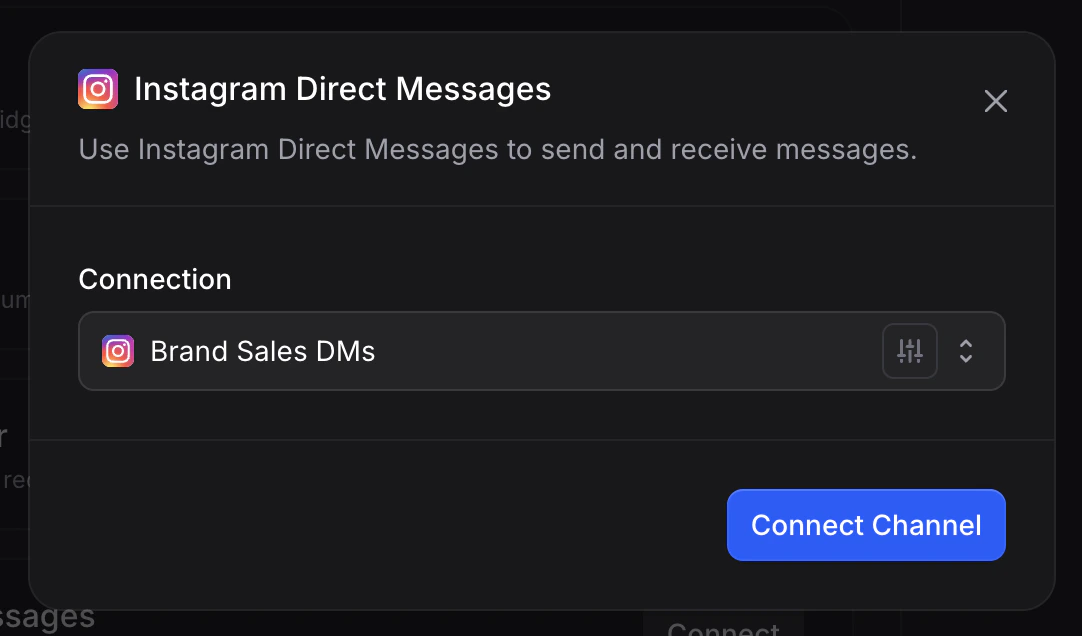 Each option in the dropdown shows the Instagram avatar and the connection name you gave it (or the username if you skipped naming), so you can tell sister accounts apart at a glance. Pick the connection this assistant should own if it is not already selected.
**One Instagram account, one assistant.** An Instagram account can only be bound to **one** assistant at a time. If two assistants need to share the same account, [AI routing](/assistants/routing) is usually a better pattern than splitting the inbox. Binding an account already attached to another Invent assistant overrides the previous binding and the new assistant takes over from the next message onwards.
Click **Connect Channel**. Behind the scenes Invent subscribes its webhook to the account, validates that the messaging permissions are healthy, and turns the channel on. Instagram now shows up in the assistant's Channels tab with an enable/disable toggle, a **Manage** button, and the Instagram username as its identifier.
## Step 10: Send a Test Message
Open Instagram on your personal device, search for the connected username (or open `instagram.com/` and tap **Message**), and send a DM. You should see your assistant reply within a few seconds. The conversation also appears in your [Inbox](/guides/inbox) immediately, with the originating account and the Instagram channel shown on the conversation.
That is it, the assistant is live on Instagram.
## Connecting More Accounts
You can add additional Instagram accounts to the same assistant at any time. From the Channels tab, click **+ Add another** under the Instagram section and either:
* **Pick another account from the same connection** (rare, since each Instagram login covers one account), or
* **Connect a new account** by opening the Connection dropdown and choosing **Connect Instagram** again. This is the path you will take most often, because each Instagram account needs its own login.
Each account runs in parallel under the same assistant, sharing the same Instructions, Knowledge, Memory, and Actions. Conversations are tagged with the originating account in the Inbox so your team always knows which brand or region a DM belongs to. See [Multiple Connections Per Channel](/assistants/channels#multiple-connections-per-channel) for common patterns.
## Reusing a Connection Across Assistants
Once an Instagram connection exists in your workspace, any assistant can pick it up from the **Connection** dropdown without going through the Instagram popup again. Authenticate once, reuse everywhere.
Manage every connection centrally from [Settings → Connections](/assistants/connections):
* **Rename** a connection to keep the list readable as you add more.
* **Reconnect** — open the connection with **Edit** and click **Reconnect** inside the dialog — if Instagram's session expires, the password is rotated, or the user revokes the integration from `instagram.com/accounts/manage_access`.
* **Disconnect** to remove the link entirely. Any assistant still using that connection stops sending and receiving until it is pointed at a new one.
## Troubleshooting
Nothing is saved until Instagram redirects back to Invent with a success. Click **Connect** on the channel again and run through the flow. Your account is already a professional account if you reached Step 4, so the second run will skip straight past the account-type screens.
Instagram sometimes prefers WhatsApp delivery on the registered phone number even when SMS would be faster. On the 2FA screen, click **Try another way** and switch to SMS or to an authenticator app. If the registered phone number is no longer in use, recover the account from `instagram.com/accounts/login/` first, update the phone number, then retry the connect flow.
Instagram occasionally rejects the switch when the account is too new (less than \~24 hours old) or has triggered an integrity check. Wait a few hours, sign in to Instagram on the mobile app, complete any verification prompts shown there (email confirmation, phone confirmation), and try the connect flow again from Invent.
The most common cause is that **Allow access to messages** was toggled off on the permissions screen in [Step 7](#step-7-review-permissions-and-confirm). Open [Settings → Connections](/assistants/connections), click **Fix** (or **Edit**) on the Instagram connection, then **Reconnect** inside the dialog, and confirm both **Allow access to messages** and **Access and manage messages** are ON when you reach the permissions screen this time.
A second cause is that DMs from non-followers are restricted on the account. Open Instagram → **Settings → Privacy → Messages** and make sure your message controls allow DMs from the audience you expect.
Instagram's access token has expired or was revoked. Common reasons: the password was rotated, the integration was removed from `instagram.com/accounts/manage_access`, or the account was switched back to Personal (which strips messaging access). Open [Settings → Connections](/assistants/connections), find the Instagram connection, click **Fix** (or **Edit**), then **Reconnect** inside the dialog to run a short re-authentication flow. Channels bound to that connection start working again as soon as the reconnection finishes.
Instagram blocks promotional content sent outside the 24-hour window. To re-engage a customer who went quiet for longer than that, your message must fit a [Message Tag](https://developers.facebook.com/docs/messenger-platform/instagram/features/message-tags) (such as `POST_PURCHASE_UPDATE` or `ACCOUNT_UPDATE`) and the content must match what that tag allows. Use [Auto Follow-ups](/guides/auto-follow-ups) for in-window re-engagement, or reply manually as a human agent through the Inbox using the appropriate tag.
Instagram hides identifying information for accounts with restricted profile visibility, accounts under 18, or customers who interact through certain regional entry points. The conversation works end-to-end; the assistant just does not have a name to use until the customer shares it. You can prompt for it from your Instructions, for example: *"If you do not know the customer's name, ask for it the first time you reply, then save it to memory."*
Instagram supports only **one active messaging integration per account at a time**. If a partner needs to manage the inbox from a different workspace, they have to run the connect flow on their own Invent workspace and bind the same account, which overrides the previous binding. Coordinate with the partner before switching, or use a second Instagram account so each tool can stay active independently.
## Next Steps
See the universal connection flow that every channel uses
Manage every authenticated link, including Instagram, in one place
See everything your assistant can send and receive on Instagram
Capture referrals from Instagram ads, products, and Story mentions on every conversation
Each option in the dropdown shows the Instagram avatar and the connection name you gave it (or the username if you skipped naming), so you can tell sister accounts apart at a glance. Pick the connection this assistant should own if it is not already selected.
**One Instagram account, one assistant.** An Instagram account can only be bound to **one** assistant at a time. If two assistants need to share the same account, [AI routing](/assistants/routing) is usually a better pattern than splitting the inbox. Binding an account already attached to another Invent assistant overrides the previous binding and the new assistant takes over from the next message onwards.
Click **Connect Channel**. Behind the scenes Invent subscribes its webhook to the account, validates that the messaging permissions are healthy, and turns the channel on. Instagram now shows up in the assistant's Channels tab with an enable/disable toggle, a **Manage** button, and the Instagram username as its identifier.
## Step 10: Send a Test Message
Open Instagram on your personal device, search for the connected username (or open `instagram.com/` and tap **Message**), and send a DM. You should see your assistant reply within a few seconds. The conversation also appears in your [Inbox](/guides/inbox) immediately, with the originating account and the Instagram channel shown on the conversation.
That is it, the assistant is live on Instagram.
## Connecting More Accounts
You can add additional Instagram accounts to the same assistant at any time. From the Channels tab, click **+ Add another** under the Instagram section and either:
* **Pick another account from the same connection** (rare, since each Instagram login covers one account), or
* **Connect a new account** by opening the Connection dropdown and choosing **Connect Instagram** again. This is the path you will take most often, because each Instagram account needs its own login.
Each account runs in parallel under the same assistant, sharing the same Instructions, Knowledge, Memory, and Actions. Conversations are tagged with the originating account in the Inbox so your team always knows which brand or region a DM belongs to. See [Multiple Connections Per Channel](/assistants/channels#multiple-connections-per-channel) for common patterns.
## Reusing a Connection Across Assistants
Once an Instagram connection exists in your workspace, any assistant can pick it up from the **Connection** dropdown without going through the Instagram popup again. Authenticate once, reuse everywhere.
Manage every connection centrally from [Settings → Connections](/assistants/connections):
* **Rename** a connection to keep the list readable as you add more.
* **Reconnect** — open the connection with **Edit** and click **Reconnect** inside the dialog — if Instagram's session expires, the password is rotated, or the user revokes the integration from `instagram.com/accounts/manage_access`.
* **Disconnect** to remove the link entirely. Any assistant still using that connection stops sending and receiving until it is pointed at a new one.
## Troubleshooting
Nothing is saved until Instagram redirects back to Invent with a success. Click **Connect** on the channel again and run through the flow. Your account is already a professional account if you reached Step 4, so the second run will skip straight past the account-type screens.
Instagram sometimes prefers WhatsApp delivery on the registered phone number even when SMS would be faster. On the 2FA screen, click **Try another way** and switch to SMS or to an authenticator app. If the registered phone number is no longer in use, recover the account from `instagram.com/accounts/login/` first, update the phone number, then retry the connect flow.
Instagram occasionally rejects the switch when the account is too new (less than \~24 hours old) or has triggered an integrity check. Wait a few hours, sign in to Instagram on the mobile app, complete any verification prompts shown there (email confirmation, phone confirmation), and try the connect flow again from Invent.
The most common cause is that **Allow access to messages** was toggled off on the permissions screen in [Step 7](#step-7-review-permissions-and-confirm). Open [Settings → Connections](/assistants/connections), click **Fix** (or **Edit**) on the Instagram connection, then **Reconnect** inside the dialog, and confirm both **Allow access to messages** and **Access and manage messages** are ON when you reach the permissions screen this time.
A second cause is that DMs from non-followers are restricted on the account. Open Instagram → **Settings → Privacy → Messages** and make sure your message controls allow DMs from the audience you expect.
Instagram's access token has expired or was revoked. Common reasons: the password was rotated, the integration was removed from `instagram.com/accounts/manage_access`, or the account was switched back to Personal (which strips messaging access). Open [Settings → Connections](/assistants/connections), find the Instagram connection, click **Fix** (or **Edit**), then **Reconnect** inside the dialog to run a short re-authentication flow. Channels bound to that connection start working again as soon as the reconnection finishes.
Instagram blocks promotional content sent outside the 24-hour window. To re-engage a customer who went quiet for longer than that, your message must fit a [Message Tag](https://developers.facebook.com/docs/messenger-platform/instagram/features/message-tags) (such as `POST_PURCHASE_UPDATE` or `ACCOUNT_UPDATE`) and the content must match what that tag allows. Use [Auto Follow-ups](/guides/auto-follow-ups) for in-window re-engagement, or reply manually as a human agent through the Inbox using the appropriate tag.
Instagram hides identifying information for accounts with restricted profile visibility, accounts under 18, or customers who interact through certain regional entry points. The conversation works end-to-end; the assistant just does not have a name to use until the customer shares it. You can prompt for it from your Instructions, for example: *"If you do not know the customer's name, ask for it the first time you reply, then save it to memory."*
Instagram supports only **one active messaging integration per account at a time**. If a partner needs to manage the inbox from a different workspace, they have to run the connect flow on their own Invent workspace and bind the same account, which overrides the previous binding. Coordinate with the partner before switching, or use a second Instagram account so each tool can stay active independently.
## Next Steps
See the universal connection flow that every channel uses
Manage every authenticated link, including Instagram, in one place
See everything your assistant can send and receive on Instagram
Capture referrals from Instagram ads, products, and Story mentions on every conversation