> ## Documentation Index
> Fetch the complete documentation index at: https://docs.useinvent.com/llms.txt
> Use this file to discover all available pages before exploring further.
# Contacts
> Manage your contacts, organize them into segments, and build targeted audiences for broadcasts
Every customer who has ever messaged your assistant through WhatsApp, Instagram, web chat, or any other channel is already part of your audience. The **Audience** page is where you manage these contacts, organize them into segments, and build the foundation for powerful broadcasts.
*Think about it: every person who reaches out to your business through any channel becomes a contact you can re-engage later. Send them product updates via WhatsApp, promotions via email, or announcements across multiple channels at once.*
Your audience is the foundation for [Broadcasts](/guides/broadcasts/introduction). Organize contacts into segments here, then use those segments to send targeted messages at scale.
 The Audience section in the sidebar has three pages: **Contacts**, **[Segments](/guides/audience/segments)**, and **[Properties](/guides/audience/properties)**.
## Contacts
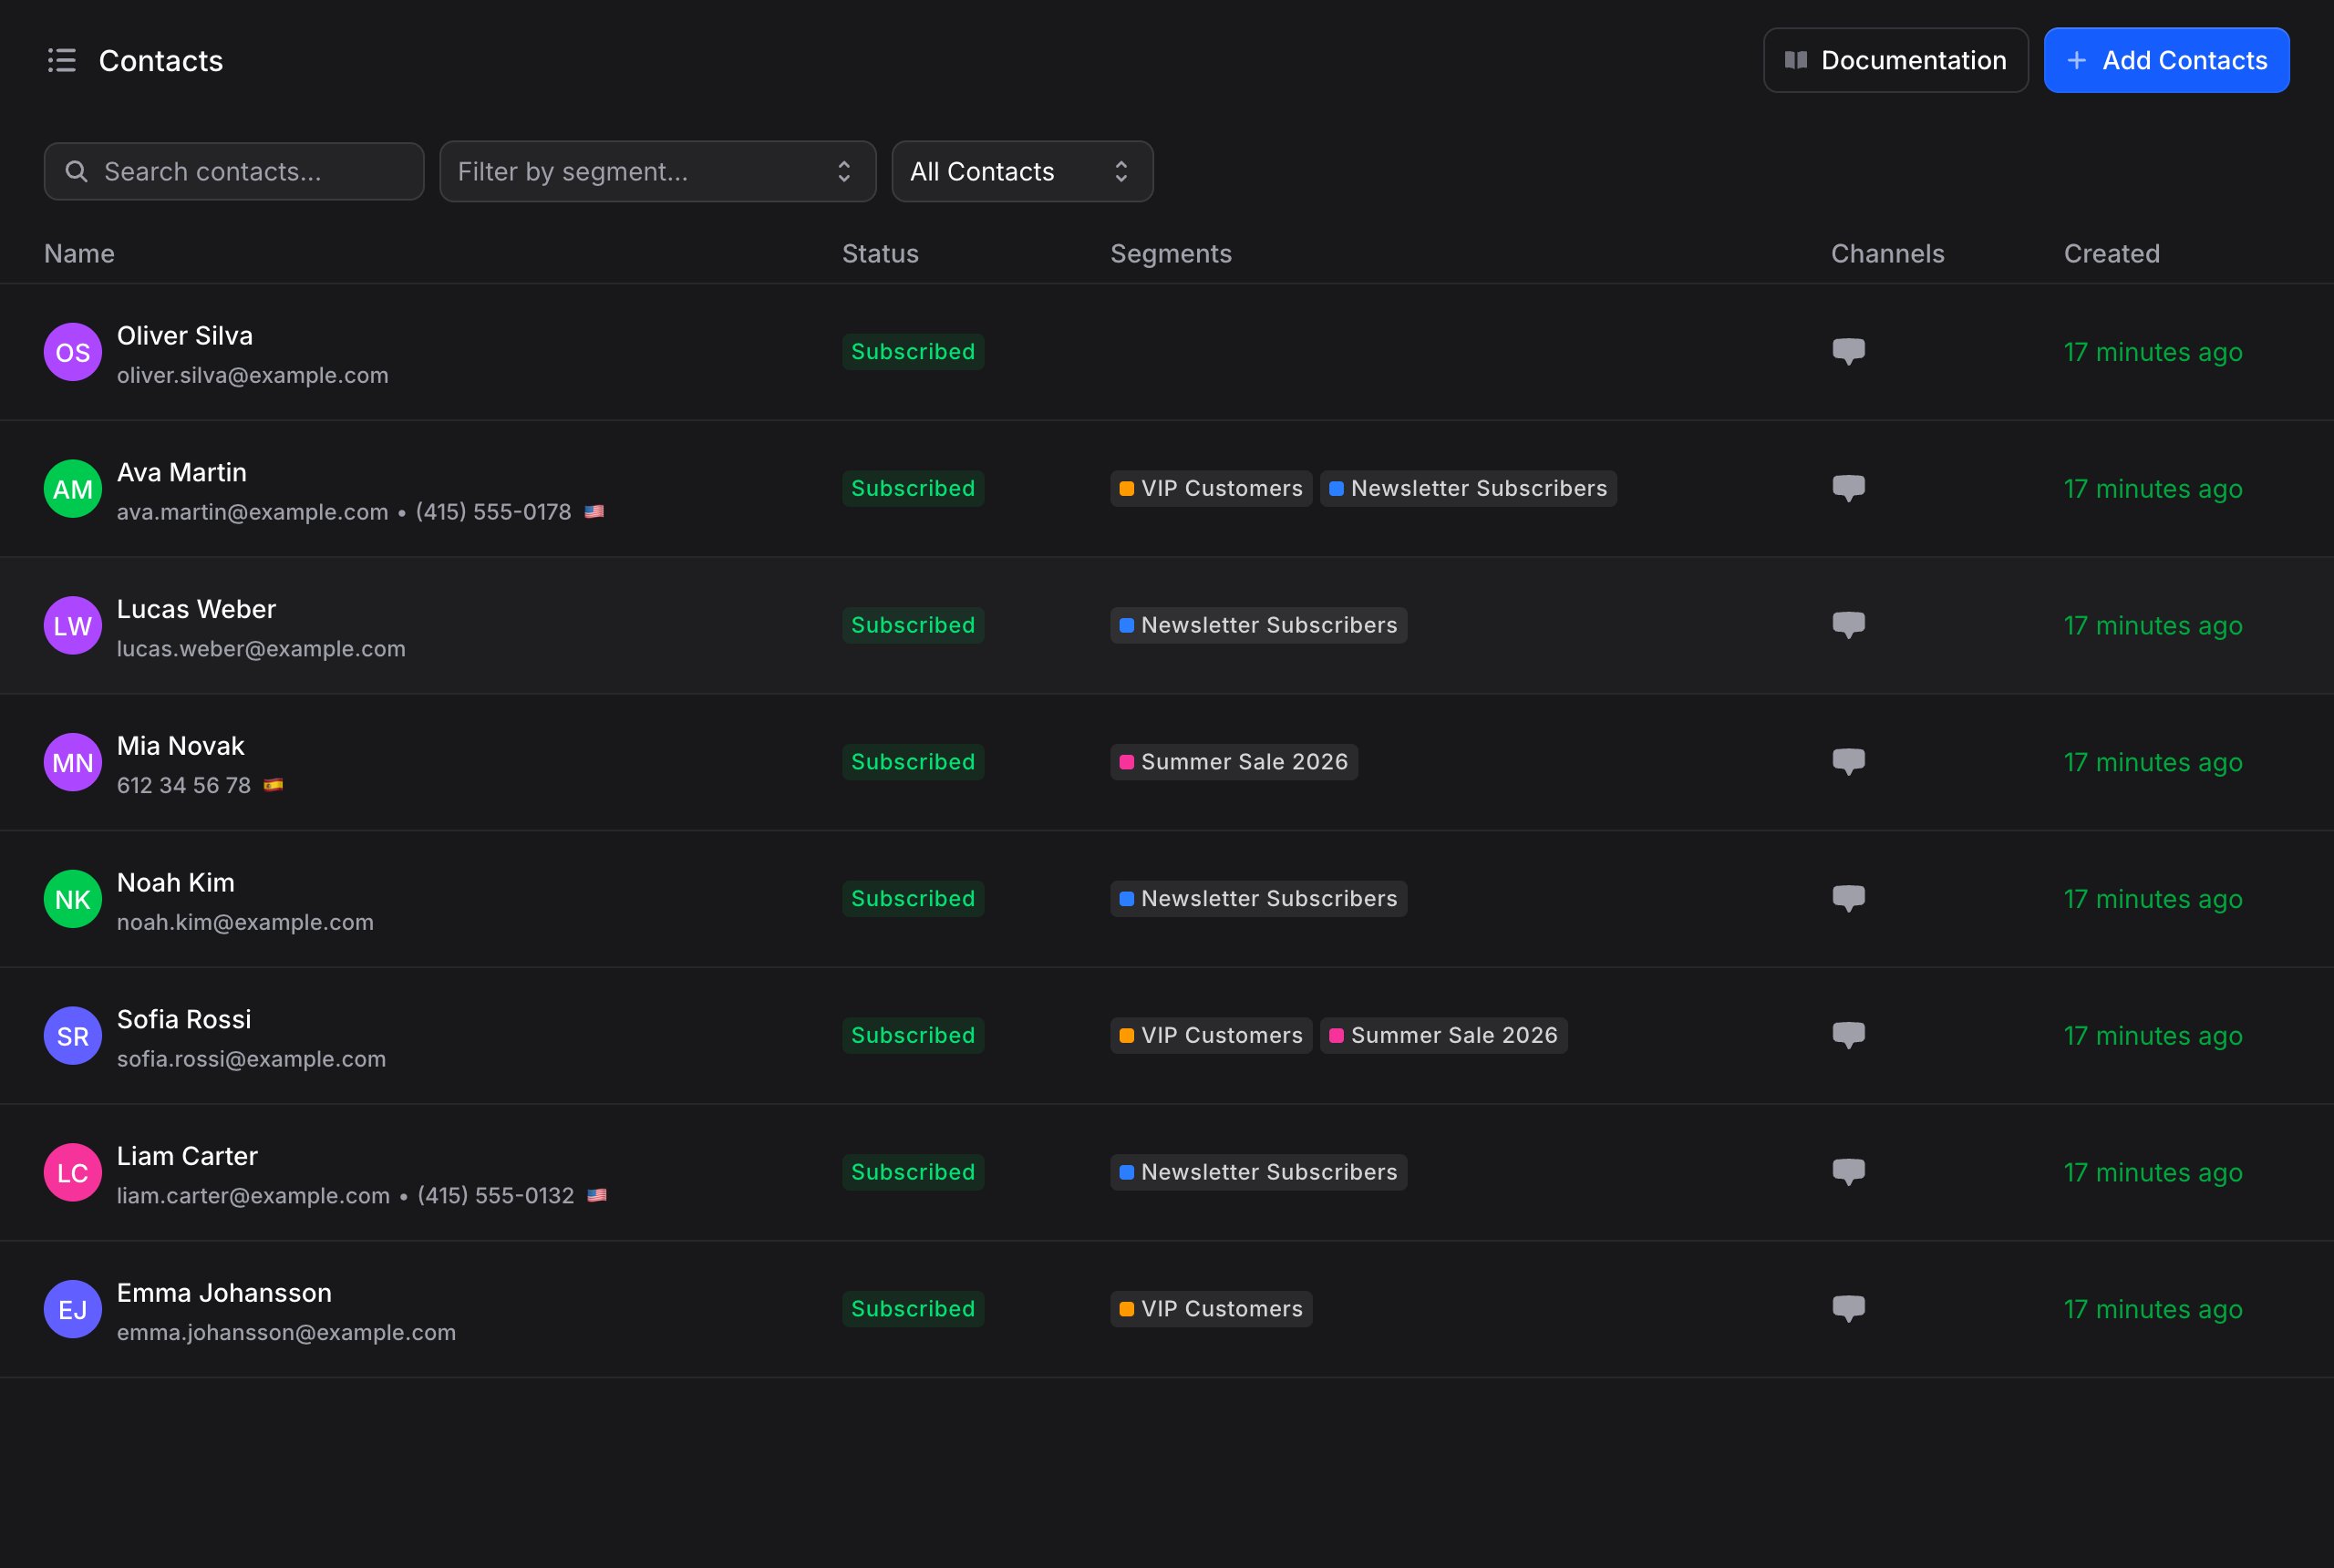
The Contacts page shows every person in your audience. Each contact displays:
* **Name and identifier**: The contact's name along with their email or phone number
* **Segments**: Any segments they belong to (shown as badges)
* **Channels**: Icons showing which channels they've interacted through (web chat, WhatsApp, Telegram, etc.)
* **Created date**: When the contact was first added
You can search for any contact by name using the search bar, or filter your list by segment using the **Filter by segment** dropdown.
### Adding Contacts
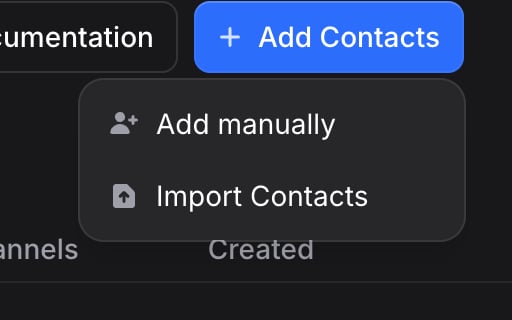
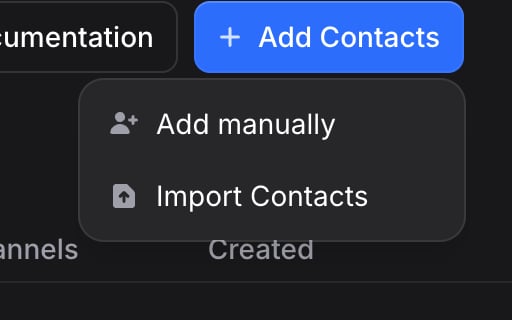
Click **+ Add Contacts** in the top-right corner to see two options:
* **Add manually**: Create a single contact by entering their details
* **Import Contacts**: Bulk import contacts from a CSV or Excel file
#### Add Manually
To add a single contact:
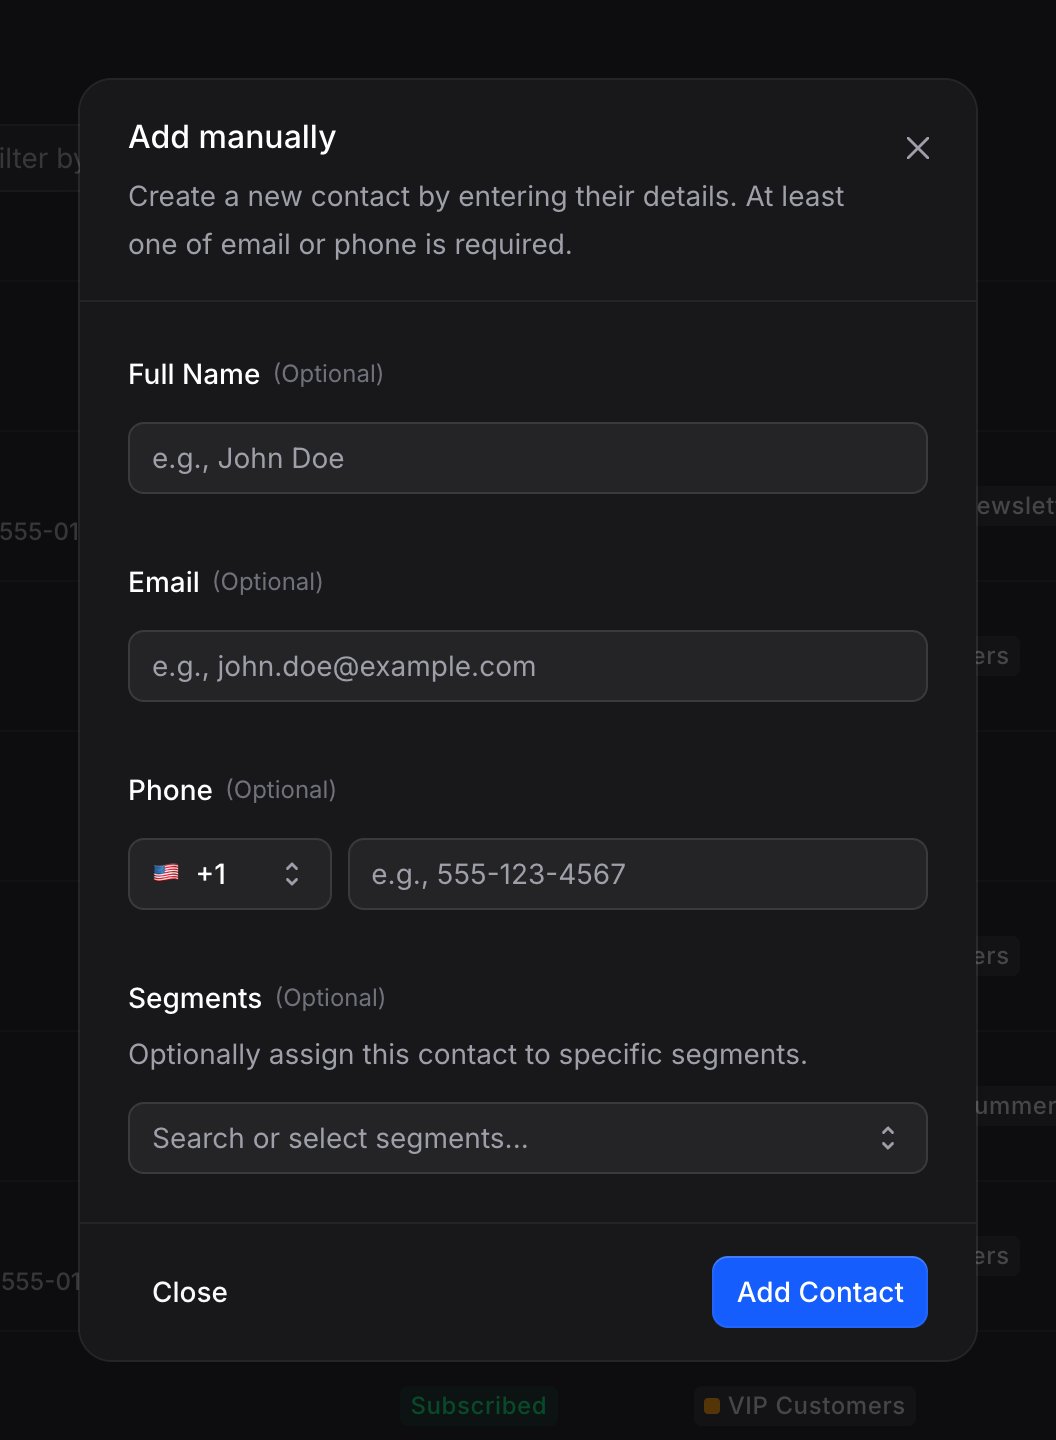
A dialog opens with fields for the contact's information.
Fill in the following fields:
* **Full Name** (Optional): The contact's display name
* **Email** (Optional): Their email address
* **Phone** (Optional): Their phone number with country code selector
At least one of Email or Phone is required.
Use the **Segments** dropdown to assign this contact to one or more segments. You can search and select from your existing segments.
The contact is created and appears in your contacts list immediately.
The Audience section in the sidebar has three pages: **Contacts**, **[Segments](/guides/audience/segments)**, and **[Properties](/guides/audience/properties)**.
## Contacts
The Contacts page shows every person in your audience. Each contact displays:
* **Name and identifier**: The contact's name along with their email or phone number
* **Segments**: Any segments they belong to (shown as badges)
* **Channels**: Icons showing which channels they've interacted through (web chat, WhatsApp, Telegram, etc.)
* **Created date**: When the contact was first added
You can search for any contact by name using the search bar, or filter your list by segment using the **Filter by segment** dropdown.
### Adding Contacts
Click **+ Add Contacts** in the top-right corner to see two options:
* **Add manually**: Create a single contact by entering their details
* **Import Contacts**: Bulk import contacts from a CSV or Excel file
#### Add Manually
To add a single contact:
A dialog opens with fields for the contact's information.
Fill in the following fields:
* **Full Name** (Optional): The contact's display name
* **Email** (Optional): Their email address
* **Phone** (Optional): Their phone number with country code selector
At least one of Email or Phone is required.
Use the **Segments** dropdown to assign this contact to one or more segments. You can search and select from your existing segments.
The contact is created and appears in your contacts list immediately.
 #### Import Contacts
 To import contacts in bulk from a spreadsheet:
The import page opens with a file upload area.
Drag and drop a **.csv**, **.xlsx**, or **.xls** file into the upload area, or click to browse. The first row of your file should contain column headers (like "Full Name", "Email", "Phone").
Click **Download sample CSV** at the bottom to get a template file with the correct format.
To import contacts in bulk from a spreadsheet:
The import page opens with a file upload area.
Drag and drop a **.csv**, **.xlsx**, or **.xls** file into the upload area, or click to browse. The first row of your file should contain column headers (like "Full Name", "Email", "Phone").
Click **Download sample CSV** at the bottom to get a template file with the correct format.
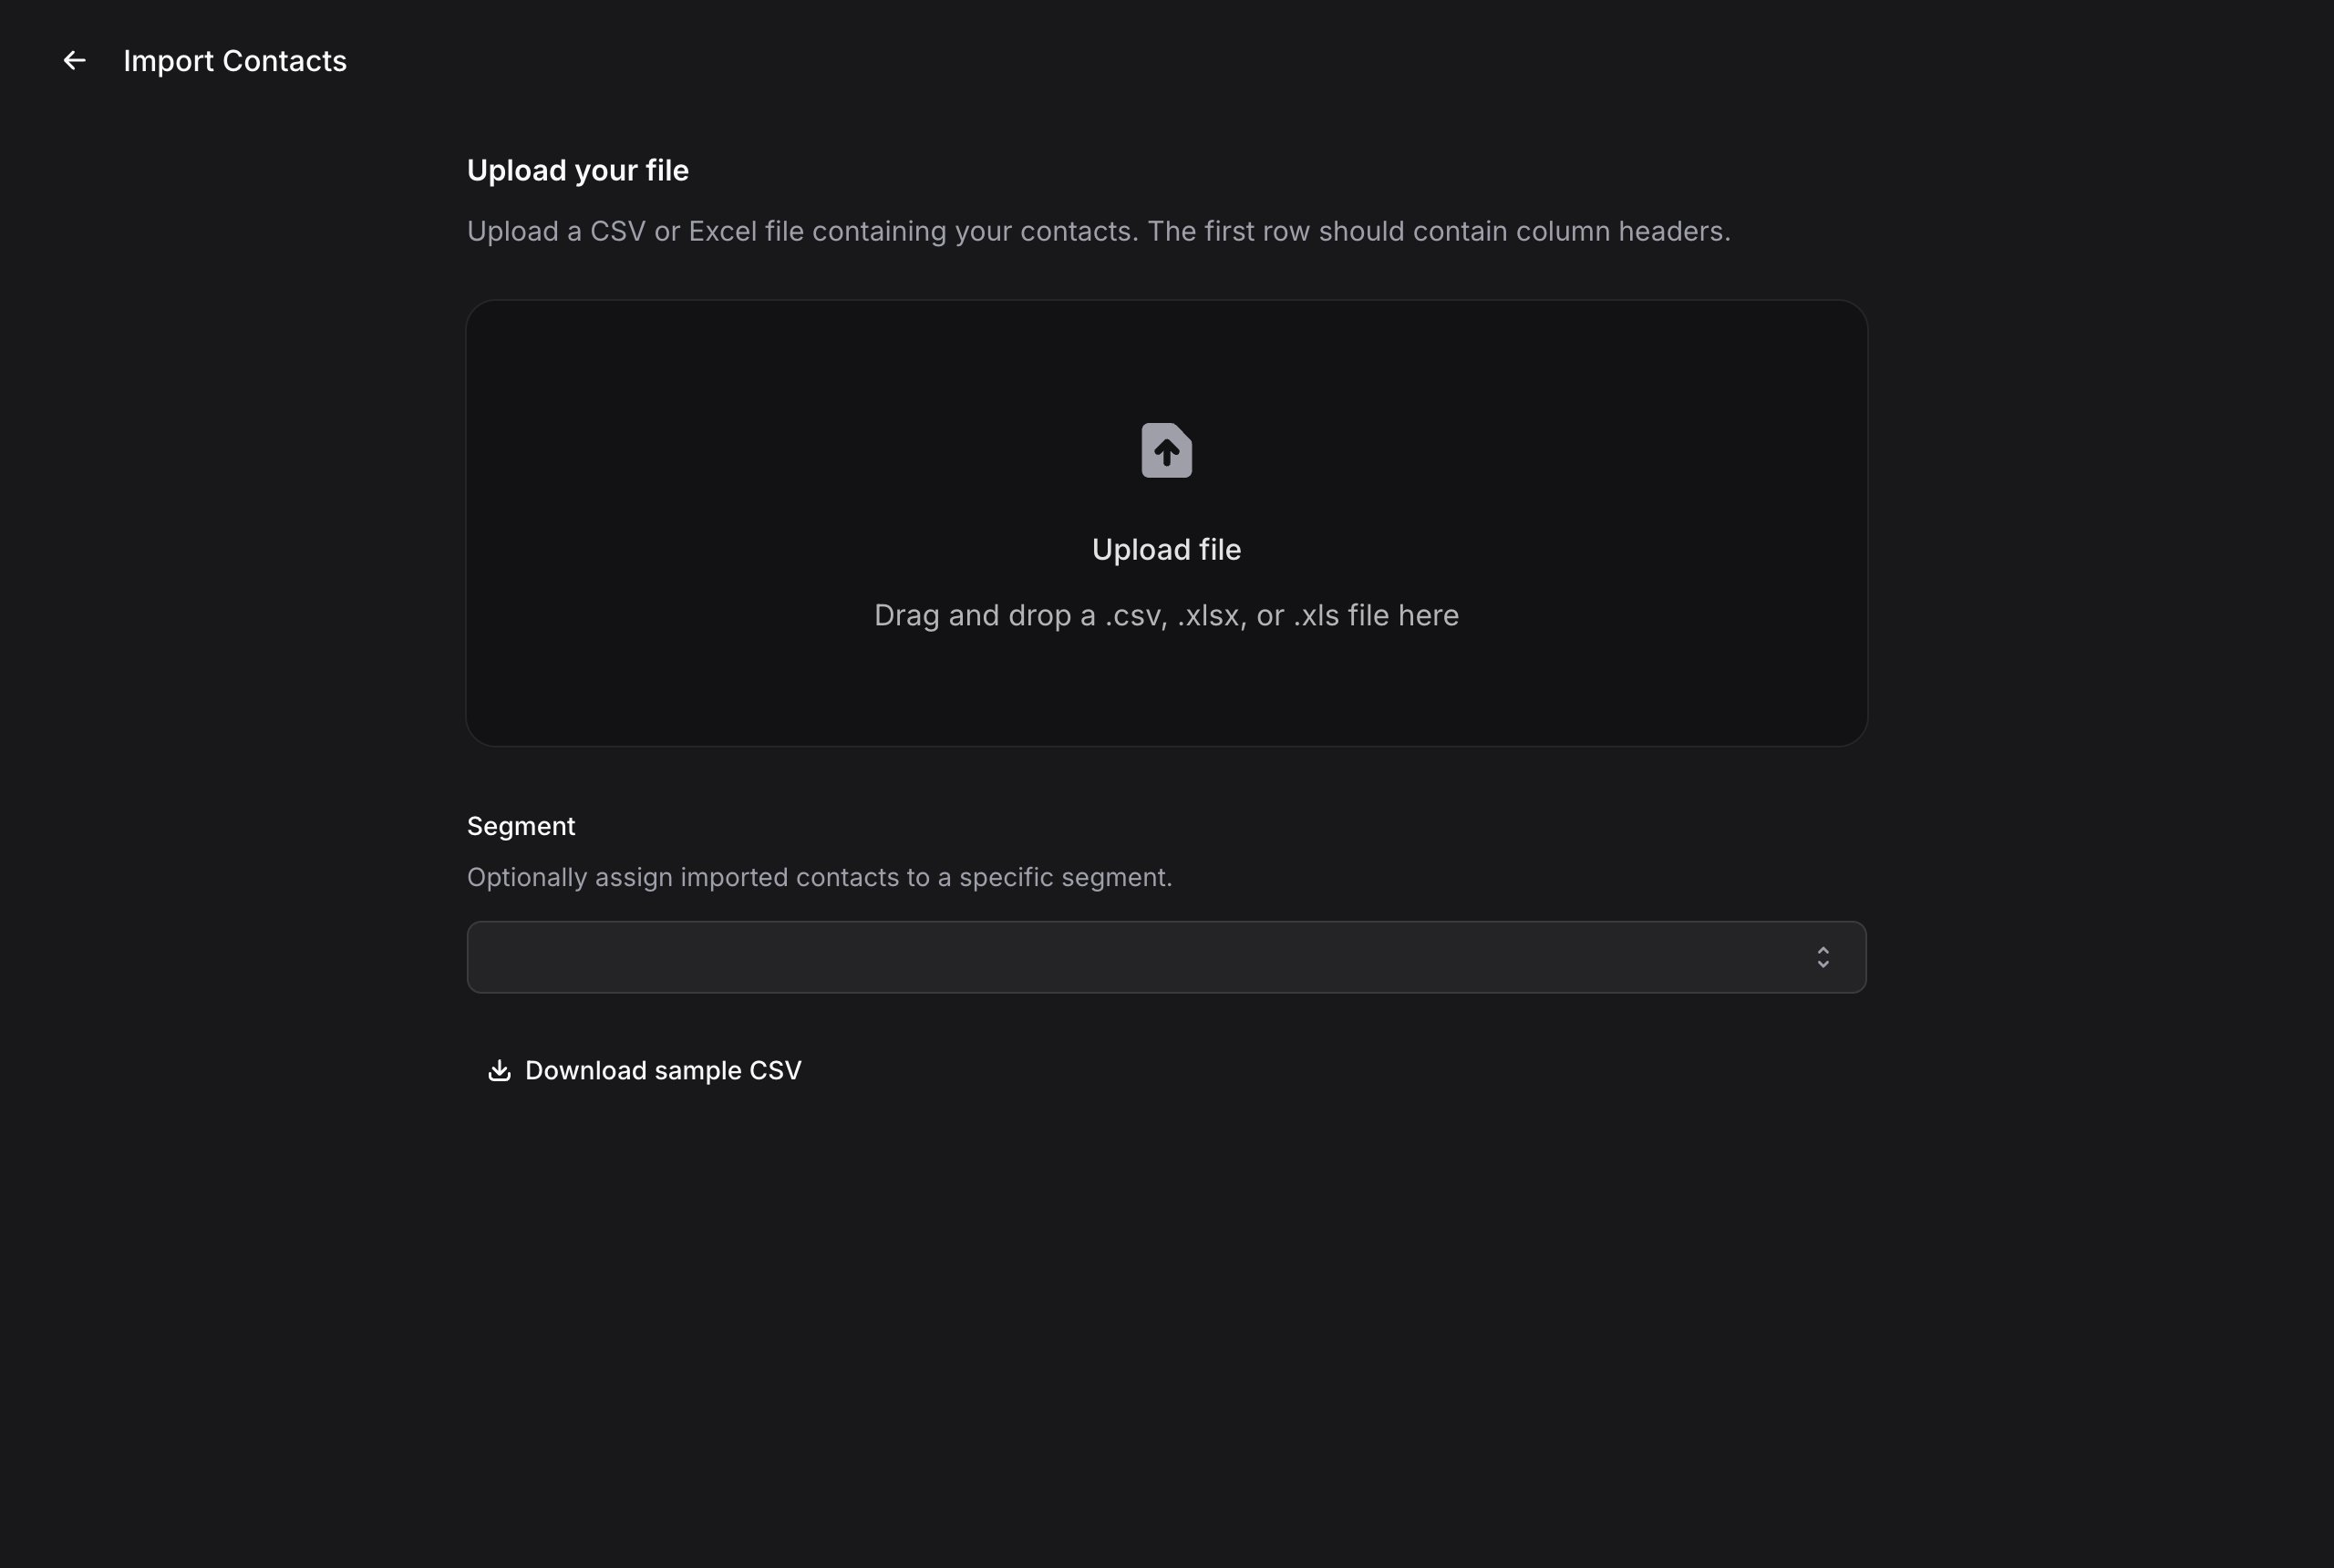 Below the upload area, you can optionally assign all imported contacts to a specific segment using the **Segment** dropdown.
After uploading, Invent shows a mapping table with three columns:
| Column | Description |
| ---------------- | ------------------------------------ |
| **CSV Column** | The column name from your file |
| **Sample Data** | A preview of the data in that column |
| **Map to Field** | The Invent field to map it to |
For each column, choose a mapping:
* **Do not import**: Skip this column entirely
* **Full Name**: Map to the contact's full name
* **First Name**: Map to the contact's first name
* **Last Name**: Map to the contact's last name
* **Email**: Map to the contact's email address
* **Phone**: Map to the contact's phone number
At least one of **Email** or **Phone** must be mapped to continue. Name is optional.
Below the upload area, you can optionally assign all imported contacts to a specific segment using the **Segment** dropdown.
After uploading, Invent shows a mapping table with three columns:
| Column | Description |
| ---------------- | ------------------------------------ |
| **CSV Column** | The column name from your file |
| **Sample Data** | A preview of the data in that column |
| **Map to Field** | The Invent field to map it to |
For each column, choose a mapping:
* **Do not import**: Skip this column entirely
* **Full Name**: Map to the contact's full name
* **First Name**: Map to the contact's first name
* **Last Name**: Map to the contact's last name
* **Email**: Map to the contact's email address
* **Phone**: Map to the contact's phone number
At least one of **Email** or **Phone** must be mapped to continue. Name is optional.
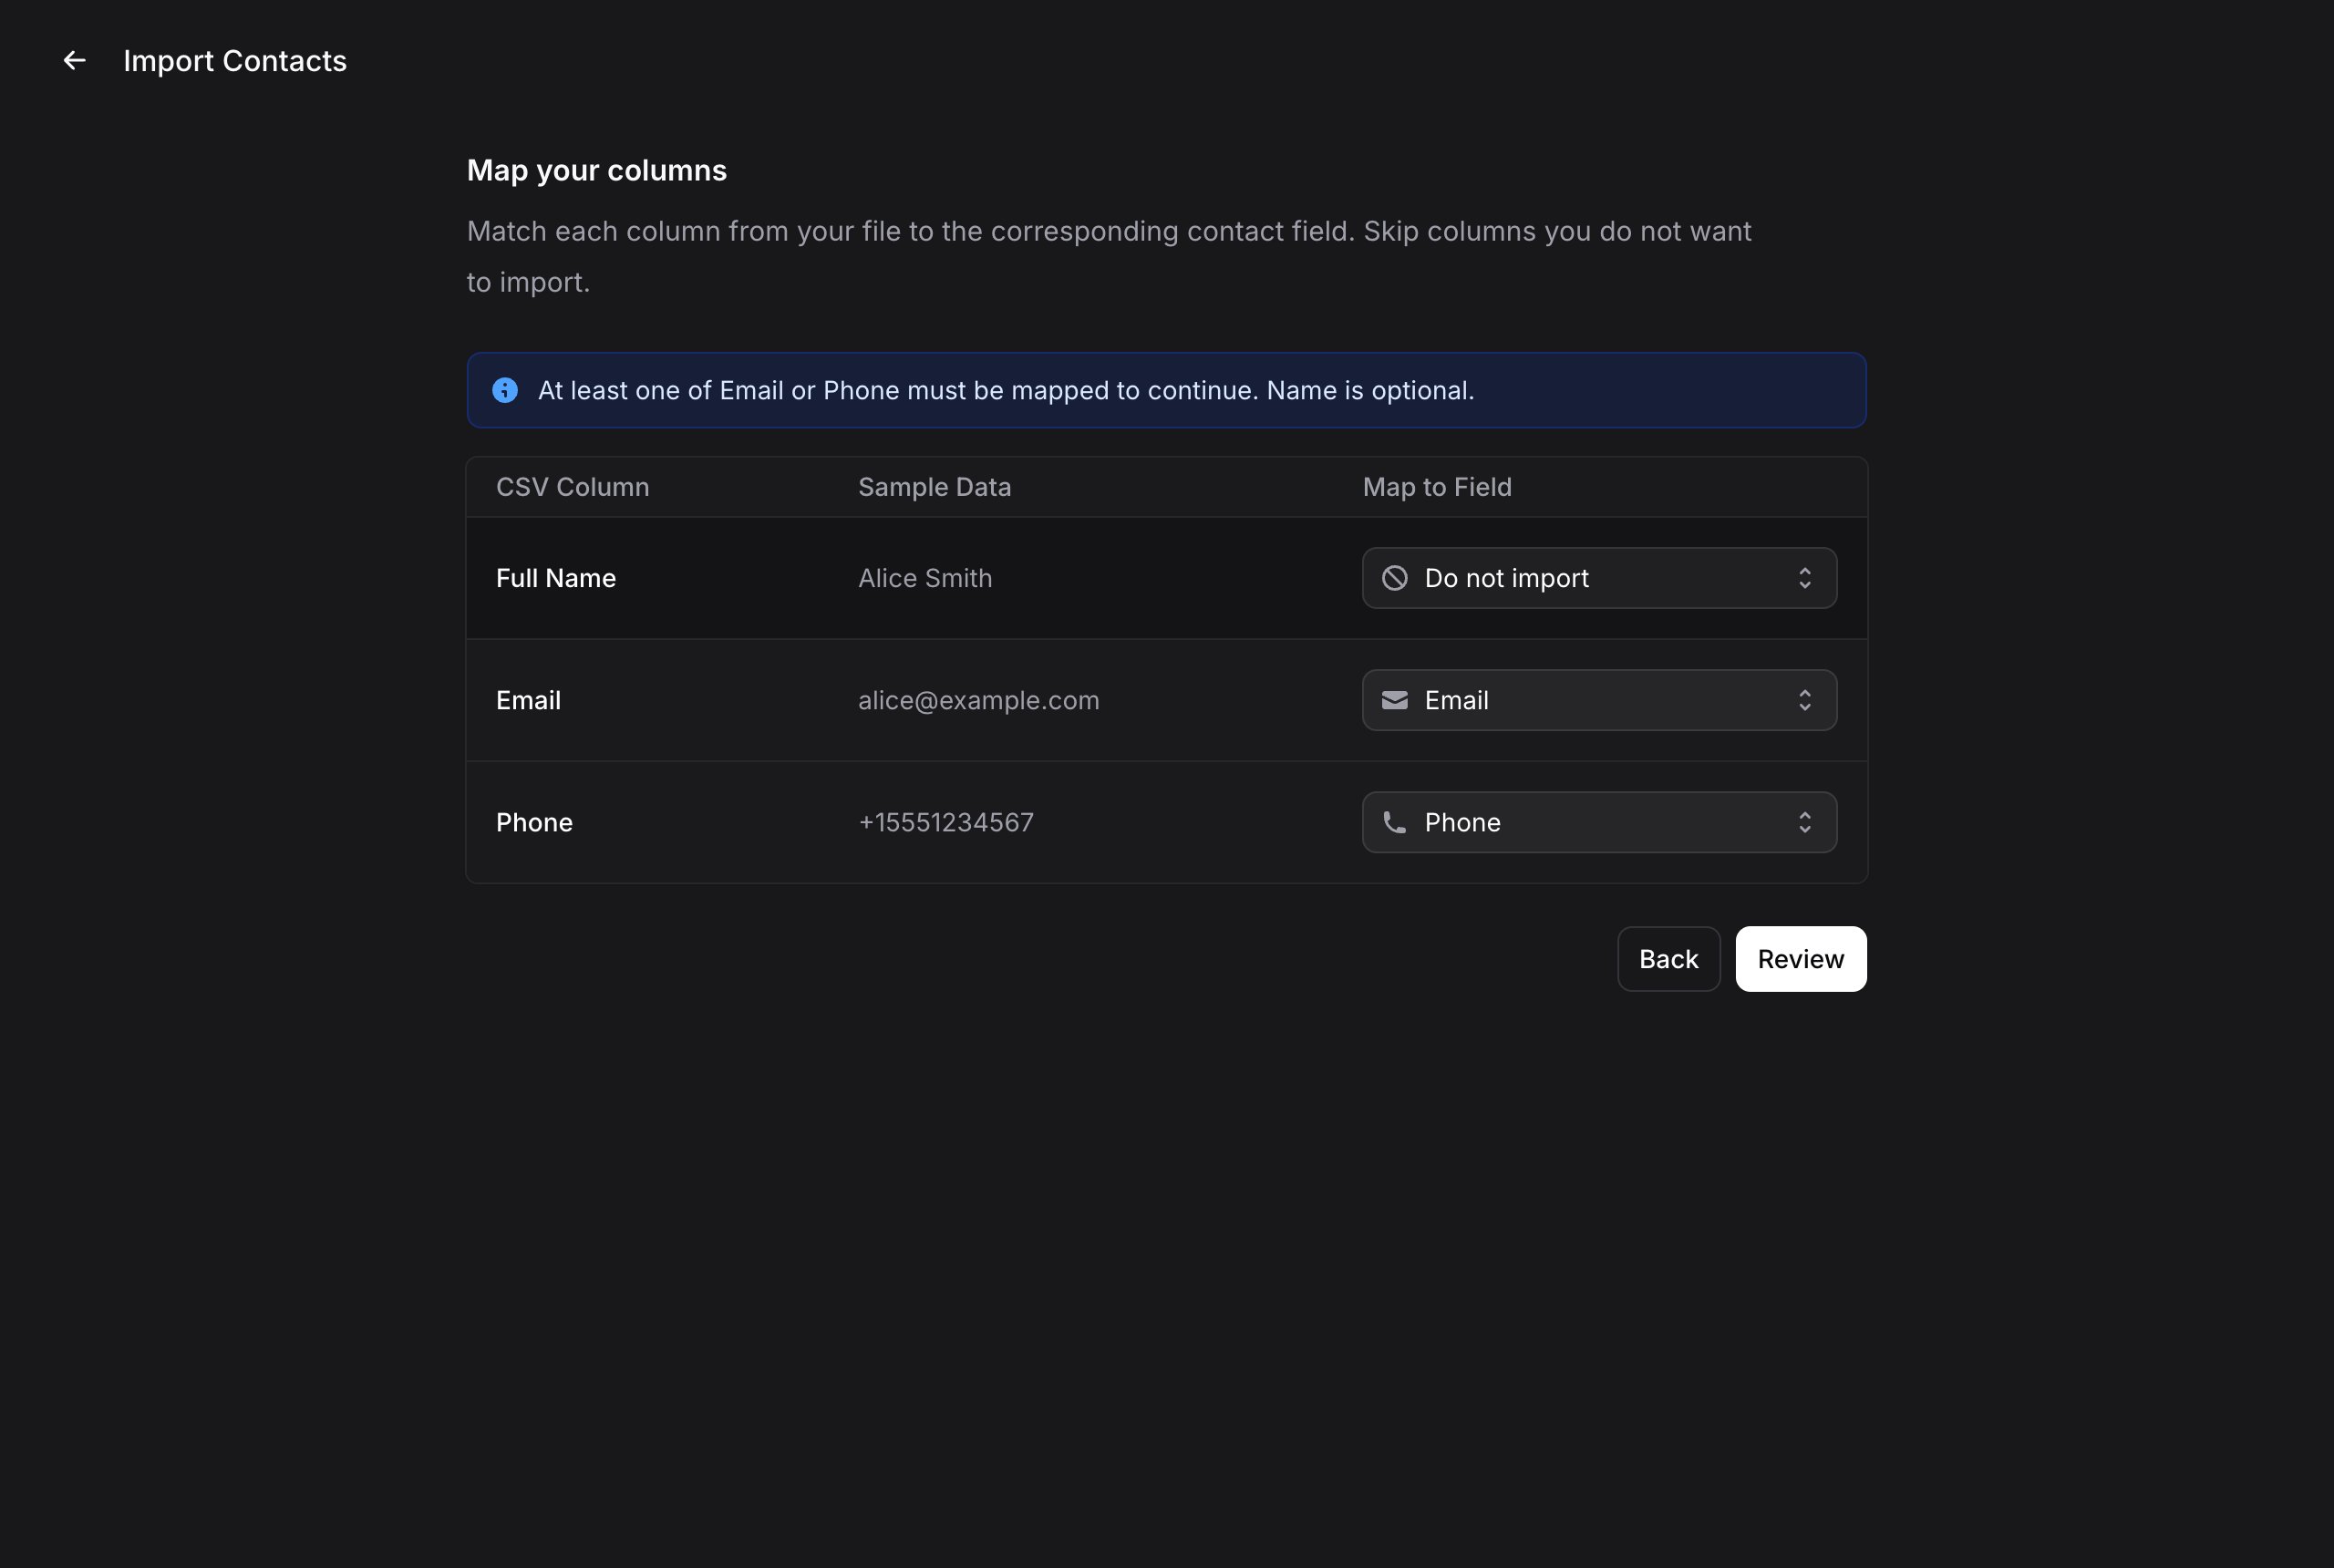 Click **Review** to see a preview table of all the contacts that will be imported. Verify the data looks correct before proceeding.
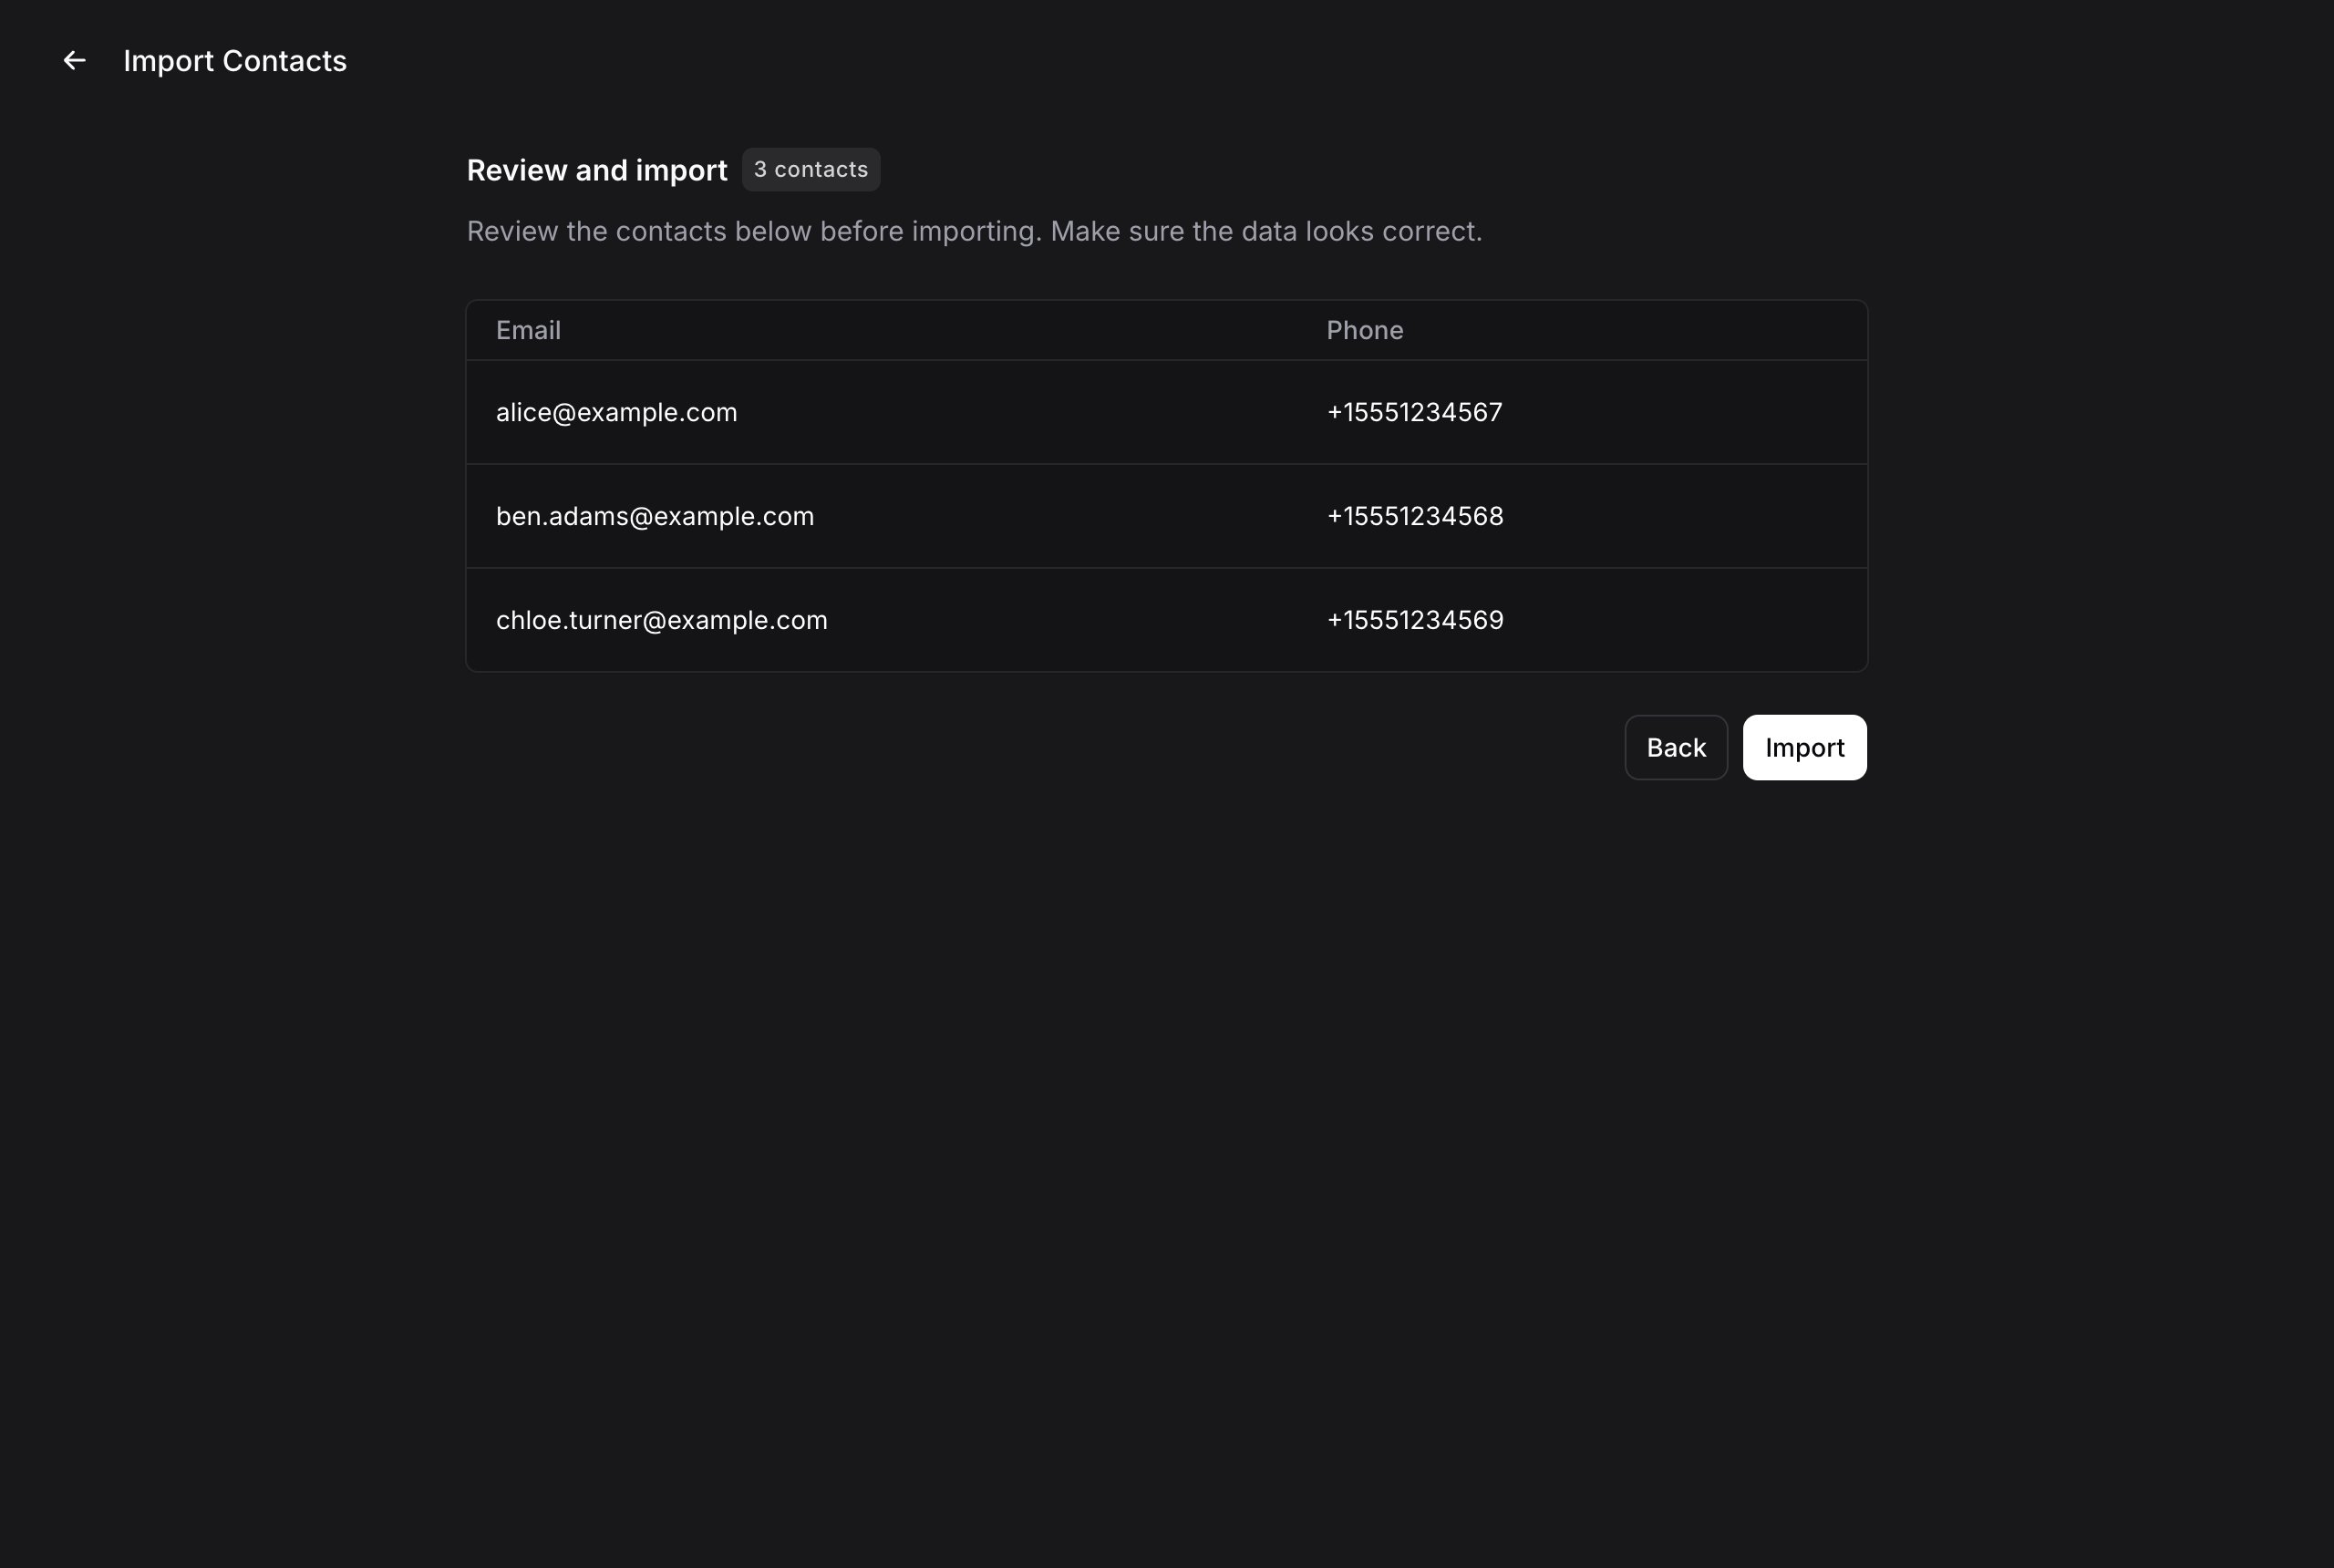 Click **Import**. A confirmation dialog appears asking you to confirm that you have obtained appropriate consent to send messages to these contacts in compliance with applicable laws and regulations.
Click **Import** to confirm, and your contacts are added to the audience.
Once the import completes, you'll see a success message confirming how many contacts were imported (e.g., "3 contacts imported successfully").
### Contact Profile
Click on any contact in the list to open their profile panel on the right side. The profile shows everything Invent knows about this person:
**Segments**
The segments this contact belongs to. You can add or remove segments directly from here by clicking the segment dropdown. Remove a segment by clicking the **x** next to its name.
**Profile**
Detailed contact information including:
* **Name**: The contact's display name (click the pencil icon to edit)
* **User ID**: Their unique identifier in the system
* **Country**: Detected country with flag
* **Phone**: Phone number with channel icon (e.g., WhatsApp)
* **Link**: Direct link to message them (e.g., a `wa.me` link for WhatsApp contacts)
**Properties**
The values of your custom [contact properties](/guides/audience/properties) (e.g., a loyalty tier or a marketing opt-in), editable inline.
**Conversations**
A history of all conversations this contact has had with your assistants, showing the status (resolved or active) and the last message.
**Broadcasts**
A list of all broadcasts this contact has received, along with their engagement status (e.g., "Opened") and the broadcast name.
Click the three-dot menu at the top of the contact profile for additional options like deleting the contact.
## Segments
Segments let you group contacts together for easy targeting. Instead of broadcasting to your entire audience, you can send messages to specific groups, like "VIP Customers", "Newsletter Subscribers", or "Beta Testers".
Click **Import**. A confirmation dialog appears asking you to confirm that you have obtained appropriate consent to send messages to these contacts in compliance with applicable laws and regulations.
Click **Import** to confirm, and your contacts are added to the audience.
Once the import completes, you'll see a success message confirming how many contacts were imported (e.g., "3 contacts imported successfully").
### Contact Profile
Click on any contact in the list to open their profile panel on the right side. The profile shows everything Invent knows about this person:
**Segments**
The segments this contact belongs to. You can add or remove segments directly from here by clicking the segment dropdown. Remove a segment by clicking the **x** next to its name.
**Profile**
Detailed contact information including:
* **Name**: The contact's display name (click the pencil icon to edit)
* **User ID**: Their unique identifier in the system
* **Country**: Detected country with flag
* **Phone**: Phone number with channel icon (e.g., WhatsApp)
* **Link**: Direct link to message them (e.g., a `wa.me` link for WhatsApp contacts)
**Properties**
The values of your custom [contact properties](/guides/audience/properties) (e.g., a loyalty tier or a marketing opt-in), editable inline.
**Conversations**
A history of all conversations this contact has had with your assistants, showing the status (resolved or active) and the last message.
**Broadcasts**
A list of all broadcasts this contact has received, along with their engagement status (e.g., "Opened") and the broadcast name.
Click the three-dot menu at the top of the contact profile for additional options like deleting the contact.
## Segments
Segments let you group contacts together for easy targeting. Instead of broadcasting to your entire audience, you can send messages to specific groups, like "VIP Customers", "Newsletter Subscribers", or "Beta Testers".
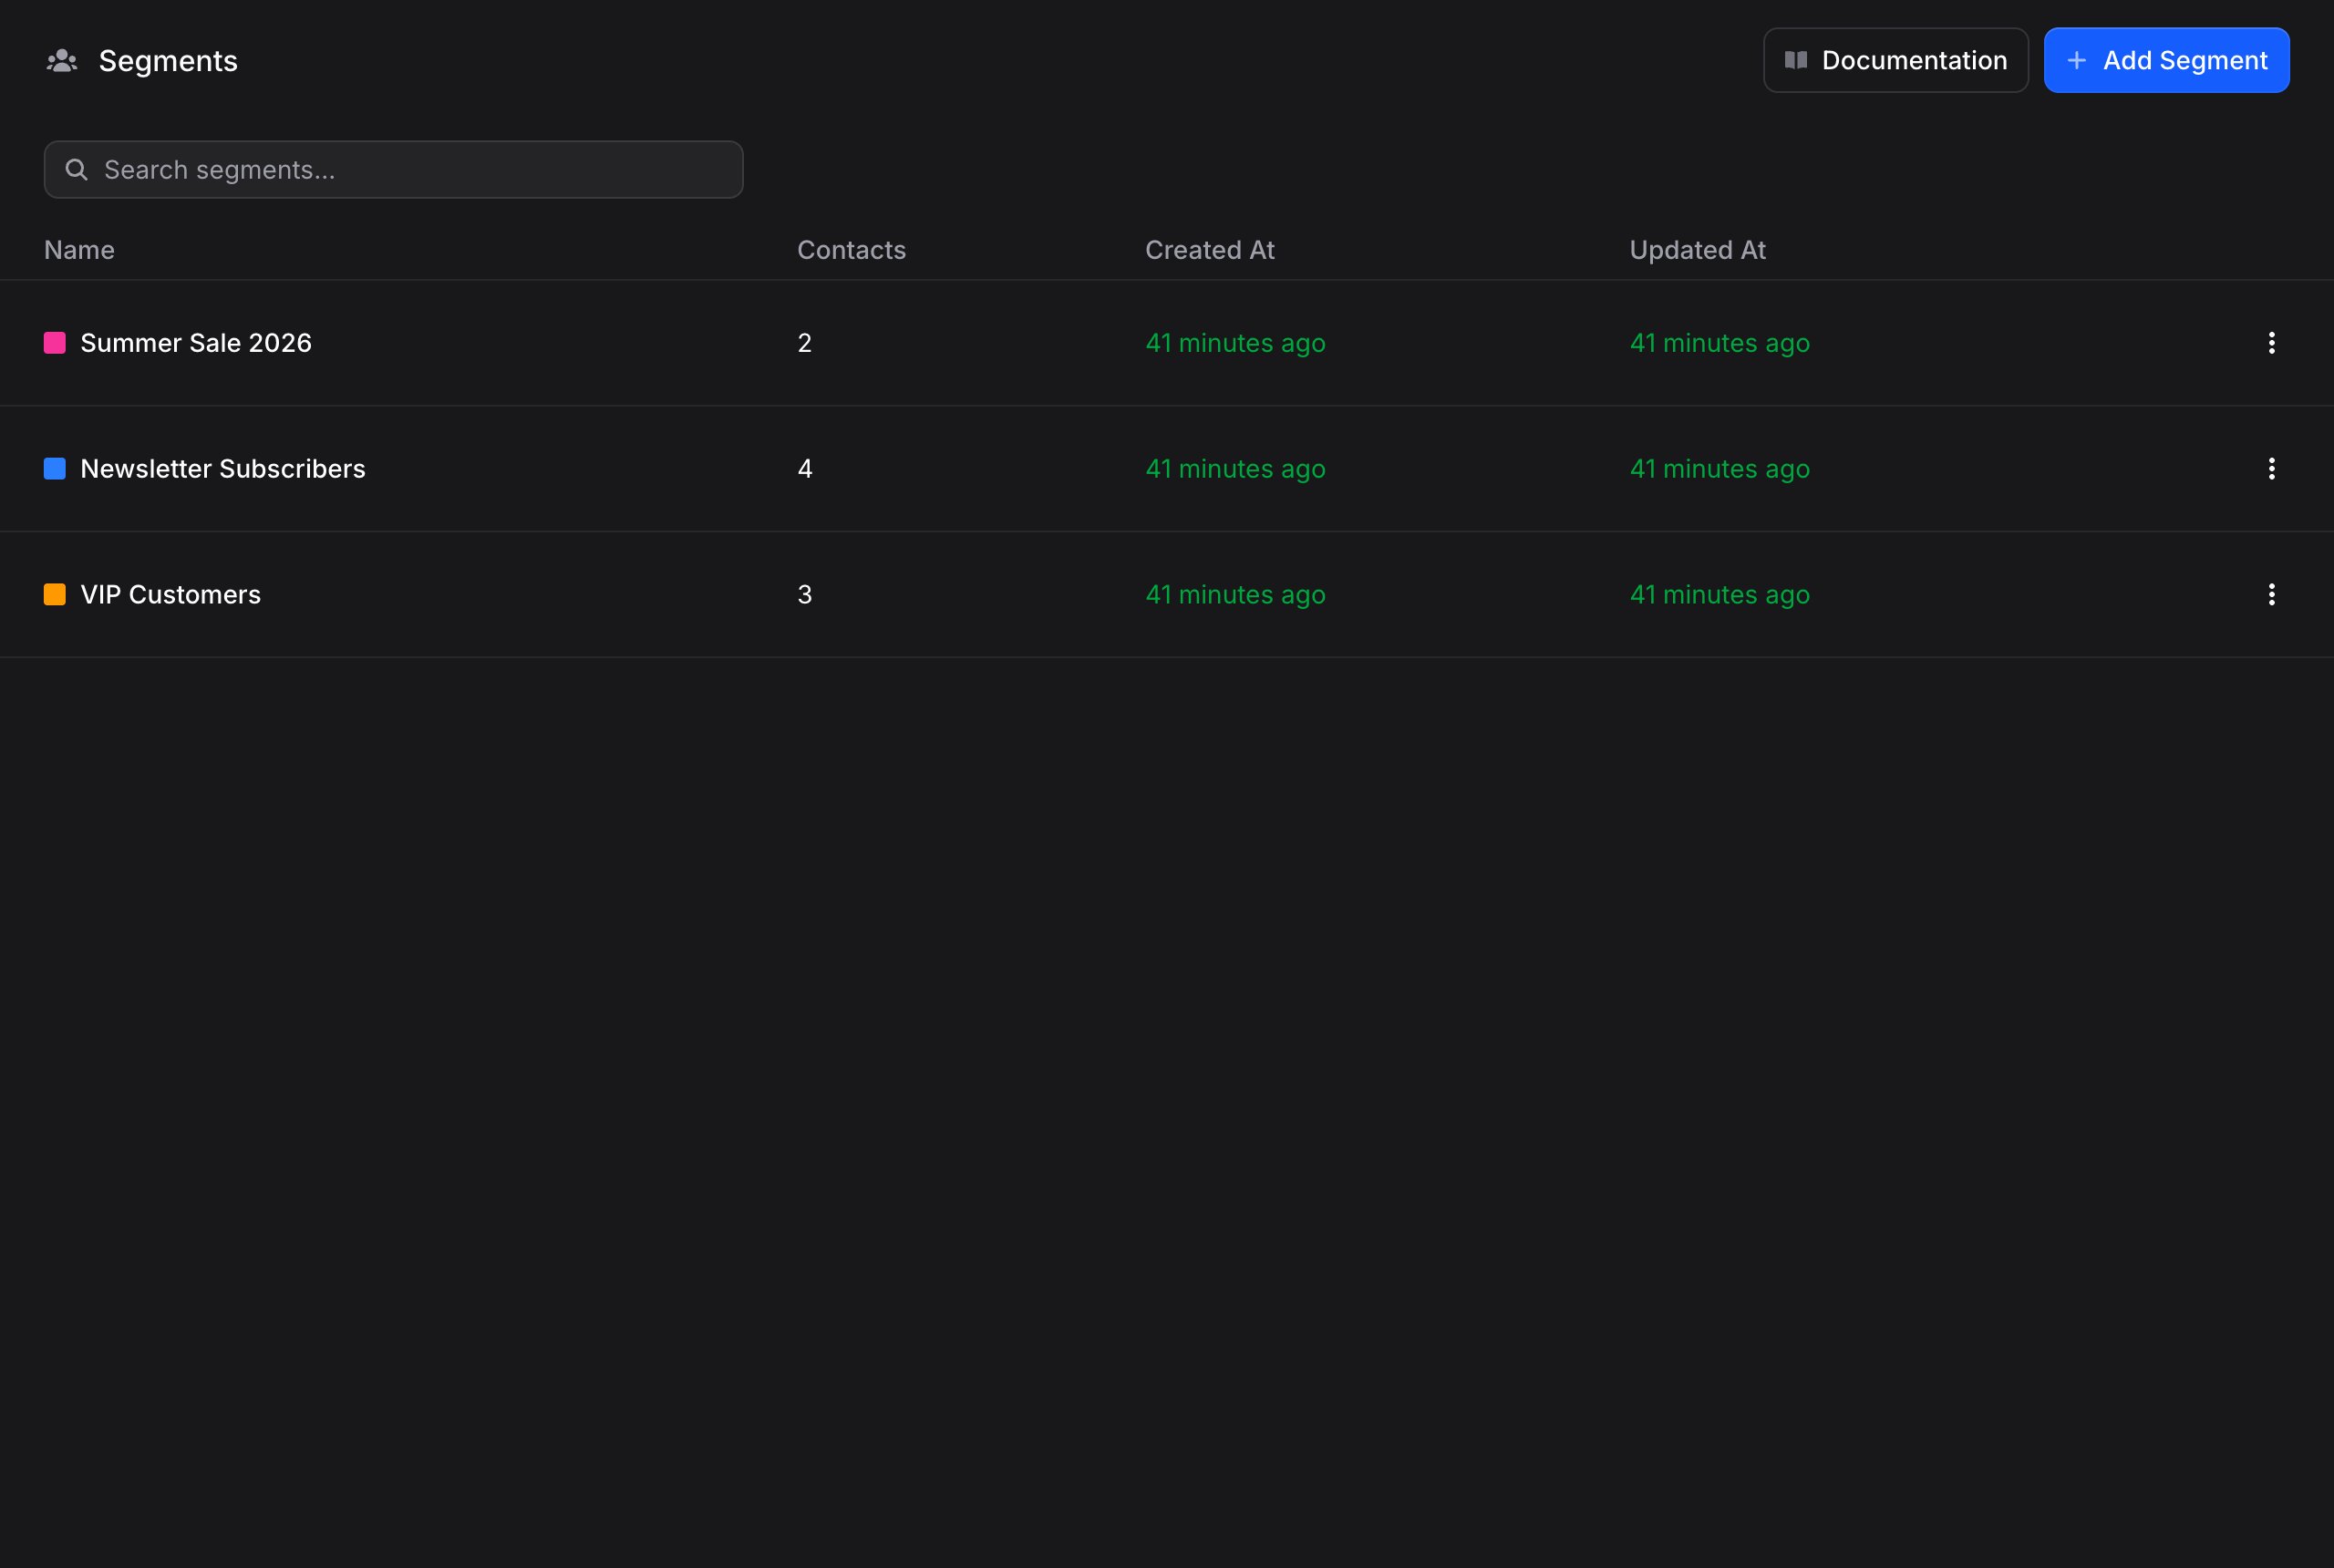 See the [Segments guide](/guides/audience/segments) for creating, managing, and filling segments.
## Properties
Properties are custom fields stored on every contact: a size preference, a loyalty tier, a renewal date. Define them once and they appear on every contact profile, ready to be filled manually, via the API, or automatically by your assistants.
See the [Properties guide](/guides/audience/properties) for the available types and how to manage them.
## Best Practices
1. **Create segments early**: Set up segments like "Promotions", "Product Updates", and "VIP" before you start broadcasting. This makes targeting much easier later
2. **Capture data with properties**: Define properties for the contact data your business cares about, and let assistants keep them up to date
3. **Keep your audience clean**: Regularly review and remove contacts who are no longer relevant
4. **Combine with broadcasts**: Segments are most powerful when used with broadcasts to send targeted messages to the right people at the right time
## Next Steps
Group contacts for targeted broadcasts
Store custom data on every contact
Send targeted messages to your audience via WhatsApp and more
Manage all customer conversations in one unified space
See the [Segments guide](/guides/audience/segments) for creating, managing, and filling segments.
## Properties
Properties are custom fields stored on every contact: a size preference, a loyalty tier, a renewal date. Define them once and they appear on every contact profile, ready to be filled manually, via the API, or automatically by your assistants.
See the [Properties guide](/guides/audience/properties) for the available types and how to manage them.
## Best Practices
1. **Create segments early**: Set up segments like "Promotions", "Product Updates", and "VIP" before you start broadcasting. This makes targeting much easier later
2. **Capture data with properties**: Define properties for the contact data your business cares about, and let assistants keep them up to date
3. **Keep your audience clean**: Regularly review and remove contacts who are no longer relevant
4. **Combine with broadcasts**: Segments are most powerful when used with broadcasts to send targeted messages to the right people at the right time
## Next Steps
Group contacts for targeted broadcasts
Store custom data on every contact
Send targeted messages to your audience via WhatsApp and more
Manage all customer conversations in one unified space