> ## Documentation Index
> Fetch the complete documentation index at: https://docs.useinvent.com/llms.txt
> Use this file to discover all available pages before exploring further.
# Properties
> Define custom fields that store extra information on every contact
Properties are custom fields stored on every contact. Out of the box, a contact has a name, email, and phone. Properties let you capture everything else your business cares about: a size preference, a loyalty tier, a renewal date, a marketing opt-in.
Open **Audience → Properties** in the sidebar to manage them.
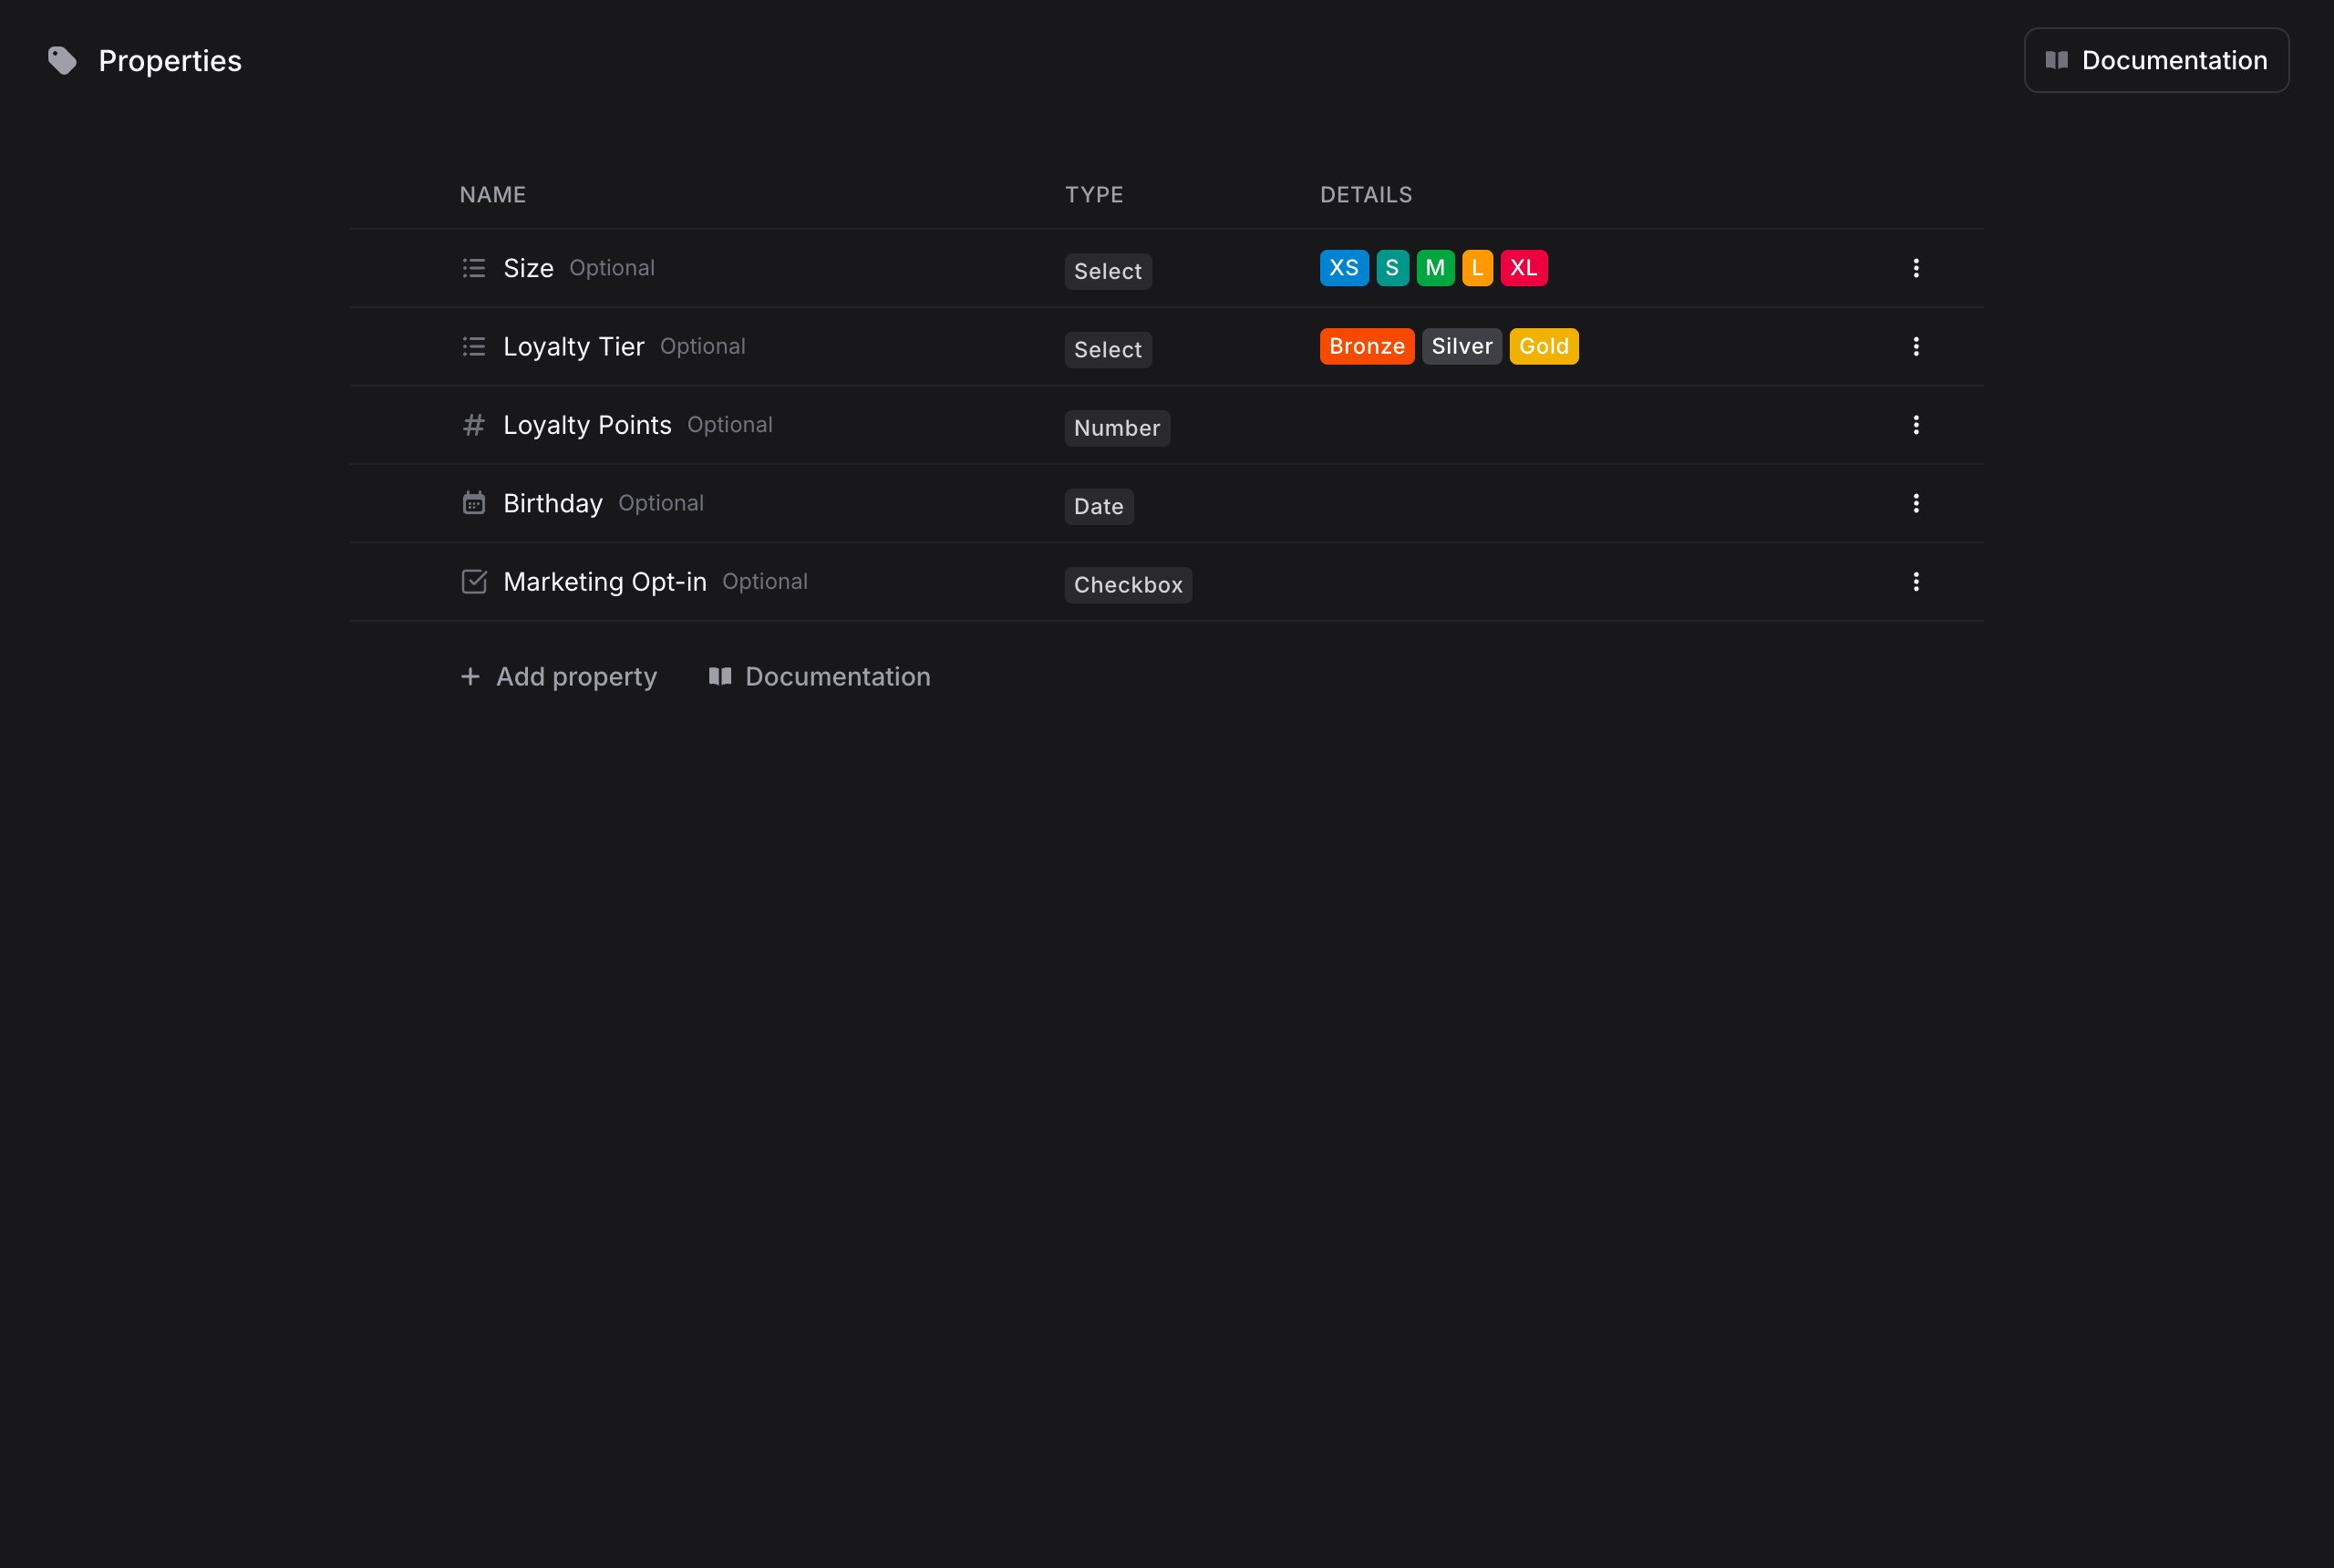 Each property shows its name, its type, and details like the options of a Select property.
Only admins and developers can create or edit contact properties. Other members see the values on contacts but cannot change the property definitions.
## Property Types
| Type | Best for |
| ---------------- | --------------------------------------------------- |
| **Text** | Short free-form values (e.g. a referral source) |
| **Long text** | Notes and multi-line values |
| **URL** | Links (e.g. a LinkedIn profile) |
| **Email** | Additional email addresses |
| **Phone** | Additional phone numbers |
| **Number** | Quantities and scores (e.g. loyalty points) |
| **Currency** | Money amounts (e.g. lifetime spend) |
| **Checkbox** | Yes/no flags (e.g. marketing opt-in) |
| **Date** | Dates without a time (e.g. birthday) |
| **Date & time** | Timestamps (e.g. last purchase) |
| **Select** | One option from a fixed list (e.g. loyalty tier) |
| **Multi-select** | Multiple options from a fixed list (e.g. interests) |
## Adding a Property
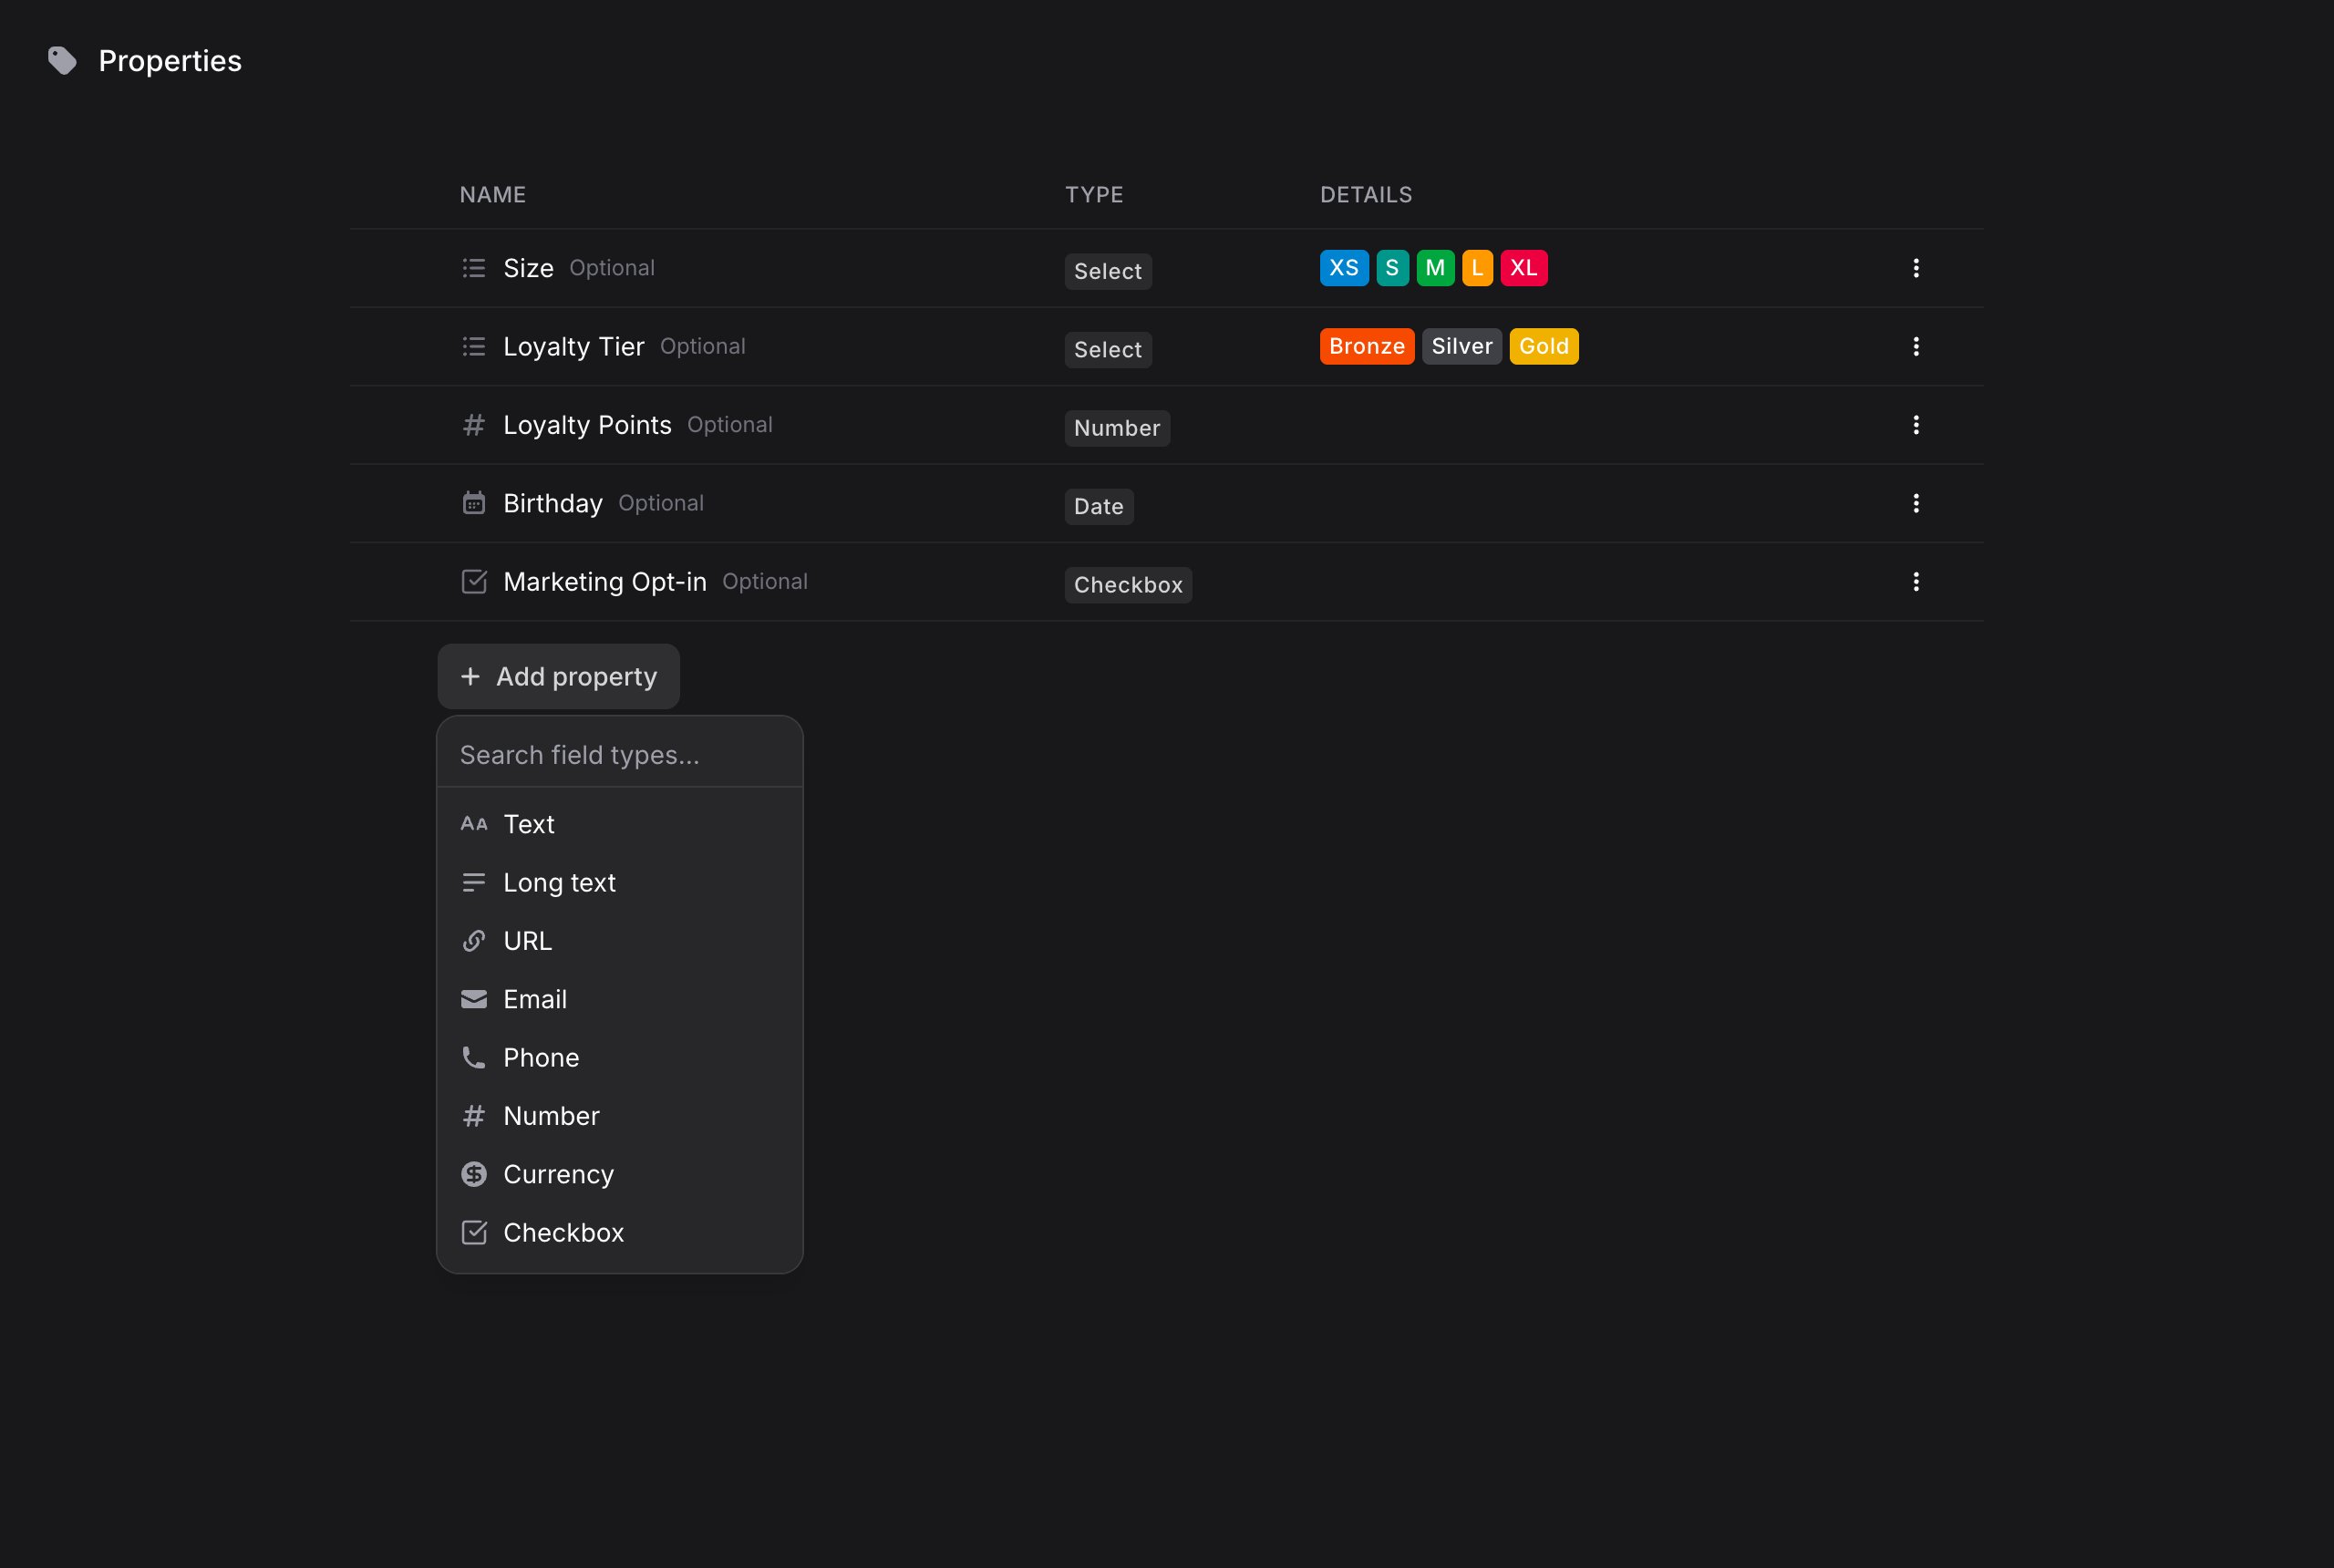
A menu opens where you can search and pick the property type.
Choose the type that matches the data you want to store. For Select and Multi-select, you define the list of options, each with its own color.
Give the property a clear name (e.g., "Loyalty Tier"). The property immediately appears on every contact profile.
Each property shows its name, its type, and details like the options of a Select property.
Only admins and developers can create or edit contact properties. Other members see the values on contacts but cannot change the property definitions.
## Property Types
| Type | Best for |
| ---------------- | --------------------------------------------------- |
| **Text** | Short free-form values (e.g. a referral source) |
| **Long text** | Notes and multi-line values |
| **URL** | Links (e.g. a LinkedIn profile) |
| **Email** | Additional email addresses |
| **Phone** | Additional phone numbers |
| **Number** | Quantities and scores (e.g. loyalty points) |
| **Currency** | Money amounts (e.g. lifetime spend) |
| **Checkbox** | Yes/no flags (e.g. marketing opt-in) |
| **Date** | Dates without a time (e.g. birthday) |
| **Date & time** | Timestamps (e.g. last purchase) |
| **Select** | One option from a fixed list (e.g. loyalty tier) |
| **Multi-select** | Multiple options from a fixed list (e.g. interests) |
## Adding a Property
A menu opens where you can search and pick the property type.
Choose the type that matches the data you want to store. For Select and Multi-select, you define the list of options, each with its own color.
Give the property a clear name (e.g., "Loyalty Tier"). The property immediately appears on every contact profile.
 ## Managing Properties
From the Properties page you can:
* **Rename a property** by clicking its name
* **Reorder properties** by dragging the handle that appears on hover. The order here is the order shown on contact profiles
* **Edit options** via the three-dot menu: change the option list of a Select property, tweak formatting, or delete the property
Deleting a property permanently removes its values from all contacts.
## Properties on the Contact Profile
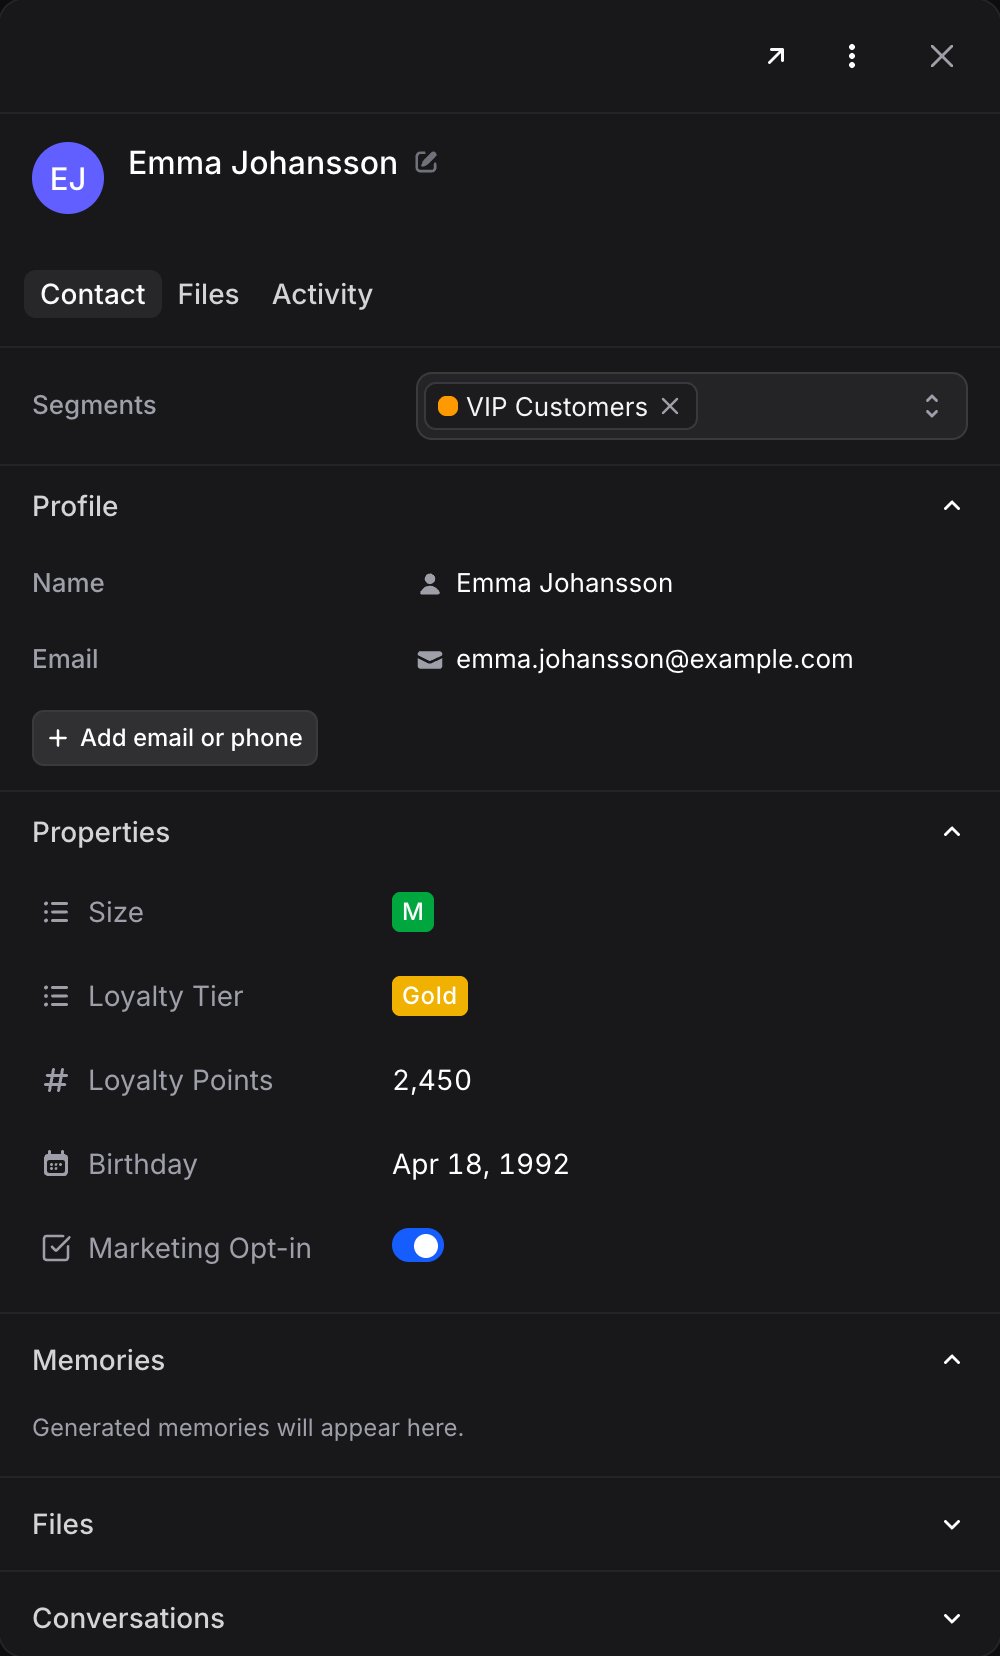
Every property appears in the **Properties** section of the contact profile panel, where you can view and edit values inline.
## Managing Properties
From the Properties page you can:
* **Rename a property** by clicking its name
* **Reorder properties** by dragging the handle that appears on hover. The order here is the order shown on contact profiles
* **Edit options** via the three-dot menu: change the option list of a Select property, tweak formatting, or delete the property
Deleting a property permanently removes its values from all contacts.
## Properties on the Contact Profile
Every property appears in the **Properties** section of the contact profile panel, where you can view and edit values inline.
 ## Let Your Assistant Fill Properties
Properties become really powerful combined with your AI assistants. With the **Update Contact Info** capability enabled, an assistant saves contact details (name, email, phone, and any custom properties) directly to the contact profile as it learns them in conversation.
For example, when a customer mentions they usually wear a size M, the assistant can set the "Size" property on their contact, no manual data entry needed.
To enable it:
Go to **Assistants**, pick your assistant, and scroll to the **Contact Properties** section of the Settings tab.
This lets the assistant save contact details directly to the contact profile.
Each property starts as **Hidden**. Choose what the assistant may do with it:
* **Hidden**: The assistant cannot see the property
* **Visible**: The assistant can see the property during conversations
* **AI Controlled**: The assistant can see and update the property
Click **Save Changes**. The assistant applies the new access on its next conversation.
## Let Your Assistant Fill Properties
Properties become really powerful combined with your AI assistants. With the **Update Contact Info** capability enabled, an assistant saves contact details (name, email, phone, and any custom properties) directly to the contact profile as it learns them in conversation.
For example, when a customer mentions they usually wear a size M, the assistant can set the "Size" property on their contact, no manual data entry needed.
To enable it:
Go to **Assistants**, pick your assistant, and scroll to the **Contact Properties** section of the Settings tab.
This lets the assistant save contact details directly to the contact profile.
Each property starts as **Hidden**. Choose what the assistant may do with it:
* **Hidden**: The assistant cannot see the property
* **Visible**: The assistant can see the property during conversations
* **AI Controlled**: The assistant can see and update the property
Click **Save Changes**. The assistant applies the new access on its next conversation.
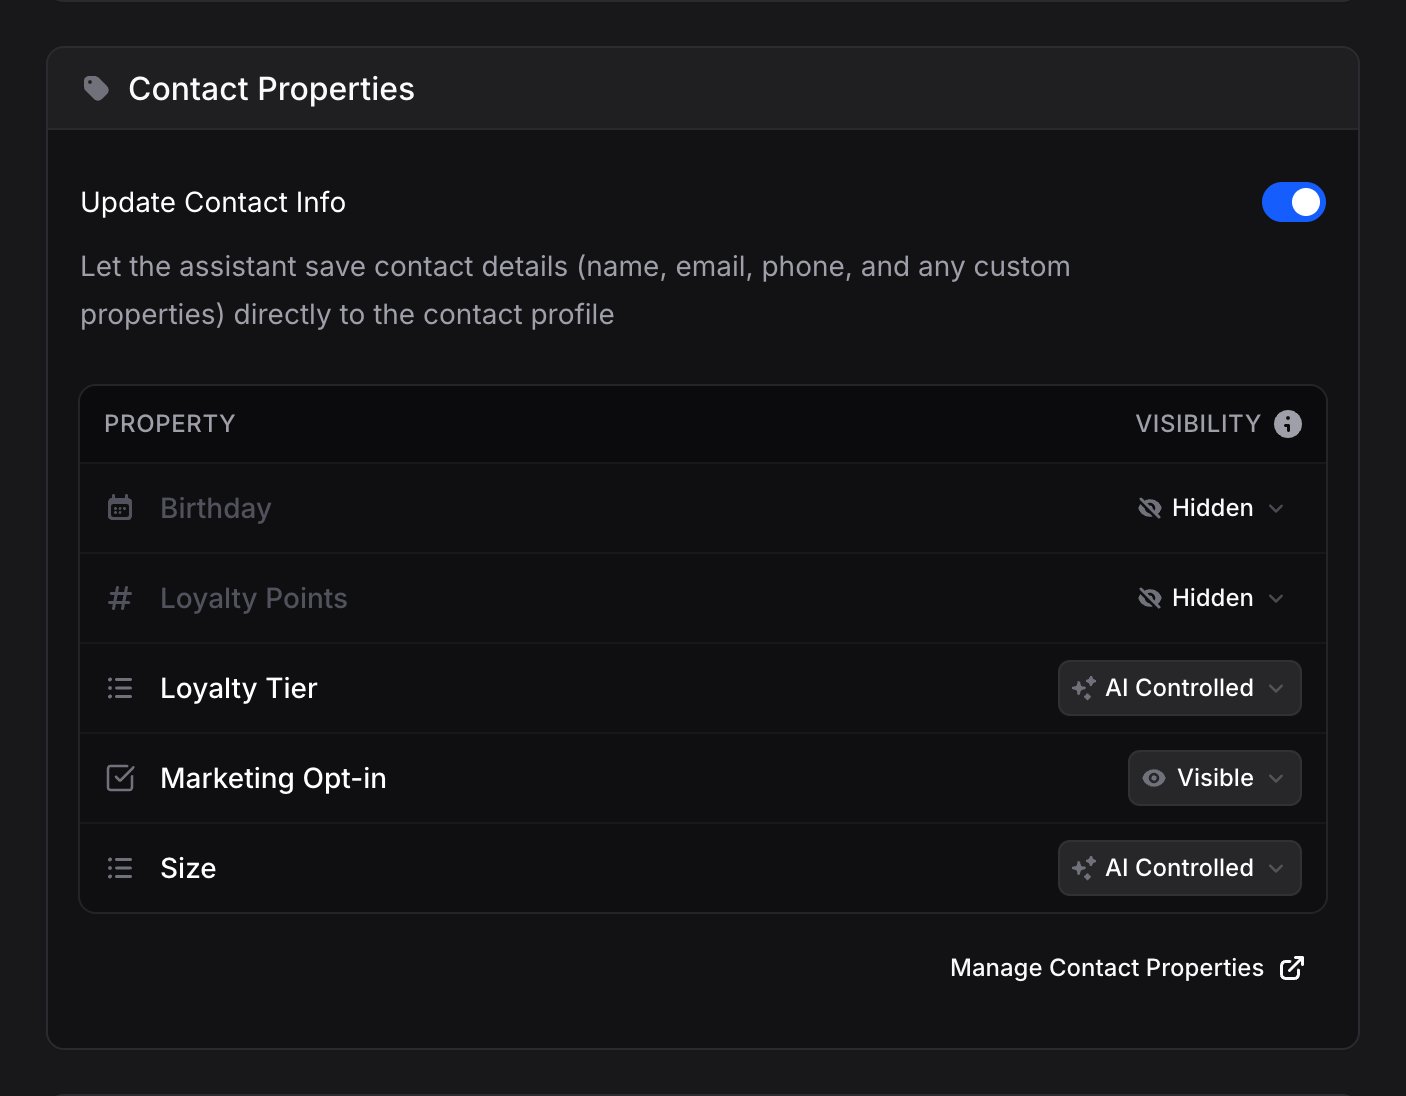 Visibility is per assistant, so a support assistant can update a "Size" property while a billing assistant cannot even see it. See [Assistant Configuration](/assistants/introduction#assistant-configuration) for the rest of the assistant settings.
## Setting Values via the API
Developers can set property values programmatically when creating or updating contacts through the [API](/api-reference/getting-started/introduction), using the property keys defined on this page.
## Best Practices
1. **Start small**: A handful of properties your team actually fills beats a long list of empty fields
2. **Prefer Select over Text** for anything with known values: options keep data consistent and filterable
3. **Name properties for humans**: "Loyalty Tier" is better than "tier\_lvl"
4. **Pair with assistants**: Let the AI keep properties up to date automatically with the Update Contact Info capability
## Next Steps
Group contacts for targeted broadcasts
Enable Update Contact Info and other assistant powers
Visibility is per assistant, so a support assistant can update a "Size" property while a billing assistant cannot even see it. See [Assistant Configuration](/assistants/introduction#assistant-configuration) for the rest of the assistant settings.
## Setting Values via the API
Developers can set property values programmatically when creating or updating contacts through the [API](/api-reference/getting-started/introduction), using the property keys defined on this page.
## Best Practices
1. **Start small**: A handful of properties your team actually fills beats a long list of empty fields
2. **Prefer Select over Text** for anything with known values: options keep data consistent and filterable
3. **Name properties for humans**: "Loyalty Tier" is better than "tier\_lvl"
4. **Pair with assistants**: Let the AI keep properties up to date automatically with the Update Contact Info capability
## Next Steps
Group contacts for targeted broadcasts
Enable Update Contact Info and other assistant powers