> ## Documentation Index
> Fetch the complete documentation index at: https://docs.useinvent.com/llms.txt
> Use this file to discover all available pages before exploring further.
# Broadcasts
> Reach your contacts on the channels they already use, in bulk or one event at a time
Your customers reached out to you through WhatsApp, Instagram, or your website. Broadcasts let you reach back out on the same channels. Send a product announcement to a whole segment, or fire a one-time passcode the instant someone signs in. Both run on the same templates, channels, and personalization.
 ## Two ways to broadcast
Every broadcast is one of two types, chosen when you create it and fixed afterwards.
| | Marketing | Transactional |
| ------------------- | --------------------------------------------- | -------------------------------------------------------------- |
| **Best for** | Announcements, updates, offers, newsletters | OTPs, receipts, confirmations, password resets |
| **Who receives it** | A segment or all contacts, chosen up front | One recipient, named on each trigger |
| **When it sends** | Now or scheduled for later | The moment your backend calls the endpoint |
| **How it is sent** | One send to many people | One API call per message |
| **Unsubscribes** | Respected; unsubscribed contacts are excluded | Respected; the trigger is rejected if the contact unsubscribed |
| **Lifecycle** | Draft to Scheduled to Sent | Draft to Active, then triggered many times |
Send one message to a group at once, immediately or scheduled
Trigger a single message through the API when an event happens
## The Broadcasts dashboard
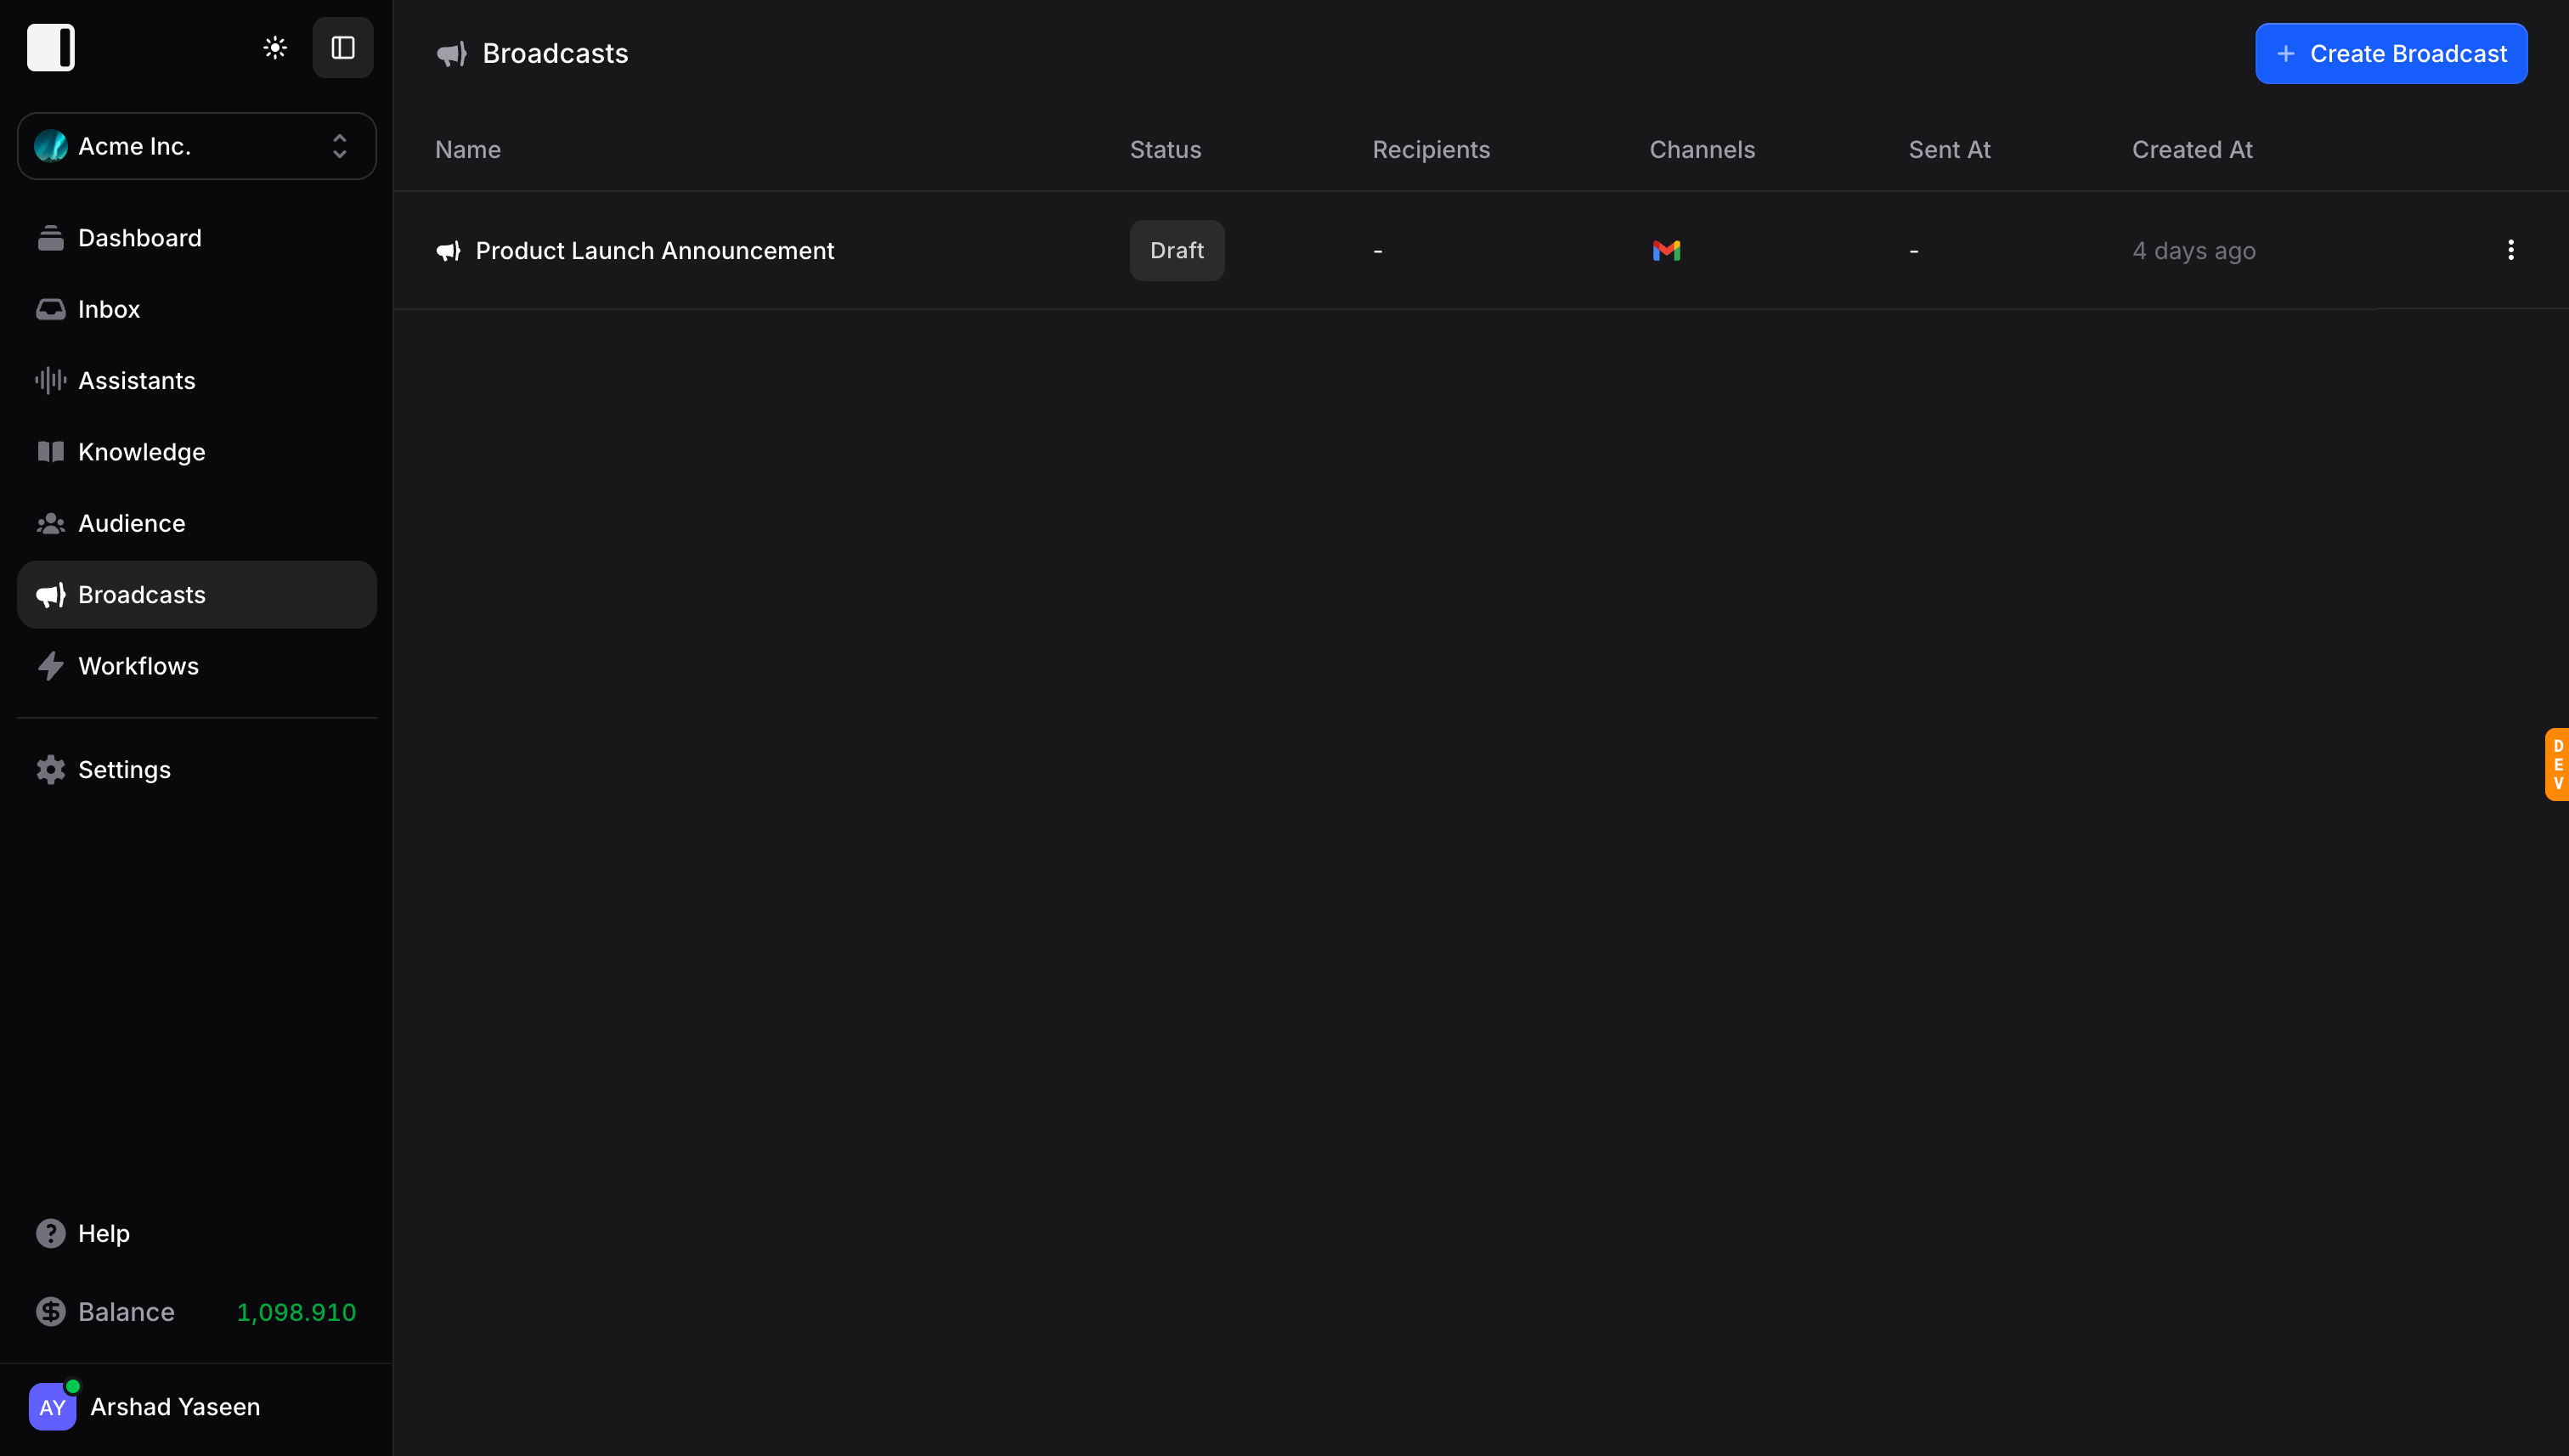
The Broadcasts page lists every broadcast in a table:
| Column | Description |
| -------------- | --------------------------------------------------------------- |
| **Name** | The name you gave the broadcast |
| **Status** | Current state (see [Broadcast statuses](#broadcast-statuses)) |
| **Recipients** | How many contacts will receive, or have received, the broadcast |
| **Channels** | Icons for the channels configured (WhatsApp, and more soon) |
| **Sent At** | When the broadcast was sent, or `-` if not yet |
| **Created At** | When the broadcast was created |
Each row has a three-dot menu to duplicate or delete the broadcast.
## Creating a broadcast
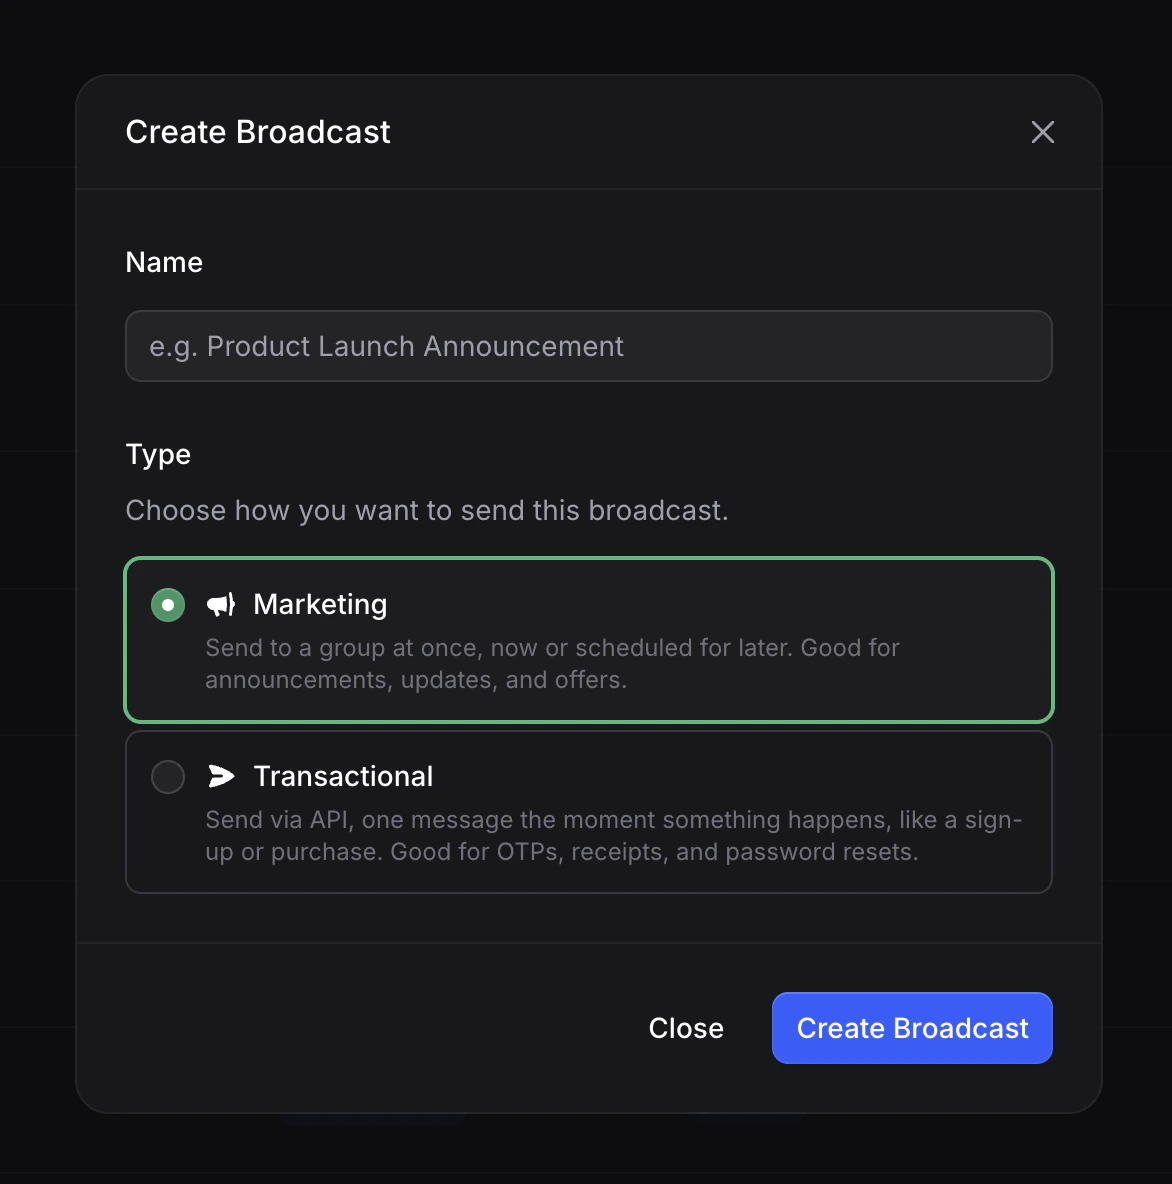
Use the **+ Create Broadcast** button in the top-right corner.
Give the broadcast a descriptive name, for example "Black Friday Sale" or "Login OTP".
Pick **Marketing** or **Transactional**. This sets how the broadcast sends and cannot be changed later.
* **Marketing**: send to a group at once, now or scheduled for later.
* **Transactional**: send via API, one message the moment something happens.
## Two ways to broadcast
Every broadcast is one of two types, chosen when you create it and fixed afterwards.
| | Marketing | Transactional |
| ------------------- | --------------------------------------------- | -------------------------------------------------------------- |
| **Best for** | Announcements, updates, offers, newsletters | OTPs, receipts, confirmations, password resets |
| **Who receives it** | A segment or all contacts, chosen up front | One recipient, named on each trigger |
| **When it sends** | Now or scheduled for later | The moment your backend calls the endpoint |
| **How it is sent** | One send to many people | One API call per message |
| **Unsubscribes** | Respected; unsubscribed contacts are excluded | Respected; the trigger is rejected if the contact unsubscribed |
| **Lifecycle** | Draft to Scheduled to Sent | Draft to Active, then triggered many times |
Send one message to a group at once, immediately or scheduled
Trigger a single message through the API when an event happens
## The Broadcasts dashboard
The Broadcasts page lists every broadcast in a table:
| Column | Description |
| -------------- | --------------------------------------------------------------- |
| **Name** | The name you gave the broadcast |
| **Status** | Current state (see [Broadcast statuses](#broadcast-statuses)) |
| **Recipients** | How many contacts will receive, or have received, the broadcast |
| **Channels** | Icons for the channels configured (WhatsApp, and more soon) |
| **Sent At** | When the broadcast was sent, or `-` if not yet |
| **Created At** | When the broadcast was created |
Each row has a three-dot menu to duplicate or delete the broadcast.
## Creating a broadcast
Use the **+ Create Broadcast** button in the top-right corner.
Give the broadcast a descriptive name, for example "Black Friday Sale" or "Login OTP".
Pick **Marketing** or **Transactional**. This sets how the broadcast sends and cannot be changed later.
* **Marketing**: send to a group at once, now or scheduled for later.
* **Transactional**: send via API, one message the moment something happens.
 The broadcast opens in **Draft**. The sections you configure depend on the type: marketing broadcasts have an **Audience**, transactional broadcasts have a **Trigger**. Both share **Channels** and **Properties**.
## Channels
Channels determine how your message is delivered. Every broadcast needs at least one, and you can add several to reach contacts across platforms in a single broadcast.
The broadcast opens in **Draft**. The sections you configure depend on the type: marketing broadcasts have an **Audience**, transactional broadcasts have a **Trigger**. Both share **Channels** and **Properties**.
## Channels
Channels determine how your message is delivered. Every broadcast needs at least one, and you can add several to reach contacts across platforms in a single broadcast.
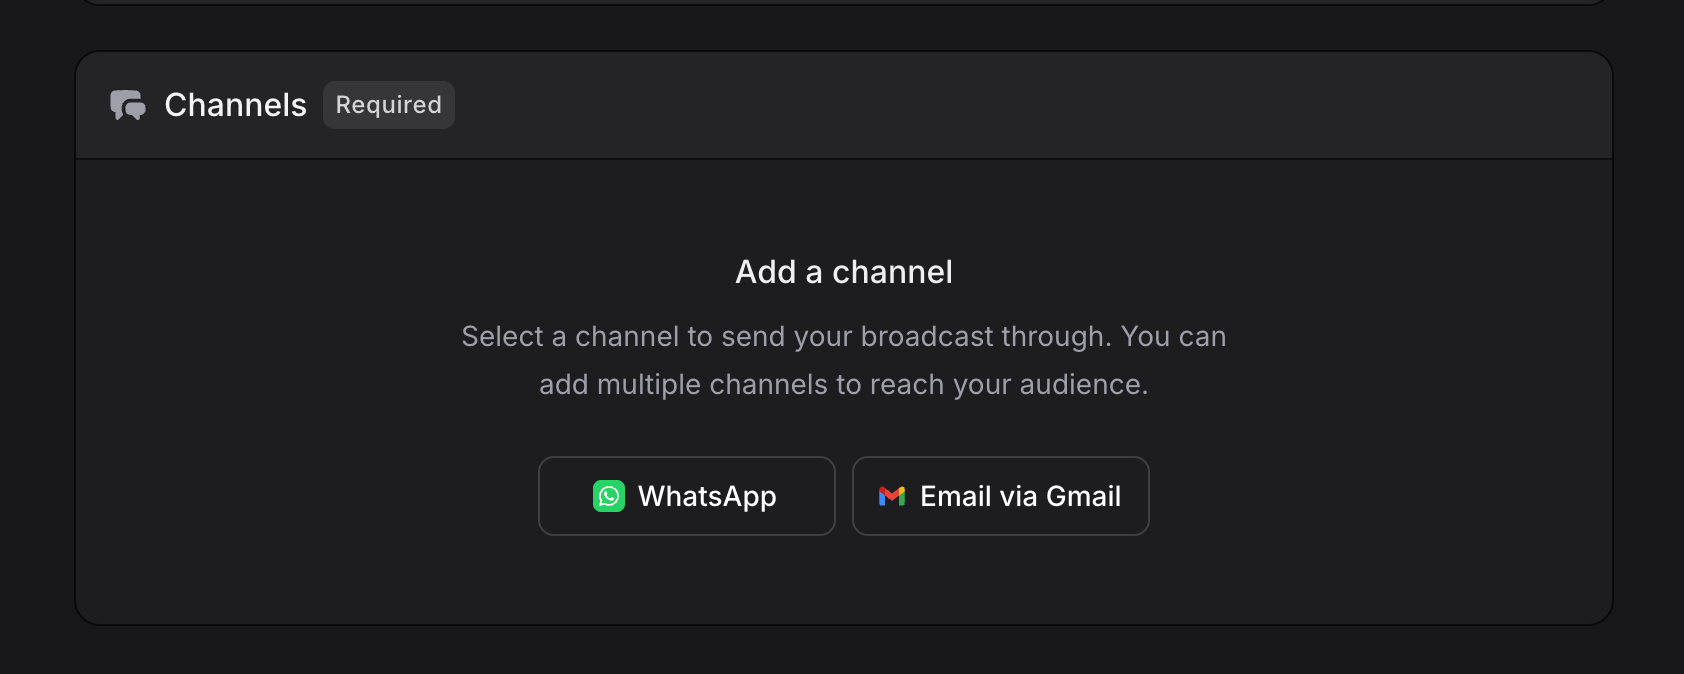 ### Available channels
| Channel | Description |
| ------------ | --------------------------------------------- |
| **WhatsApp** | Send messages via approved WhatsApp Templates |
More broadcast channels are coming soon.
Follow the channel guide to set up and configure it:
Set up WhatsApp Templates and configure the channel
### Adding multiple channels
After your first channel, click **+ Add Channel** to add another. Each channel is configured independently with its own template and settings, so a single broadcast can reach contacts on several platforms at once.
### Available channels
| Channel | Description |
| ------------ | --------------------------------------------- |
| **WhatsApp** | Send messages via approved WhatsApp Templates |
More broadcast channels are coming soon.
Follow the channel guide to set up and configure it:
Set up WhatsApp Templates and configure the channel
### Adding multiple channels
After your first channel, click **+ Add Channel** to add another. Each channel is configured independently with its own template and settings, so a single broadcast can reach contacts on several platforms at once.
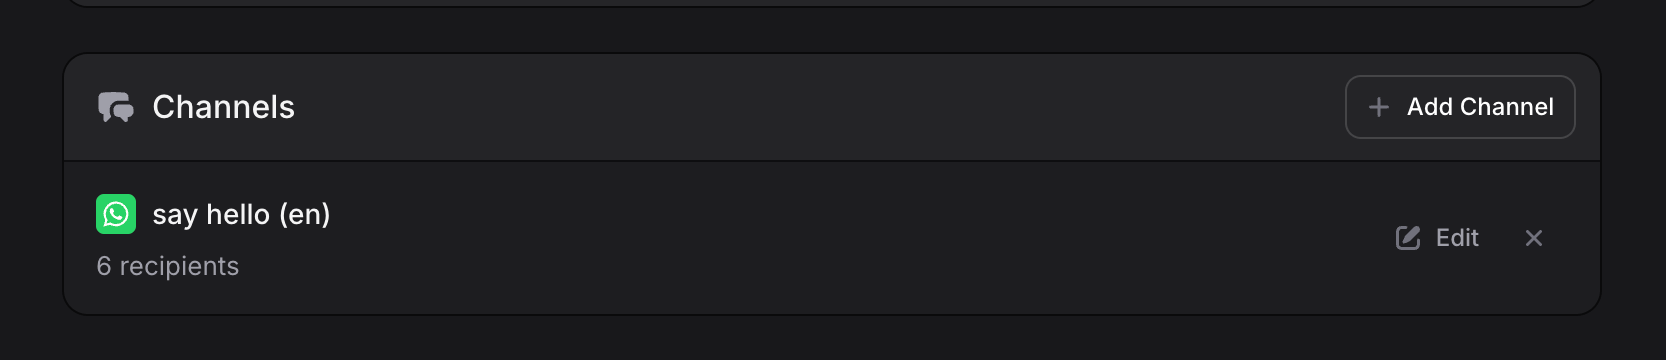 ### Editing a channel
After a channel is added you can:
* Click **Edit** to change the template, variables, or settings.
* Click **x** to remove the channel.
Editing reopens the full dialog with your previous settings, a **Remove channel** button, and **Save Changes**.
Channels can only be edited while the broadcast is in Draft.
## Properties
Properties personalize each message with per-recipient values. Think of them as variables that differ for every contact, such as a coupon code, a product link, or an account balance.
Add properties like `coupon_code` or `product_url`, then map them into your templates.
### Adding a property
A new row appears with two fields.
Type a name, for example `coupon_code` or `order_id`.
Enter a default used for any recipient without a specific value.
Click the checkmark to save, or the **x** to cancel.
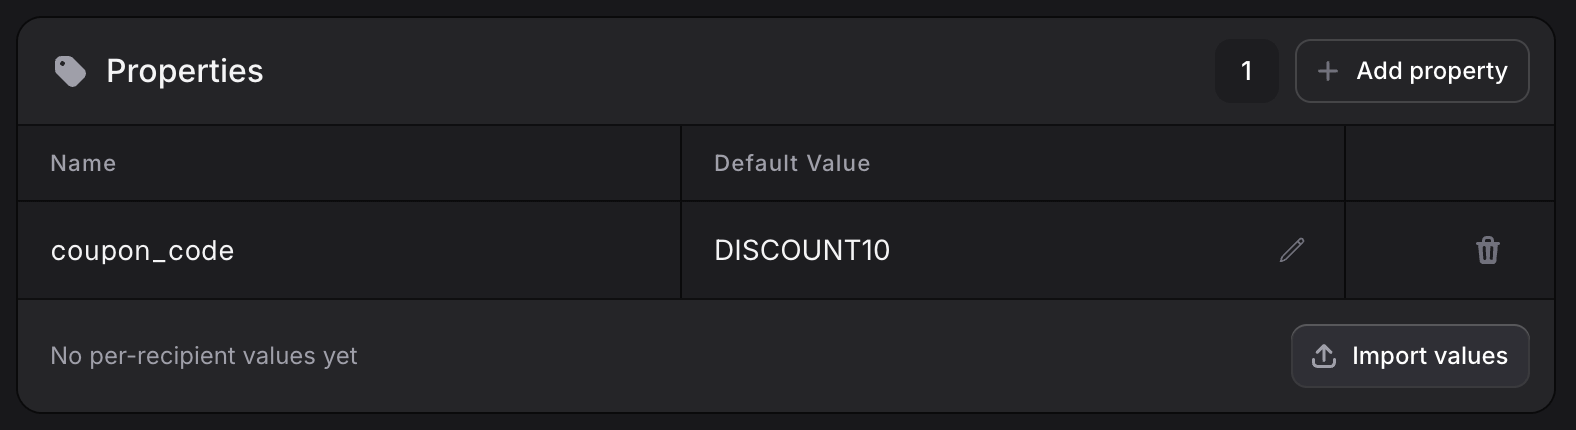
The property then appears in a table showing its **Name** and **Default Value**, with edit and delete icons.
### Editing a channel
After a channel is added you can:
* Click **Edit** to change the template, variables, or settings.
* Click **x** to remove the channel.
Editing reopens the full dialog with your previous settings, a **Remove channel** button, and **Save Changes**.
Channels can only be edited while the broadcast is in Draft.
## Properties
Properties personalize each message with per-recipient values. Think of them as variables that differ for every contact, such as a coupon code, a product link, or an account balance.
Add properties like `coupon_code` or `product_url`, then map them into your templates.
### Adding a property
A new row appears with two fields.
Type a name, for example `coupon_code` or `order_id`.
Enter a default used for any recipient without a specific value.
Click the checkmark to save, or the **x** to cancel.
The property then appears in a table showing its **Name** and **Default Value**, with edit and delete icons.
 ### Importing property values
For marketing broadcasts, you can bulk import per-recipient values from a spreadsheet instead of setting them one by one:
The import dialog opens with a file upload area.
Drag in a **.csv**, **.xlsx**, or **.xls** file with a column to identify recipients (email or phone) and a column for each property value.
Click **Download sample CSV** for a correctly formatted template.
Map each column from your file:
* **Recipient identifier**: map at least one column to **Email** or **Phone** so Invent knows which contact each row belongs to.
* **Property values**: map columns to your broadcast properties.
* **Skip column**: choose "Skip column" for anything you do not need.
Click **Review**, then **Import**. A success message confirms how many values were imported.
### Importing property values
For marketing broadcasts, you can bulk import per-recipient values from a spreadsheet instead of setting them one by one:
The import dialog opens with a file upload area.
Drag in a **.csv**, **.xlsx**, or **.xls** file with a column to identify recipients (email or phone) and a column for each property value.
Click **Download sample CSV** for a correctly formatted template.
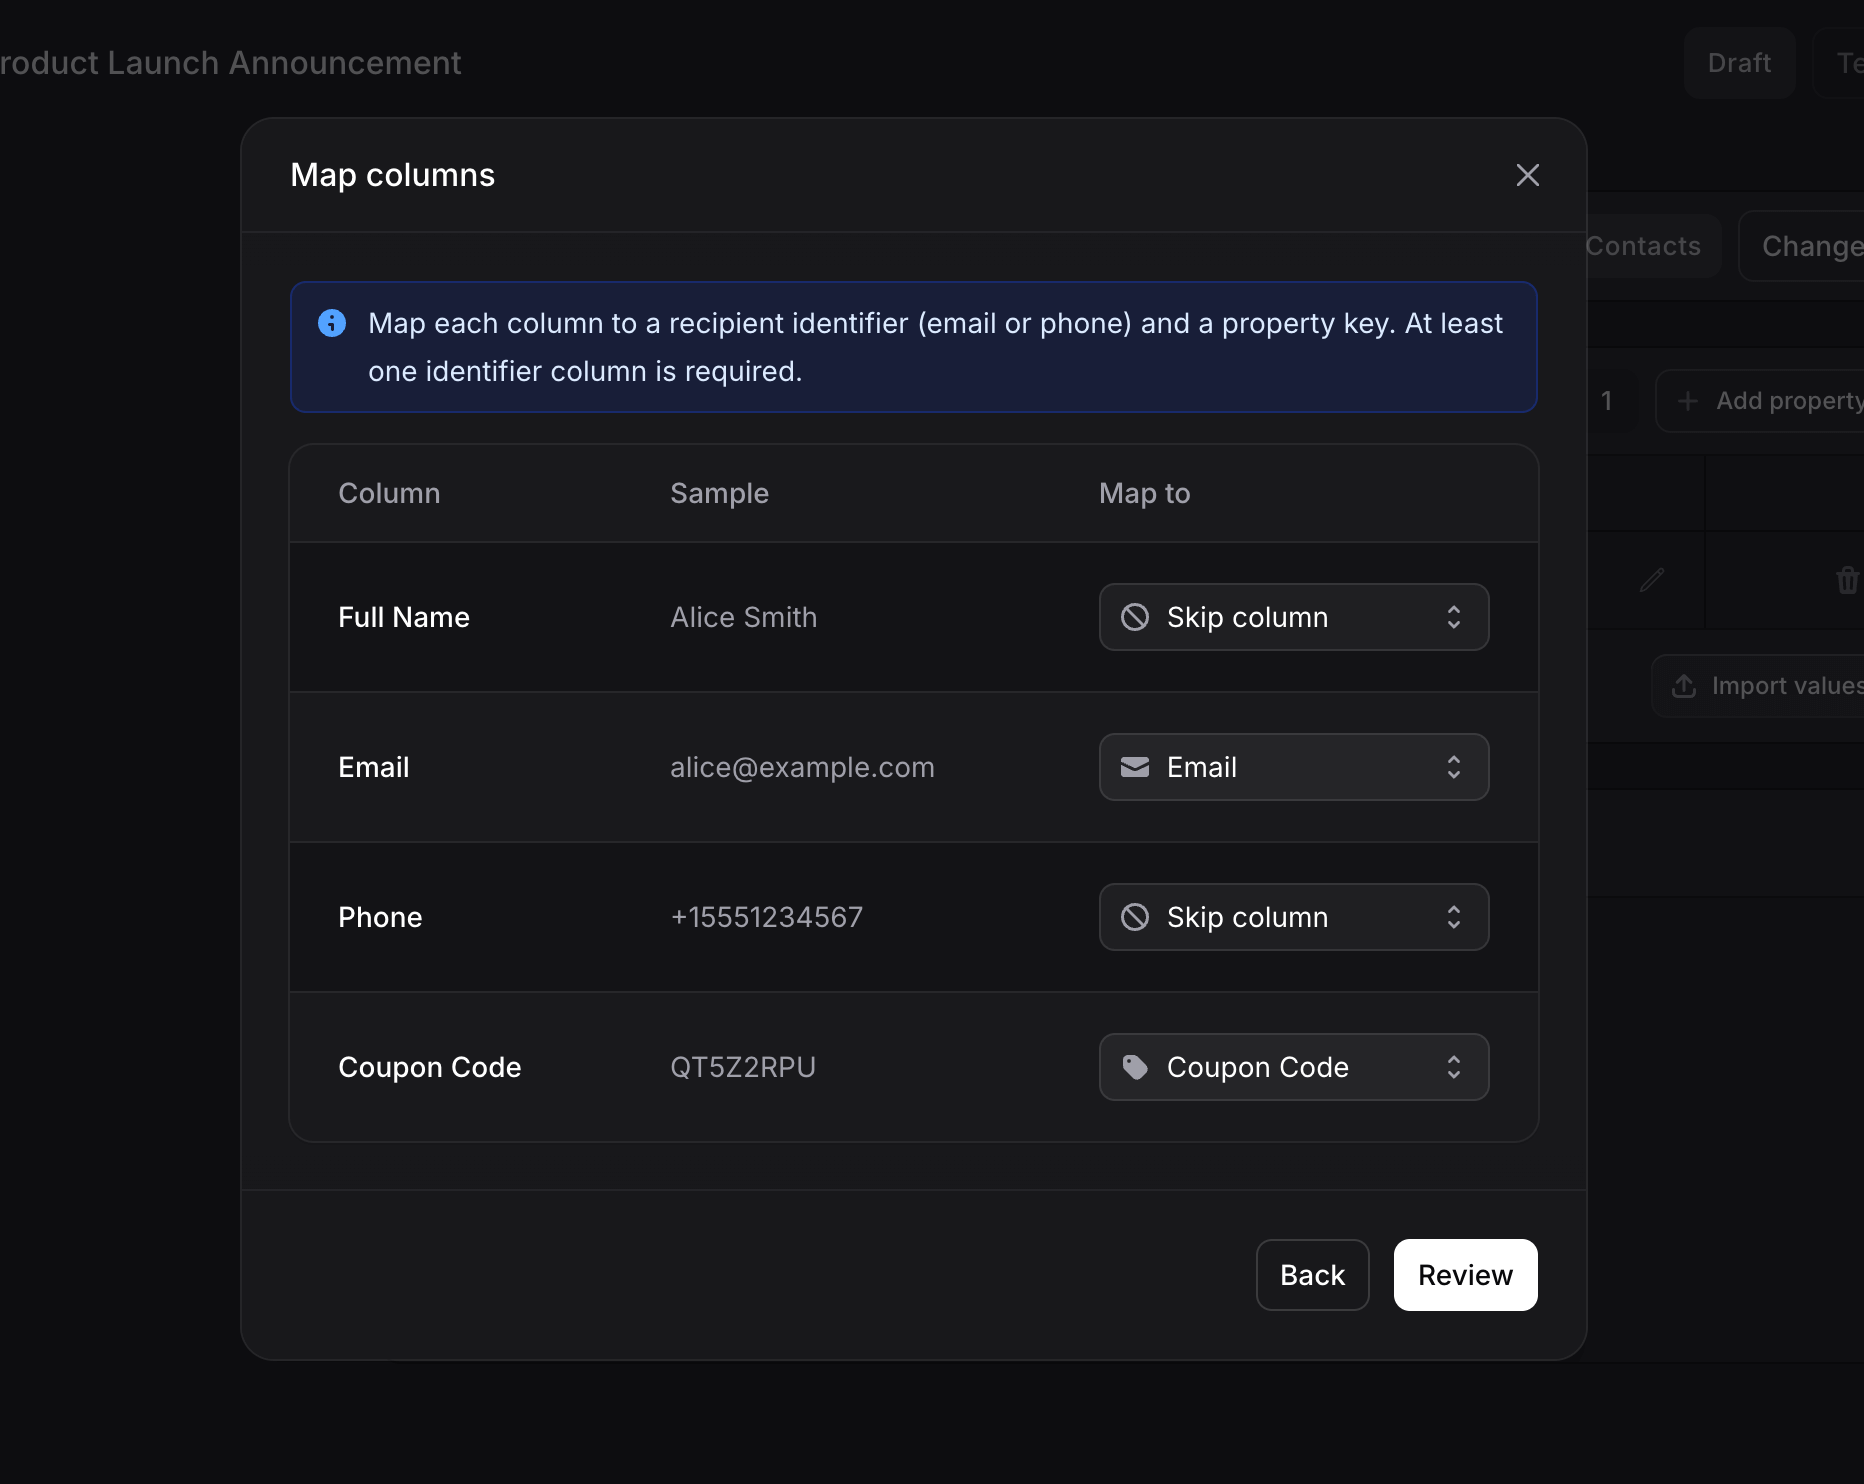
Map each column from your file:
* **Recipient identifier**: map at least one column to **Email** or **Phone** so Invent knows which contact each row belongs to.
* **Property values**: map columns to your broadcast properties.
* **Skip column**: choose "Skip column" for anything you do not need.
Click **Review**, then **Import**. A success message confirms how many values were imported.
 Transactional broadcasts do not import values up front. Their per-recipient values arrive with each [trigger](/guides/broadcasts/transactional#variables) instead.
### Using properties in templates
Once added, properties are available as template variables when you configure a channel. A `coupon_code` property, for example, can be inserted into your WhatsApp template alongside built-in variables like Contact Name and Phone.
## Broadcast statuses
| Status | Applies to | Description |
| ------------- | ------------- | ----------------------------------------------------------------------------- |
| **Draft** | Both | Being configured, not sent yet. All sections are editable. |
| **Scheduled** | Marketing | Queued to send at a future time, with a live countdown. |
| **Sending** | Marketing | Currently being delivered. Cannot be edited. |
| **Sent** | Marketing | Fully sent. Analytics and tracking are available. |
| **Active** | Transactional | The endpoint is live and accepting triggers. |
| **Paused** | Transactional | The endpoint is closed and triggers are rejected. Configuration is preserved. |
| **Cancelled** | Marketing | Stopped before finishing. Can be re-sent. |
| **Failed** | Marketing | Something went wrong during delivery. Fix the issue and re-send. |
## Duplicating a broadcast
To reuse a setup, open the three-dot menu on any broadcast and select **Duplicate**. This creates a copy with "(Copy)" appended, preserving the audience or trigger, properties, and channels.
## Next steps
Audience, scheduling, and analytics for bulk sends
API triggers, variables, and the live endpoint
Set up WhatsApp Templates and configure the channel
Manage contacts and build segments for targeting
Transactional broadcasts do not import values up front. Their per-recipient values arrive with each [trigger](/guides/broadcasts/transactional#variables) instead.
### Using properties in templates
Once added, properties are available as template variables when you configure a channel. A `coupon_code` property, for example, can be inserted into your WhatsApp template alongside built-in variables like Contact Name and Phone.
## Broadcast statuses
| Status | Applies to | Description |
| ------------- | ------------- | ----------------------------------------------------------------------------- |
| **Draft** | Both | Being configured, not sent yet. All sections are editable. |
| **Scheduled** | Marketing | Queued to send at a future time, with a live countdown. |
| **Sending** | Marketing | Currently being delivered. Cannot be edited. |
| **Sent** | Marketing | Fully sent. Analytics and tracking are available. |
| **Active** | Transactional | The endpoint is live and accepting triggers. |
| **Paused** | Transactional | The endpoint is closed and triggers are rejected. Configuration is preserved. |
| **Cancelled** | Marketing | Stopped before finishing. Can be re-sent. |
| **Failed** | Marketing | Something went wrong during delivery. Fix the issue and re-send. |
## Duplicating a broadcast
To reuse a setup, open the three-dot menu on any broadcast and select **Duplicate**. This creates a copy with "(Copy)" appended, preserving the audience or trigger, properties, and channels.
## Next steps
Audience, scheduling, and analytics for bulk sends
API triggers, variables, and the live endpoint
Set up WhatsApp Templates and configure the channel
Manage contacts and build segments for targeting