> ## Documentation Index
> Fetch the complete documentation index at: https://docs.useinvent.com/llms.txt
> Use this file to discover all available pages before exploring further.
# Marketing Broadcasts
> Send one message to a group of contacts at once, immediately or scheduled for later
Marketing broadcasts send a single message to many contacts at once. Use them for announcements, product updates, promotions, and newsletters: anything you want a whole segment to receive at the same time. You choose the audience up front, set up your channels, and either send now or schedule for later.
This page covers the marketing-specific flow. For the building blocks every broadcast shares (channels, templates, and properties), start with the [Broadcasts overview](/guides/broadcasts/introduction). For event-driven messages sent one at a time, see [Transactional broadcasts](/guides/broadcasts/transactional).
## Audience
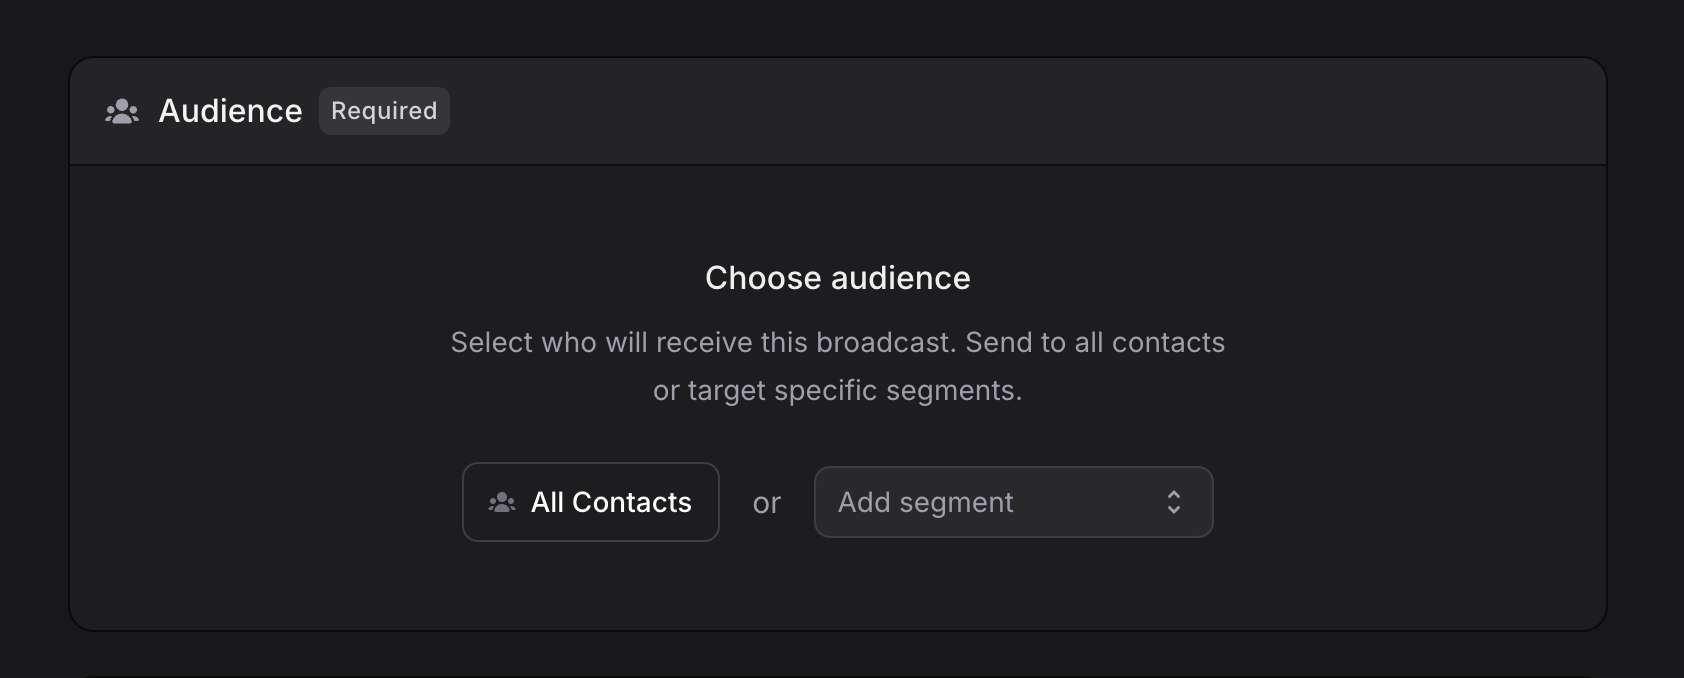
The Audience section determines who receives your broadcast. It is the first thing to configure, and it is required before you can send.
 Learn how to manage contacts and build segments in the Audience guide.
You have two options:
### All contacts
Click **All Contacts** to send to every contact in your audience. Once selected, "All Contacts" is shown with a **Change** button so you can adjust the selection later.
### Specific segments
Click **Add segment** to target specific groups:
1. **Search** for a segment by name.
2. **Select** one or more segments from the list.
3. **Add multiple segments** to widen your reach.
Each selected segment appears with its name, its contact count, a **View** button to preview the contacts, and an **x** to remove it. You can combine segments freely. Click **Add segment** again to add another.
To change your audience after configuring it, click **Change** in the Audience section header.
Marketing broadcasts respect each contact's subscription status. Contacts who have unsubscribed or are blocked are automatically excluded from the audience, so you stay compliant without extra work.
## Test your broadcast
Before sending to your whole audience, send yourself a test to confirm everything looks right.
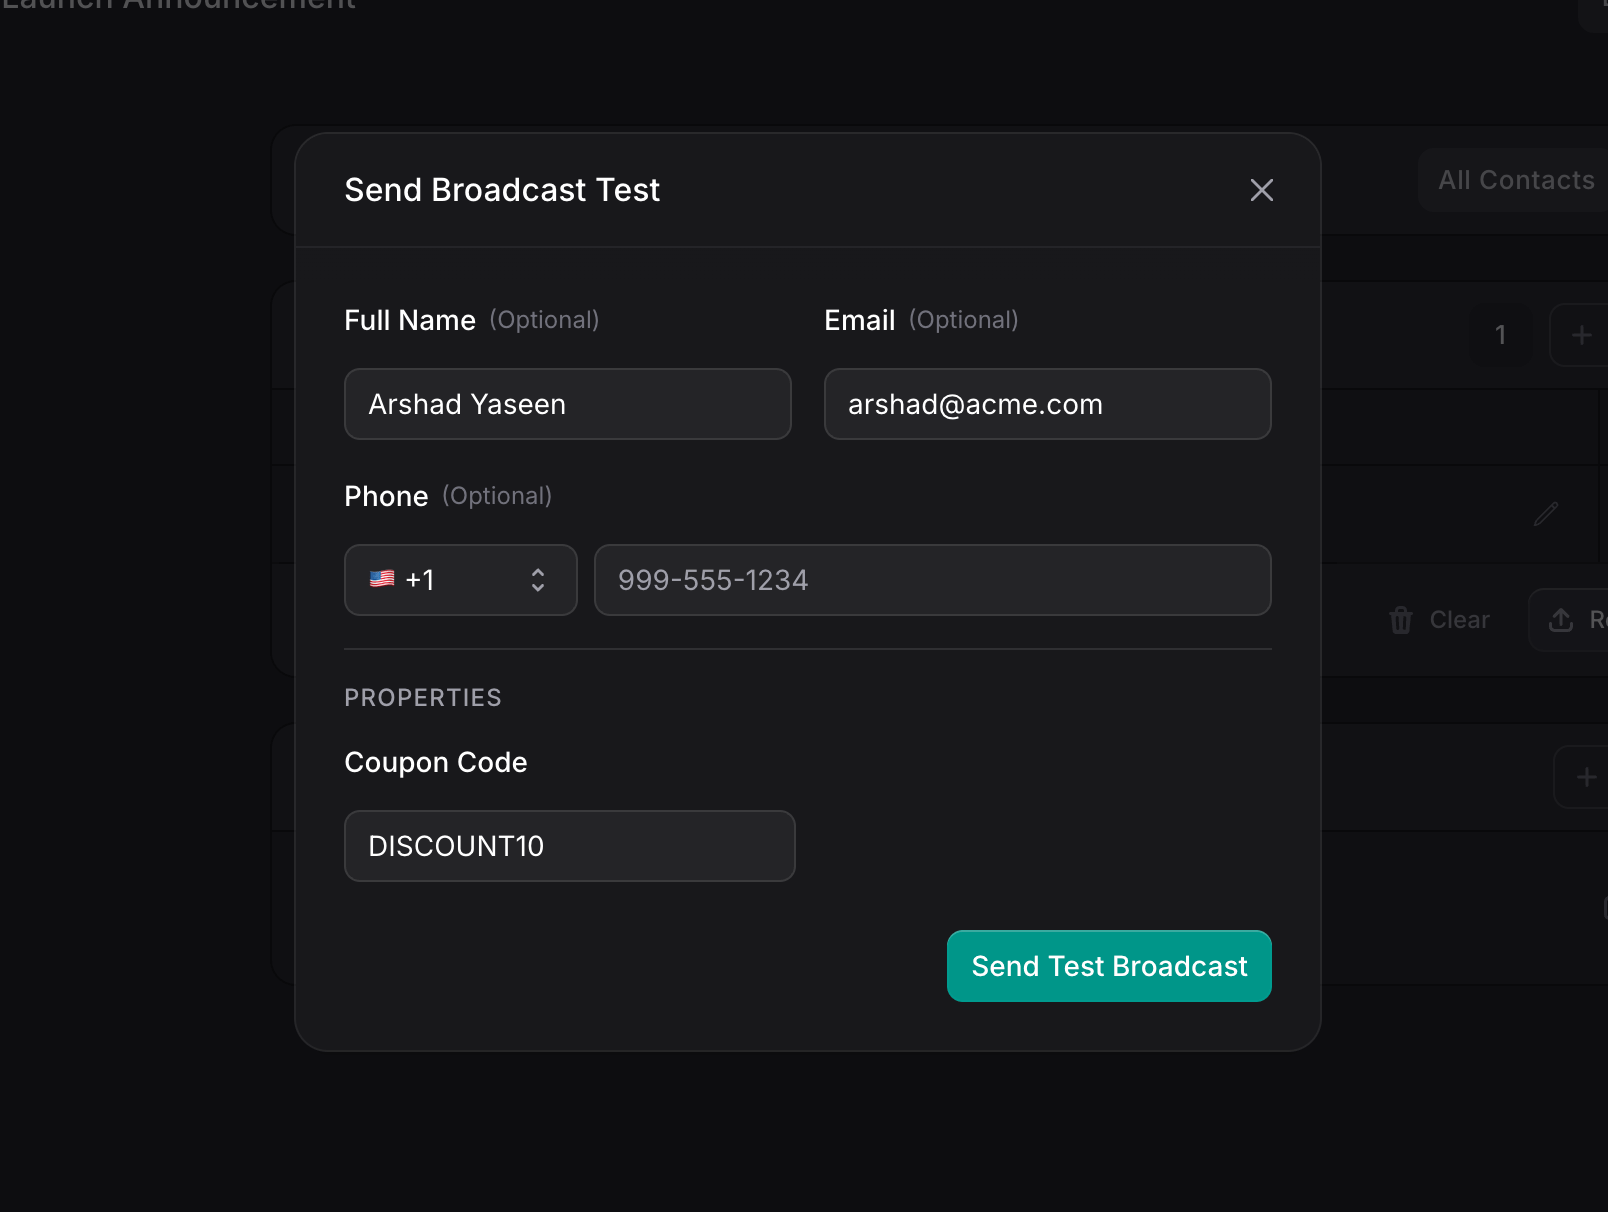
Open the broadcast and click **Test** in the top-right corner.
Provide the contact detail that matches the channel you are testing:
* **Full Name** (optional): a name for the test recipient.
* **Phone** (optional): the number that receives the test, with a country-code selector.
You must provide the detail that matches the channel. A WhatsApp broadcast needs a **Phone** number, and the test fails if the required field is missing.
Click **Send Test Broadcast** and check the device to confirm the message renders correctly with its variables populated.
Learn how to manage contacts and build segments in the Audience guide.
You have two options:
### All contacts
Click **All Contacts** to send to every contact in your audience. Once selected, "All Contacts" is shown with a **Change** button so you can adjust the selection later.
### Specific segments
Click **Add segment** to target specific groups:
1. **Search** for a segment by name.
2. **Select** one or more segments from the list.
3. **Add multiple segments** to widen your reach.
Each selected segment appears with its name, its contact count, a **View** button to preview the contacts, and an **x** to remove it. You can combine segments freely. Click **Add segment** again to add another.
To change your audience after configuring it, click **Change** in the Audience section header.
Marketing broadcasts respect each contact's subscription status. Contacts who have unsubscribed or are blocked are automatically excluded from the audience, so you stay compliant without extra work.
## Test your broadcast
Before sending to your whole audience, send yourself a test to confirm everything looks right.
Open the broadcast and click **Test** in the top-right corner.
Provide the contact detail that matches the channel you are testing:
* **Full Name** (optional): a name for the test recipient.
* **Phone** (optional): the number that receives the test, with a country-code selector.
You must provide the detail that matches the channel. A WhatsApp broadcast needs a **Phone** number, and the test fails if the required field is missing.
Click **Send Test Broadcast** and check the device to confirm the message renders correctly with its variables populated.
 A test sends a real, billable message to the details you enter. Use your own number, not a customer's.
## Send or schedule
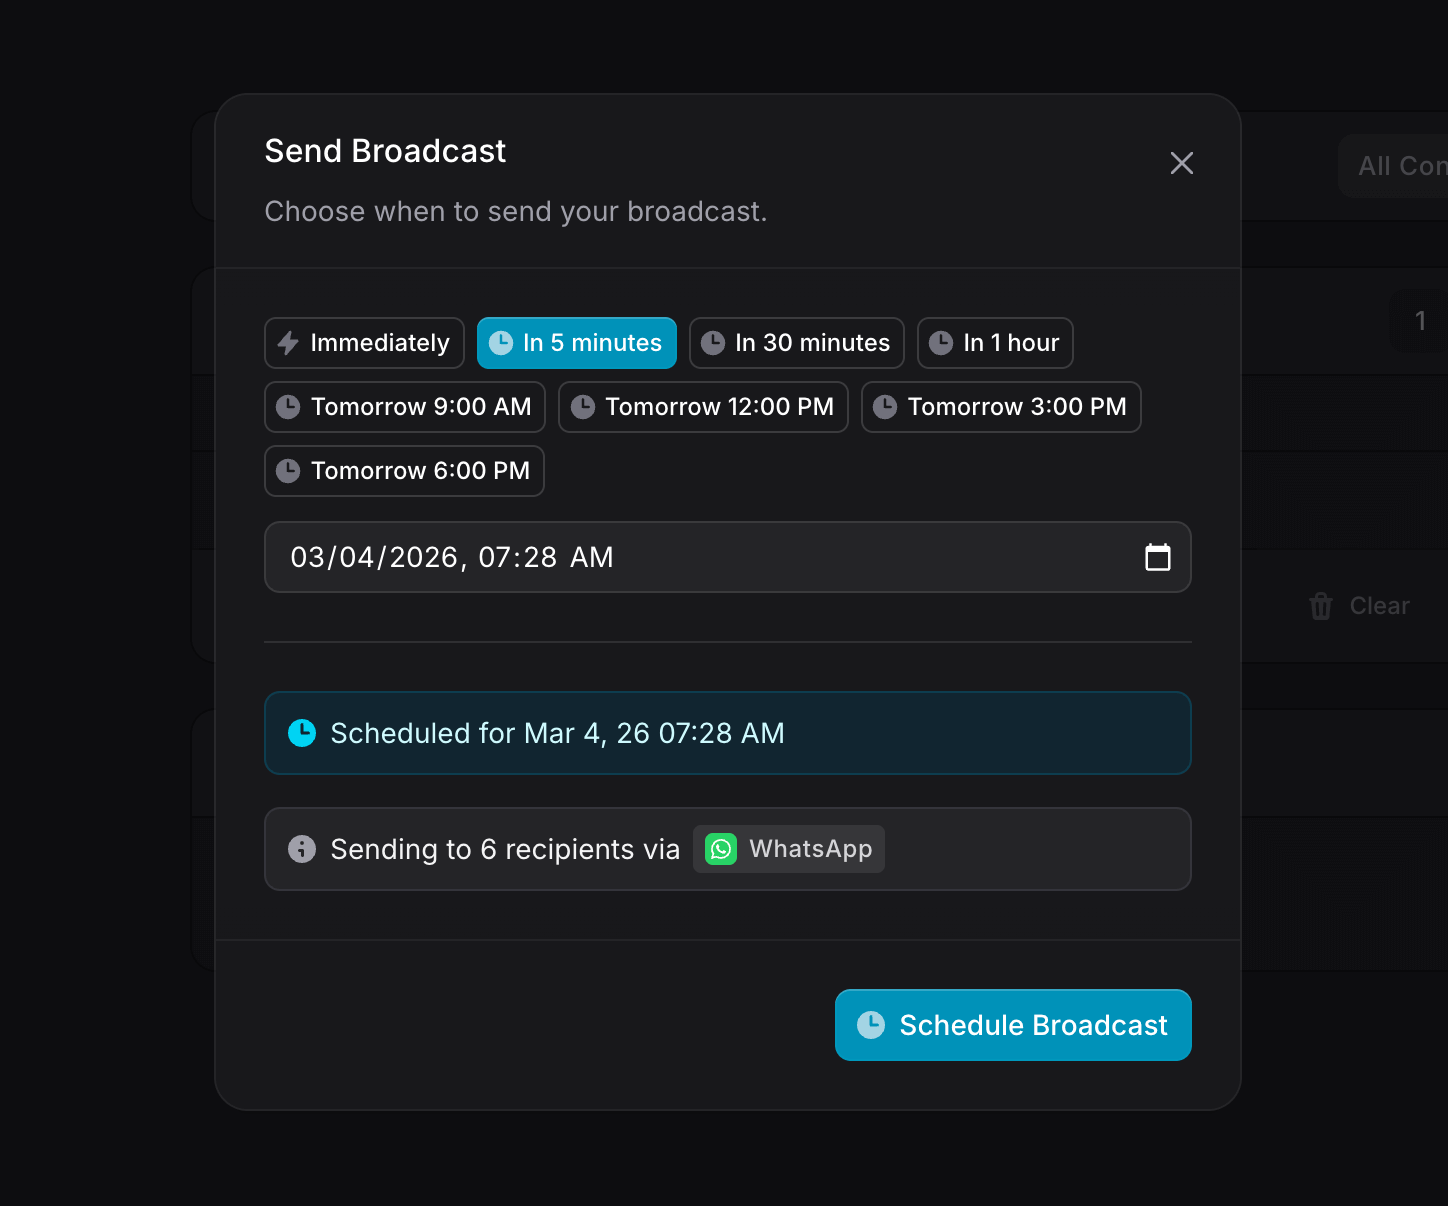
Once your audience, channels, and content are ready, click **Schedule Broadcast** in the top-right corner to open the send dialog.
A test sends a real, billable message to the details you enter. Use your own number, not a customer's.
## Send or schedule
Once your audience, channels, and content are ready, click **Schedule Broadcast** in the top-right corner to open the send dialog.
 ### Timing options
Choose when the broadcast goes out:
* **Quick options**: immediately, in 5 minutes, in 30 minutes, in 1 hour, or a preset time today or tomorrow (9:00 AM, 12:00 PM, 3:00 PM, 6:00 PM).
* **Custom date and time**: use the picker to set any future date and time.
### Confirmation
Before you send, the dialog shows a clear summary:
* A status line: "Broadcast will be sent immediately" or "Scheduled for" a specific date and time.
* A recipient summary: "Sending to X recipients via WhatsApp", showing the channel and count.
Click **Send Broadcast** to send now, or **Schedule Broadcast** to queue it for later.
## Scheduled broadcasts
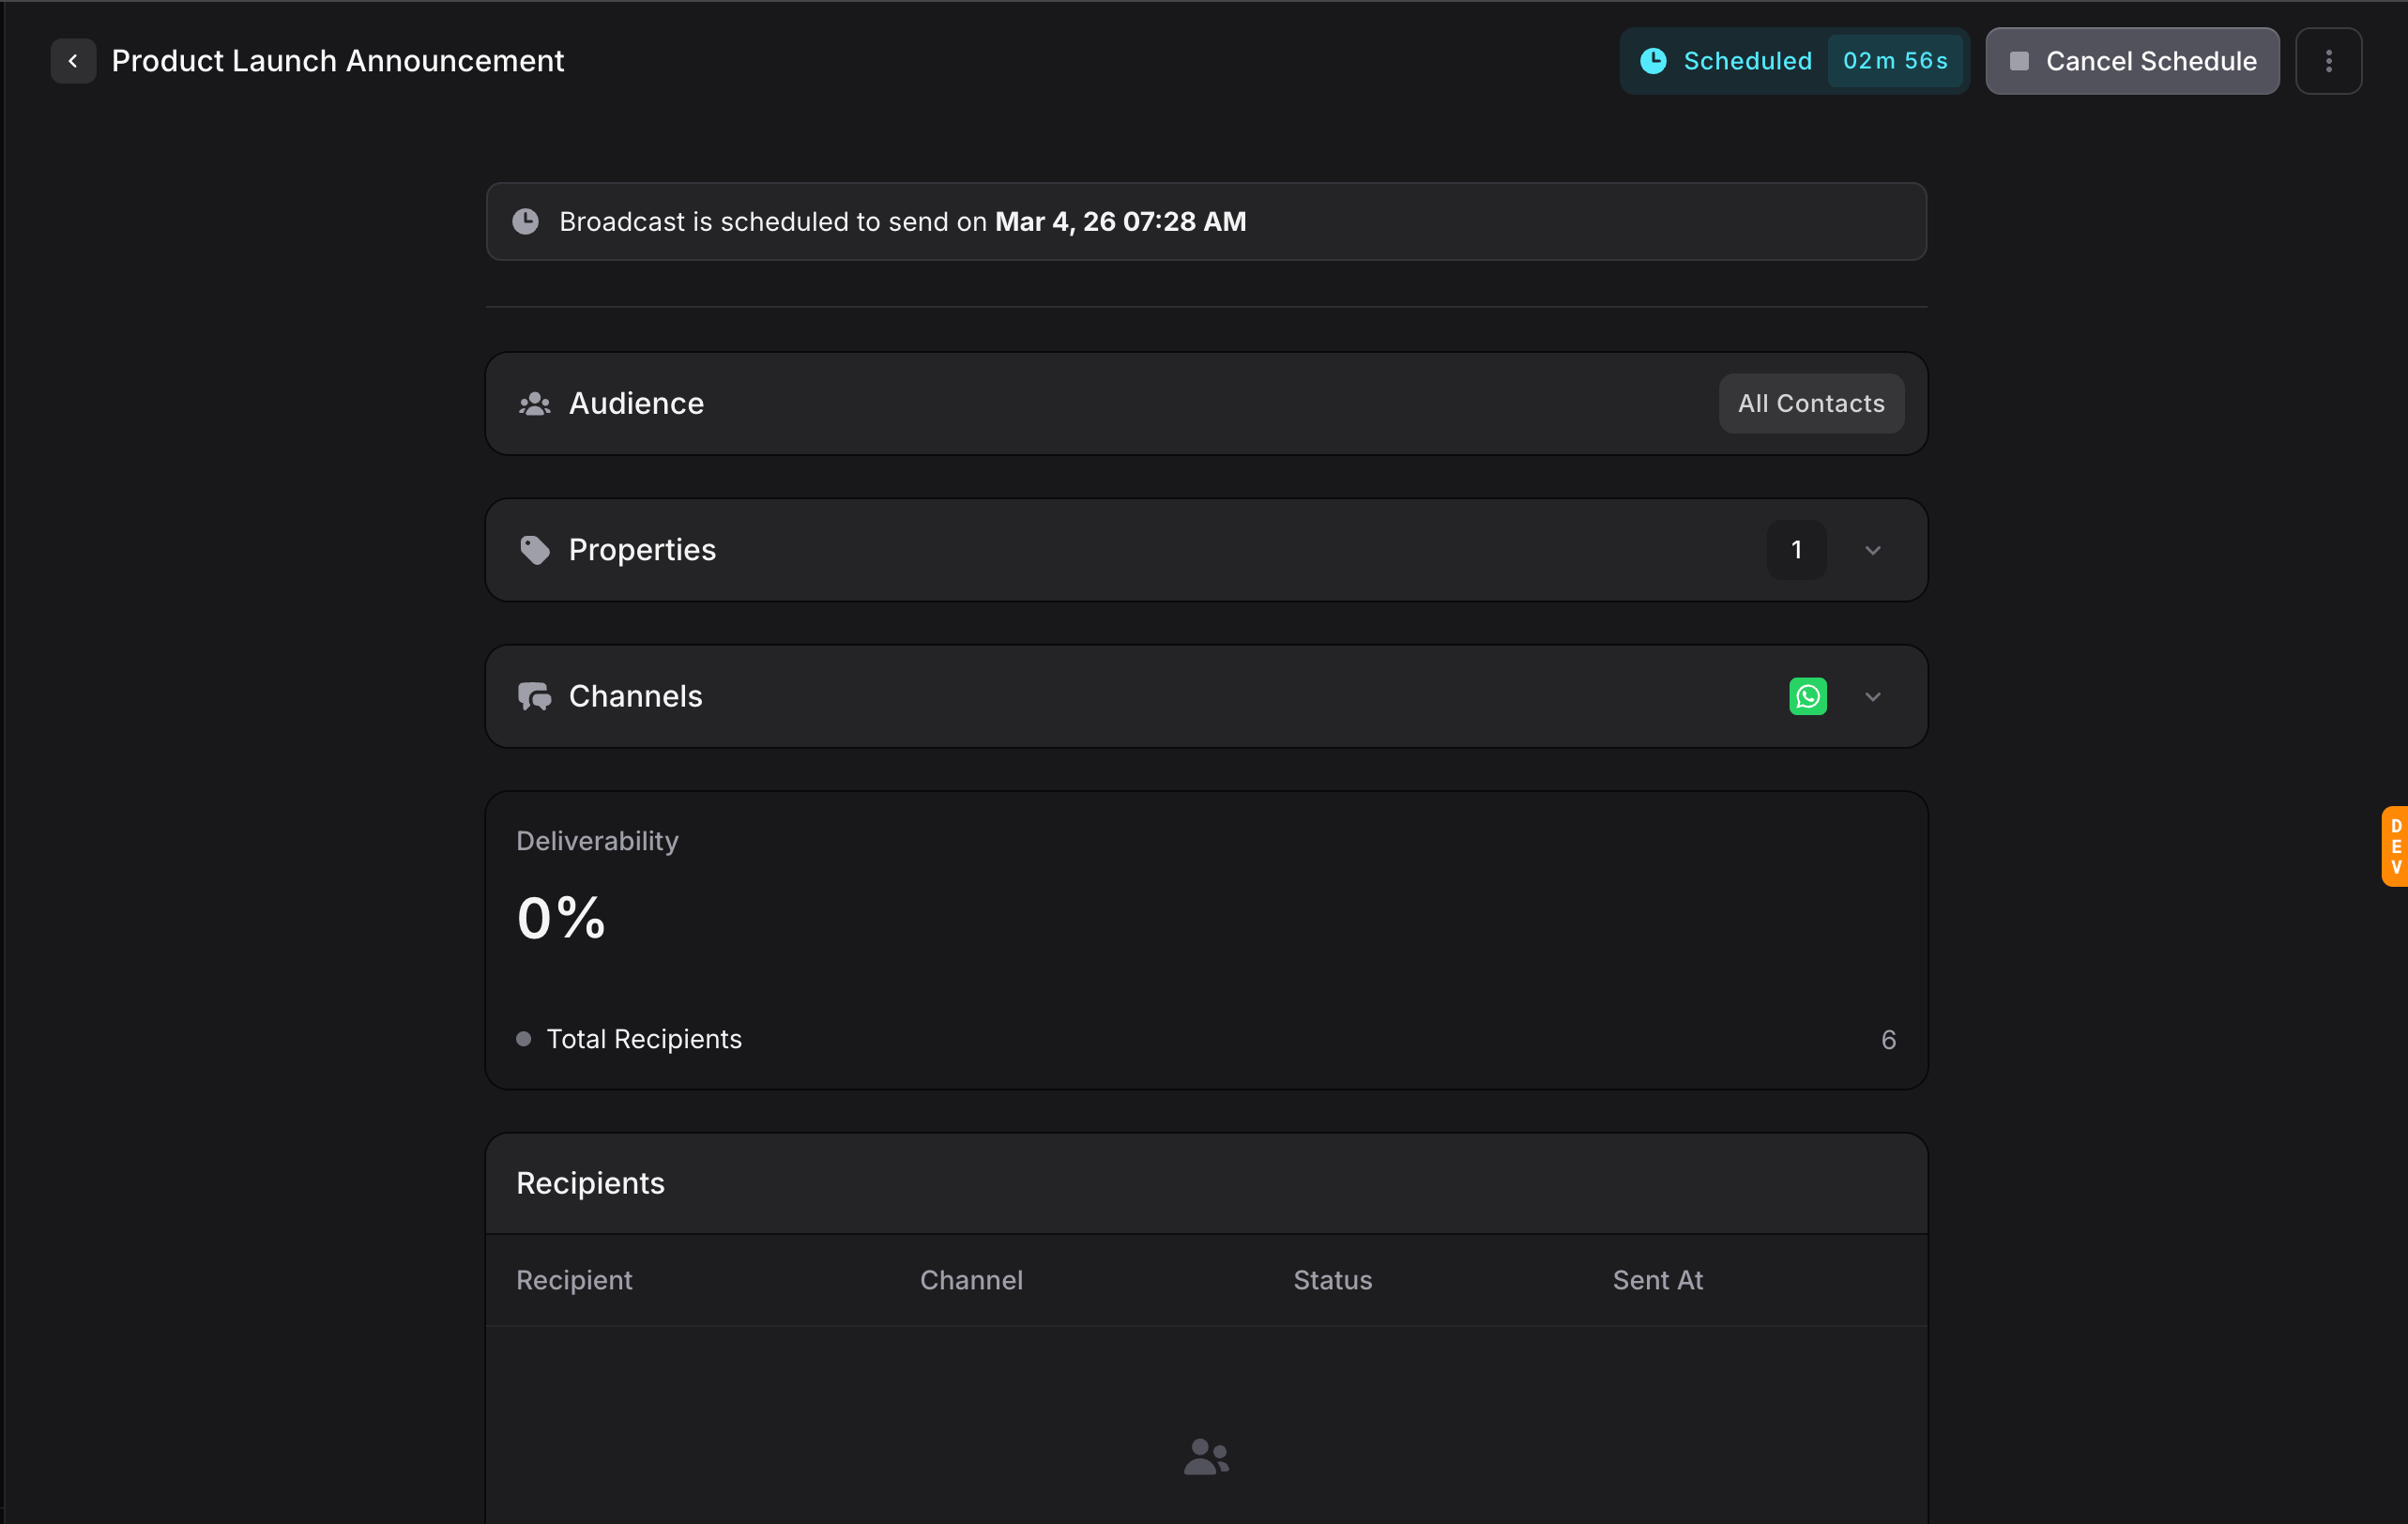
When a broadcast is scheduled, the page updates to show:
* A banner: "Broadcast is scheduled to send on" the chosen date and time.
* A live countdown in the top-right corner.
* A **Cancel Schedule** button that returns the broadcast to Draft.
To edit a scheduled broadcast, cancel the schedule first, make your changes, then schedule it again.
### Timing options
Choose when the broadcast goes out:
* **Quick options**: immediately, in 5 minutes, in 30 minutes, in 1 hour, or a preset time today or tomorrow (9:00 AM, 12:00 PM, 3:00 PM, 6:00 PM).
* **Custom date and time**: use the picker to set any future date and time.
### Confirmation
Before you send, the dialog shows a clear summary:
* A status line: "Broadcast will be sent immediately" or "Scheduled for" a specific date and time.
* A recipient summary: "Sending to X recipients via WhatsApp", showing the channel and count.
Click **Send Broadcast** to send now, or **Schedule Broadcast** to queue it for later.
## Scheduled broadcasts
When a broadcast is scheduled, the page updates to show:
* A banner: "Broadcast is scheduled to send on" the chosen date and time.
* A live countdown in the top-right corner.
* A **Cancel Schedule** button that returns the broadcast to Draft.
To edit a scheduled broadcast, cancel the schedule first, make your changes, then schedule it again.
 ## Analytics
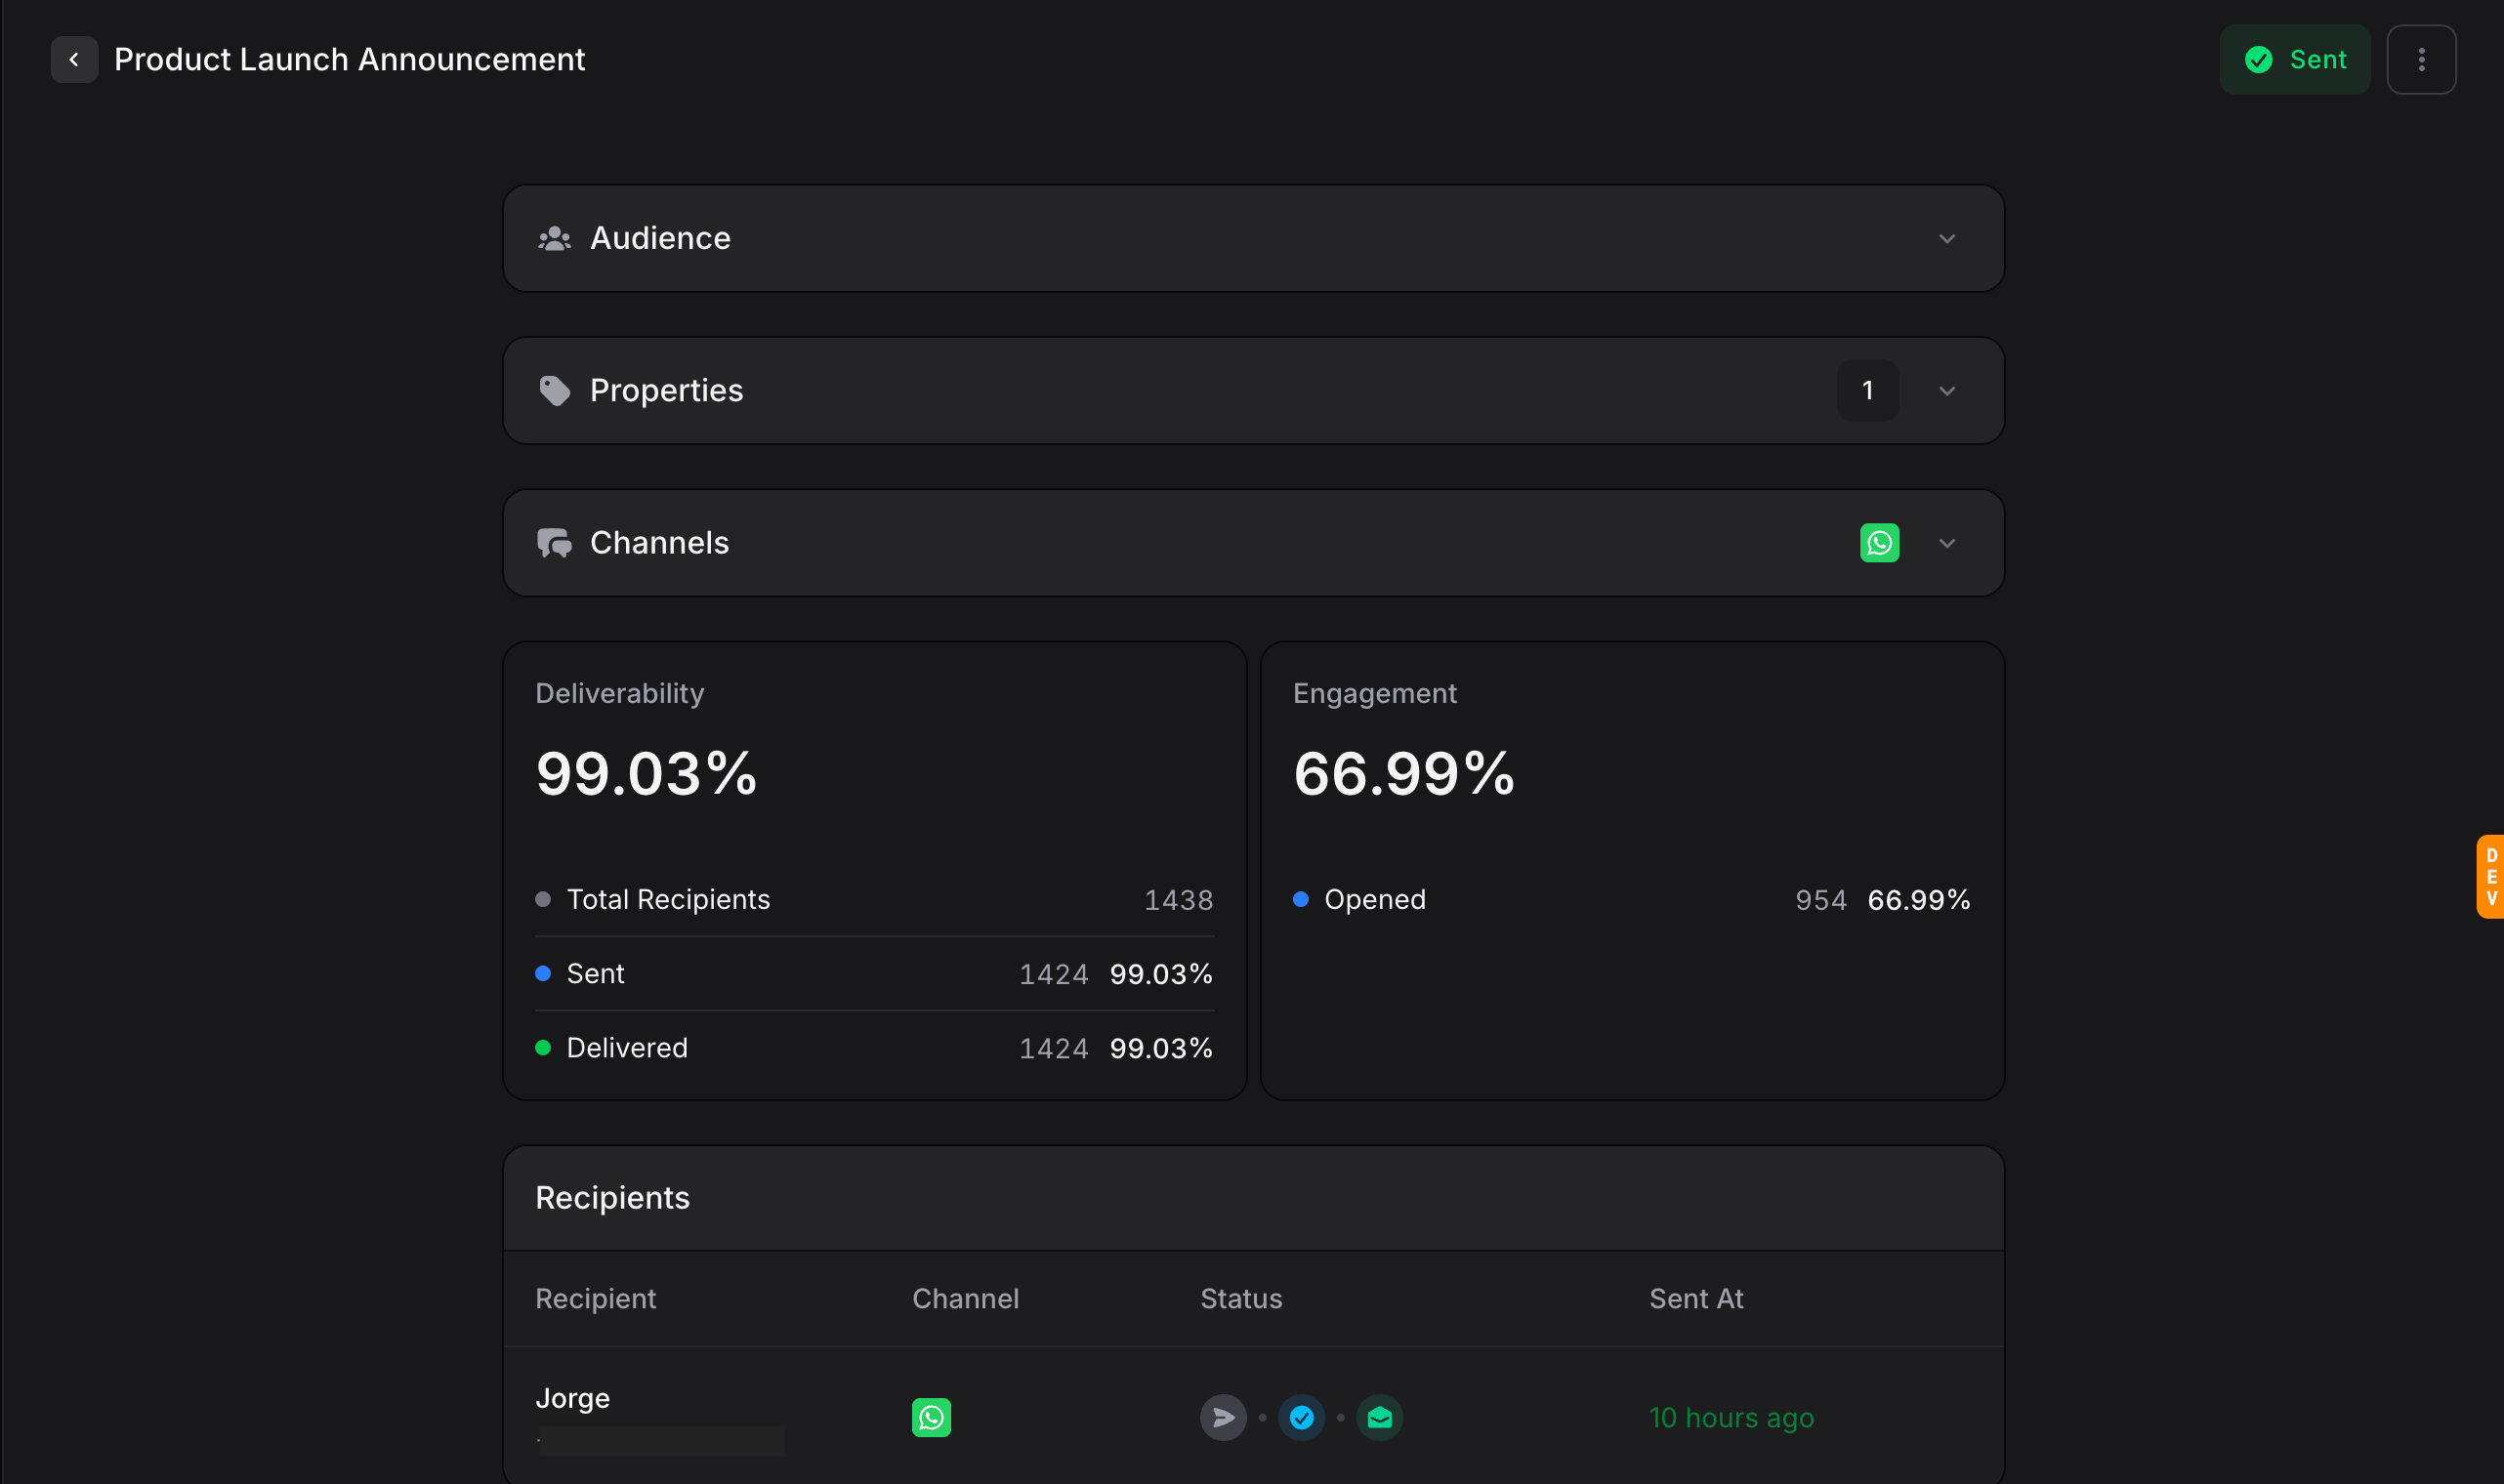
After a broadcast is sent, the page becomes an analytics dashboard. The Audience, Properties, and Channels sections collapse into summaries, and delivery data takes their place.
### Deliverability
* **Total Recipients**: how many contacts were targeted.
* **Sent**: how many messages were sent, with the percentage.
* **Delivered**: how many were confirmed delivered, with the percentage.
The large figure at the top is your at-a-glance delivery rate.
### Engagement
* **Opened**: how many recipients opened or read the message, with the percentage.
### Recipients table
A per-recipient table lists every contact, the channel used, the delivery status, and the send time. Hover a status icon to see exact timestamps for each event.
## Analytics
After a broadcast is sent, the page becomes an analytics dashboard. The Audience, Properties, and Channels sections collapse into summaries, and delivery data takes their place.
### Deliverability
* **Total Recipients**: how many contacts were targeted.
* **Sent**: how many messages were sent, with the percentage.
* **Delivered**: how many were confirmed delivered, with the percentage.
The large figure at the top is your at-a-glance delivery rate.
### Engagement
* **Opened**: how many recipients opened or read the message, with the percentage.
### Recipients table
A per-recipient table lists every contact, the channel used, the delivery status, and the send time. Hover a status icon to see exact timestamps for each event.
 ## Best practices
1. **Always test first.** Send yourself a preview and confirm the template and variables render correctly.
2. **Segment instead of blasting.** Send relevant content to the right group rather than the same message to everyone.
3. **Personalize with properties.** A name and a unique code lift engagement. See [Properties](/guides/broadcasts/introduction#properties).
4. **Schedule for the right moment.** Send when your audience is active, and avoid late nights and weekends.
5. **Watch your numbers.** Low deliverability usually points to bad phone numbers or addresses in your contacts.
6. **Get consent.** Only message contacts who opted in. On WhatsApp this is essential. See [WhatsApp Best Practices](/guides/broadcasts/whatsapp-best-practices).
## Next steps
Send event-driven messages one at a time through the API
Set up WhatsApp Templates and configure the channel
Keep your number and templates in good standing
Manage contacts and build segments for targeting
## Best practices
1. **Always test first.** Send yourself a preview and confirm the template and variables render correctly.
2. **Segment instead of blasting.** Send relevant content to the right group rather than the same message to everyone.
3. **Personalize with properties.** A name and a unique code lift engagement. See [Properties](/guides/broadcasts/introduction#properties).
4. **Schedule for the right moment.** Send when your audience is active, and avoid late nights and weekends.
5. **Watch your numbers.** Low deliverability usually points to bad phone numbers or addresses in your contacts.
6. **Get consent.** Only message contacts who opted in. On WhatsApp this is essential. See [WhatsApp Best Practices](/guides/broadcasts/whatsapp-best-practices).
## Next steps
Send event-driven messages one at a time through the API
Set up WhatsApp Templates and configure the channel
Keep your number and templates in good standing
Manage contacts and build segments for targeting